32nd Kio Match Game 2
[Black "Moriuchi Toshiyuki, Kio"]
[White "Sato Yasumitsu, Challenger"]
[Event "32nd Kio-sen, Game 2"]
[Date "February 24th 2007"]
1.P7g-7f     00:00:00  00:00:00
2.P3c-3d     00:00:00  00:00:00
3.P2g-2f     00:00:00  00:00:00
4.P9c-9d     00:00:00  00:01:00
5.P2f-2e     00:01:00  00:01:00
6.P9d-9e     00:01:00  00:02:00
7.G6i-7h     00:07:00  00:02:00
8.R8b-4b     00:07:00  00:04:00
9.P2e-2d     00:22:00  00:04:00
10.P2cx2d    00:22:00  00:25:00
11.R2hx2d    00:22:00  00:25:00
12.B2bx8h+   00:22:00  00:35:00
13.S7ix8h    00:23:00  00:35:00
14.R4b-2b    00:23:00  00:35:00
15.R2dx2b+   00:54:00  00:35:00
16.S3ax2b    00:54:00  00:35:00
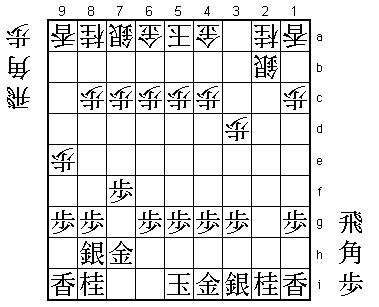
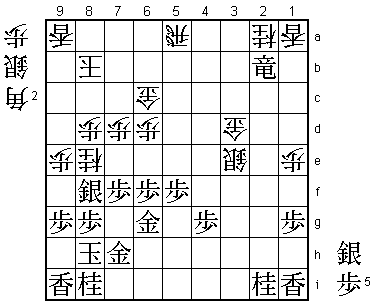
This has already turned into a strange opening, even for Sato's standards.
It is only the 16th move, but both players have already exchanged the major
pieces. After the game, both players admitted to be surprised by the turn of
events here. The idea of answering the early pawn push to 9e with G7h followed
by P2d was already played in the third game of the 54th Oza match between Sato and Habu
in 2006. There white didn't exchange the bishops first and after Rx2d, Habu played
K6b and the game become a slow build-up (after this the rook promotion R2c+ doesn't
work because of Bx8h+ Sx8h R2b). The bishop exchange followed by 14.R2b is
far more aggressive. After the game, Moriuchi said that he never
expected 14.R2b to be played here. Sato was also surprised: "I thought 15.Rx2b+
was not possible and only thought about 15.P*2c R4b". An interesting difference
of opinion, leading to this unusual opening. Things will get a lot weirder, though...

17.R*2h      00:54:00  00:35:00
18.G4a-3b    00:54:00  00:38:00
19.B*6e      01:06:00  00:38:00
20.R*8b?!    01:06:00  01:29:00
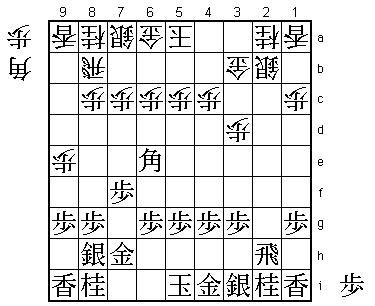
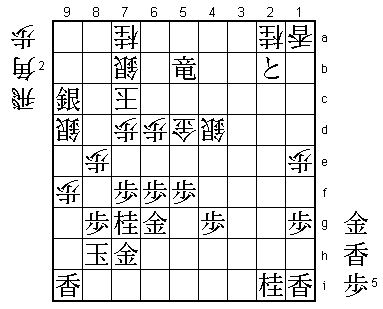
Only a few moves later, three of the four major pieces are back on the board.
Not only that, both rooks have been dropped on their original square. Sato
thought he had the advantage here, because the black bishop has been dropped
and seems to be heading for trouble. However, he had underestimated the power
of the bishop here and after the game he regretted not playing 20.P*2c Bx8c+
B*7d +Bx7d Px7d here which keeps the rook in hand.

21.B6e-5f!   01:13:00  01:29:00

Simply going for the pawn on 3d, but very effective. White can't defend this
pawn without dropping the bishop (22.G3c Bx8c+ Rx8c Rx2b+) and that is not an
option in this position. From 3d, the bishop has many places to go. Black has
the upper hand, but the story of this opening has not been completely told yet.
Sato has another surprise for us...

22.P*2c      01:13:00  01:36:00
23.B5fx3d    01:15:00  01:36:00
24.R8b-4b!?! 01:15:00  01:37:00
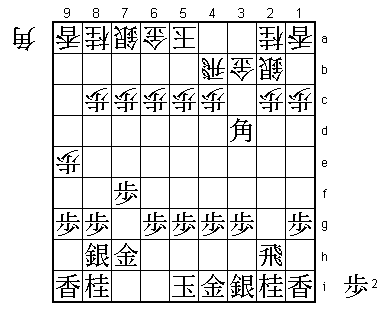
This makes the game a once in a lifetime experience. White play Shikenbisha
for the second time (R4b-R2b followed R*8b-R4b), which has of course never
been done before and probably never be done again (especially since black is
better in this position). After the game, Sato was asked which name he would
like to give to this opening. Among several alternatives the only name he
liked was "Shikenbisha returns", so that is what it will be.
25.S3i-3h 01:46:00 01:37:00
26.S7a-7b 01:46:00 01:39:00
27.S3h-2g 01:49:00 01:39:00
28.K5a-6b 01:49:00 01:53:00
29.S2g-3f 01:49:00 01:53:00
30.K6b-7a 01:49:00 01:56:00
31.K5i-6h 01:52:00 01:56:00
32.K7a-8b 01:52:00 02:16:00
33.K6h-7i 01:57:00 02:16:00
34.P6c-6d 01:57:00 02:29:00
35.S8h-7g 02:01:00 02:29:00
36.P7c-7d 02:01:00 02:31:00
37.B3d-5f 02:26:00 02:31:00
38.S7b-6c 02:26:00 02:56:00
39.S3f-3e 02:27:00 02:56:00
40.P5c-5d 02:27:00 03:07:00
41.G4i-5h 02:47:00 03:07:00
42.G6a-7b 02:47:00 03:08:00
43.P6g-6f 02:47:00 03:08:00
44.P5d-5e 02:47:00 03:11:00
45.B5f-4e 02:52:00 03:11:00
46.R4b-5b 02:52:00 03:12:00
47.S3e-4f 02:56:00 03:12:00
48.R5b-5a 02:56:00 03:13:00
49.P3g-3f 02:58:00 03:13:00
50.P4c-4d 02:58:00 03:14:00
51.B4e-3d 03:03:00 03:14:00
52.N8a-7c 03:03:00 03:14:00
53.G5h-6g 03:10:00 03:14:00
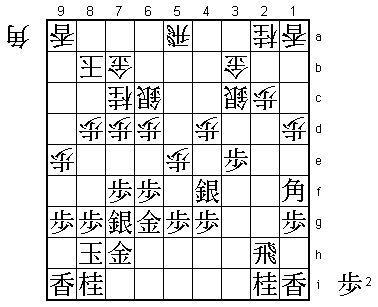
54.P8c-8d?! 03:10:00 03:20:00
In the press room this was labeled a mistake, because now the black bishop
gets total freedom. The suggestion was 54.P1d because after 55.B1f (which
Moriuchi had planned) P4e S3e P1e white seems to have good chances. However,
after the game it was discovered that black can simply play 55.K8h and answer
56.P1e with G6g-6h, after which the bishop can retreat to 6g. So, objectively
54.P8d is not a mistake, but Moriuchi admitted that he would never have
thought of the maneuver K8h followed by G6g-6h.
55.K7i-8h 03:12:00 03:20:00
56.S2b-3c 03:12:00 03:20:00
57.B3d-1f 03:13:00 03:20:00
58.P1c-1d 03:13:00 03:22:00
59.P3f-3e 03:14:00 03:22:00
Finally Moriuchi started to feel happy about his position here. The bishop
is working fine on 1f, but will even work better on 2g, because it is pointing
straight to the white castle.

60.P4d-4e    03:14:00  03:37:00
61.S4fx4e    03:14:00  03:37:00
62.P1d-1e    03:14:00  03:37:00
63.B1f-2g    03:15:00  03:37:00
64.S3c-2d    03:15:00  03:37:00
65.S4e-3d    03:24:00  03:37:00
66.N7c-8e    03:24:00  03:41:00
67.S7g-8f    03:25:00  03:41:00
68.S2dx3e    03:25:00  03:41:00
69.S3dx2c=   03:29:00  03:41:00
70.P5e-5f    03:29:00  03:45:00
71.P5gx5f    03:34:00  03:45:00
72.G3b-3c    03:34:00  03:45:00
73.S2c-3d+   03:42:00  03:45:00
74.G3cx3d    03:42:00  03:45:00
75.B2gx6c+   03:42:00  03:45:00
76.G7bx6c    03:42:00  03:45:00
77.R2h-2b+   03:42:00  03:45:00
Moriuchi has given up a full bishop for this rook promotion, but his attack is
too strong to be stopped. Still, he was not 100% sure that his position was winning.

78.P*5b      03:42:00  03:48:00
79.+R2b-4b   03:44:00  03:48:00
80.R5a-6a    03:44:00  03:50:00

A better defense seems to 80.S*6b P7e B*4i Px7d R7a, but after +Rx5b Rx7d P*7e
R7b S*7d the white position is still bad.

81.+R4bx5b   03:46:00  03:50:00
82.S*7b      03:46:00  03:57:00
83.S8fx8e    03:50:00  03:57:00
84.P8dx8e    03:50:00  03:57:00
85.N*8d      03:50:00  03:57:00
86.S*8c      03:50:00  03:57:00
87.N8dx7b+   03:50:00  03:57:00
88.S8cx7b    03:50:00  03:57:00
89.S*8d      03:51:00  03:57:00
90.N*7a      03:51:00  03:57:00
91.S*9c      03:57:00  03:57:00
92.L9ax9c    03:57:00  03:57:00
93.S8dx9c=   03:57:00  03:57:00
94.K8b-7c    03:57:00  03:58:00
95.N8i-7g    03:57:00  03:58:00

Only here Moriuchi felt like he was winning. There is no way white can keep
his position together.

96.S*9d      03:57:00  03:59:00
97.P9g-9f    03:57:00  03:59:00
98.R6a-6b    03:57:00  03:59:00
99.+R5b-4c   03:57:00  03:59:00
100.R6b-2b   03:57:00  03:59:00
101.P*2c     03:57:00  03:59:00
102.G3d-4d   03:57:00  03:59:00
103.+R4cx4d  03:57:00  03:59:00
104.S3ex4d   03:57:00  03:59:00
105.P2cx2b+  03:57:00  03:59:00
106.P9ex9f   03:57:00  03:59:00
107.R*4b     03:58:00  03:59:00
108.G6c-5d   03:58:00  03:59:00
109.R4b-5b+  03:58:00  03:59:00
Resigns      03:58:00  03:59:00
Here Sato had enough: a simple mating threat and the hanging gold on 5d is
too much. This game may have been a little one-sided, but the very unusual
opening will make sure that it will be remembered for a long time. With both
players winning a game, this match has now become a best-of-three. Most of
the pressure is on Sato to win the third game with the black pieces,
"holding serve" as they say.