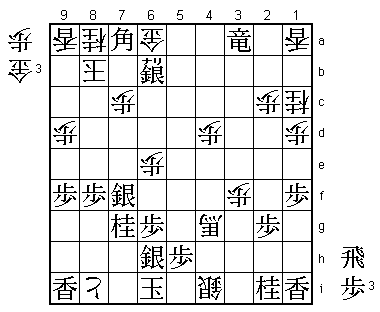
32nd Kio Match Game 1
[Black "Sato Yasumitsu, Challenger"]
[White "Moriuchi Toshiyuki, Kio"]
[Event "32nd Kio-sen, Game 1"]
[Date "February 11th 2007"]
1.P2g-2f     00:00:00  00:00:00

At the party before the game, Sato was told that the paper that organizes
this match is celebrating its 115th anniversary. Sato told in his speech:
"Tomorrow I will win in 115 moves", which got a good laugh from the audience.

2.P3c-3d     00:00:00  00:05:00
3.P7g-7f     00:00:00  00:05:00
4.P9c-9d     00:00:00  00:06:00
5.P2f-2e     00:02:00  00:06:00
6.B2bx8h+    00:02:00  00:06:00
7.S7ix8h     00:02:00  00:06:00
8.S3a-2b     00:02:00  00:06:00
9.P9g-9f     00:11:00  00:06:00
10.S2b-3c    00:11:00  00:11:00
11.S3i-4h    00:13:00  00:11:00
12.S7a-6b    00:13:00  00:16:00
13.P1g-1f    00:19:00  00:16:00
14.P1c-1d    00:19:00  00:21:00
15.P3g-3f    00:22:00  00:21:00
16.P6c-6d    00:22:00  00:27:00
17.S8h-7g    00:27:00  00:27:00
18.G4a-3b    00:27:00  00:32:00
19.S4h-3g    00:30:00  00:32:00
20.S6b-6c    00:30:00  00:56:00
21.S3g-4f    00:30:00  00:56:00
22.S6c-5d    00:30:00  01:08:00
23.P3f-3e    00:31:00  01:08:00
24.P3dx3e    00:31:00  01:08:00
25.S4fx3e    00:31:00  01:08:00
26.P6d-6e    00:31:00  01:08:00
27.P5g-5f    01:10:00  01:08:00
28.S5d-4e    01:10:00  01:08:00

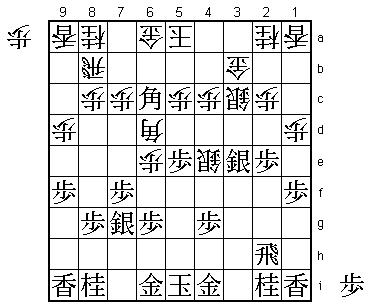
The Kakugawari with tempo loss is a very difficult opening and both
players go at it from the start without bothering to put their king
in a safe castle. 28.S4e invites the next aggressive move, and Sato is
not the kind of player to turn down the invitation to a fight.

29.B*6c      01:25:00  01:08:00

This is not as bad for white as it looks. The point is that the white
bishop doesn't have a safe promotion square on 9f because the edge
pawns have been pushed. White hopes to develop his pieces while
attacking the bishop.

30.B*6d      01:25:00  01:23:00
31.P5f-5e    01:29:00  01:23:00

32.S4e-5d    01:29:00  01:34:00

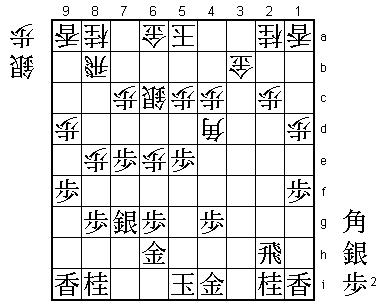
A difficult choice. In the press room 32.Bx5e was analyzed. The main
variation was 33.R5h S5d Rx5e Sx5e B*1h! G7a B3f+ P9e which seems unclear.
A few days after the game, Katagami (5-dan) who was commenting this game
for Shukan Shogi checked some variations with the players over the phone
and was given a rare insight in how both players assessed this position.
Instead of the variation above, Sato had been worried about 32.Bx5e R5h
S5d Rx5e Sx6c Rx5c+ R5b. Moriuchi said that getting a rook in hand would
definitely be a good thing. He didn't like 32.Bx5e P*3g and S4d is now
answered by P2d Px2d Rx2d. Rather than the wild variation analyzed in
the press room, both player had looked at the deeper strategies behind
this complicated position.

33.B6c-8e+   01:32:00  01:34:00
34.P8c-8d    01:32:00  01:36:00
35.+B8e-7e   01:37:00  01:36:00
36.B6dx7e    01:37:00  01:44:00
37.P7fx7e    01:37:00  01:44:00
38.S5d-6c    01:37:00  01:48:00

Of course, white wants to take the pawn on 5e, but after 38.Sx5e P7d Px7d
R5h S3c-4d B*2h! black is better. Pulling back this silver is admitting
strategic defeat. Moriuchi said as much in the post-mortem: "That was a
meaningless strategy".

39.G6i-6h    02:08:00  01:48:00
40.P8d-8e    02:08:00  02:06:00
41.P2e-2d    02:13:00  02:06:00
42.S3cx2d    02:13:00  02:26:00
43.S3ex2d    02:13:00  02:26:00
44.P2cx2d    02:13:00  02:26:00
45.R2hx2d    02:13:00  02:26:00
46.P*2c      02:13:00  02:33:00
47.R2d-2h    02:24:00  02:33:00
48.B*4d      02:24:00  03:08:00

49.B*4e      03:28:00  03:08:00

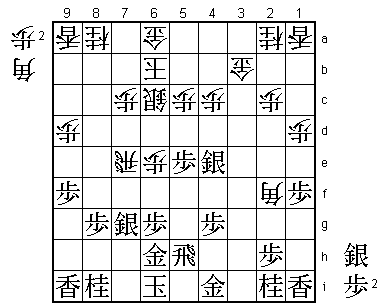
Sato spent more than an hour on this move, which is quite a lot considering
that in the Kio match both players have only 4 hours. From Moriuchi's
point of view, 48.B*4d gives the initiative to the opponent in a position
that is worse, but without obvious holes. This is a strategy often played
by professionals with a bad position, hoping that the opponent will force
his hand. Sato is of course well aware of this (having done it himself many,
many times), but is unable to find any good way to continue. The position
seems clearly better for black with the bishop still in hand and also having
the extra pawn to drop, and its also black's turn to move. After thinking long
and hard about this position, Sato reached the following remarkable conclusion:
"My opponent's sitting king is better than my sitting king". This lead him to
the following strategy: forcing white to move his king.

50.K5a-6b    03:28:00  03:30:00

Moriuchi doesn't feel strongly about moving the king, so he plays the most
natural looking move. However, Sato had been worried about 50.Bx5e S4f S5d,
although he himself pointed out that P*5b might be alright, because white must
play K4a, which again moves the sitting king. It is unlikely that Moriuchi
gave this variation much thought.

51.R2h-5h    03:30:00  03:30:00
52.P8e-8f!   03:30:00  03:38:00

Sato underestimated this counter attack and this made him lose his cool a
little. His lead, which was marginal to begin with, is slowly disappearing...

53.P8gx8f    03:30:00  03:38:00
54.P*8h      03:30:00  03:40:00
55.S7gx8h    03:42:00  03:40:00
56.R8bx8f    03:42:00  03:40:00
57.P*8g      03:42:00  03:40:00
58.R8f-2f    03:42:00  03:41:00
59.P*2h      03:42:00  03:41:00
60.S*3f      03:42:00  03:50:00
61.B4ex3f    03:44:00  03:50:00
62.R2fx3f    03:44:00  03:50:00
63.S*4e      03:44:00  03:50:00
64.B4d-2f    03:44:00  03:51:00
65.K5i-6i    03:44:00  03:51:00
66.R3f-7f    03:44:00  03:51:00
67.S8h-7g    03:47:00  03:51:00
68.R7fx7e    03:47:00  03:51:00

69.P5e-5d?!  03:54:00  03:51:00

The obvious move is 69.R5f B3e R8f and after P*8e R3f Bx6h+ Kx6h N3c S5f
Sato concluded that black is better. When looking closer, he found K7b
instead of P*8e, which he didn't like. However, this is a very dangerous
move, putting the king in the line of fire and in the post-mortem Sato
himself said that it would have been very unlikely that white would play
K7b in a real game. When you have thought of a move that looks dangerous
but might be good, it is very hard to make the decision to count on the
opponent not playing the dangerous move. Therefore, Sato decides to play
the simple silver exchange.

70.P5cx5d    03:54:00  03:51:00
71.S4ex5d    03:54:00  03:51:00
72.S6cx5d    03:54:00  03:55:00
73.R5hx5d    03:54:00  03:55:00
74.R7e-8e    03:54:00  03:55:00
75.P2h-2g    03:56:00  03:55:00
76.B2f-3e    03:56:00  03:56:00
77.R5d-3d    03:56:00  03:56:00
78.B3ex6h+   03:56:00  03:56:00
79.S7gx6h    03:57:00  03:56:00
80.G3b-3c    03:57:00  03:56:00
81.S*7f      03:59:00  03:56:00
82.R8e-8b    03:59:00  03:57:00
83.R3d-3f    03:59:00  03:57:00

In the post-mortem, Moriuchi admitted that he thought he was winning here.
Katagami gives an interesting analysis of the player's psychological state
in this position. Moriuchi felt that he had been with his back against the
wall all game, but now finally had turned the corner. On the other hand,
Sato had been thinking that the position was difficult all along, so there
is not much difference in the way he is perceiving the current position.
This difference may have been the deciding factor in this game, as we will
see next.

84.B*4e      03:59:00  03:58:00
85.R3f-2f    03:59:00  03:58:00
86.P*3f?     03:59:00  03:59:00

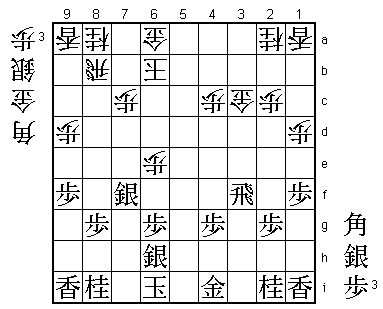
Moriuchi's state of mind gets the better of him. The right way to play is
86.G*3e and after 87.N3g B3d, white wins the rook, which will be very helpful
in attack. Both players agreed that this would still be difficult, but probably
better for white. The point is that even after G*3e, the position is still
not easy to win. Furthermore, the shape of G3e, B3d and G3c is pretty ugly.
Wasting a precious gold to get a position that is not clearly winning is very
hard to play for someone who thinks that the position is winning anyway, as
Moriuchi was thinking at that moment. With little time left, Moriuchi chooses
the cheaper pawn drop, which unfortunately for him is the losing move. If he
would have considered the position unclear, like Sato, he might have played
the risky 86.G*3e instead.

87.R2f-2e    03:59:00  03:59:00
88.B4e-5f    03:59:00  03:59:00
89.G4i-5h    03:59:00  03:59:00
90.G3c-4d    03:59:00  03:59:00
91.B*2b      03:59:00  03:59:00
92.P*8f      03:59:00  03:59:00
93.P8gx8f    03:59:00  03:59:00
94.N2a-1c    03:59:00  03:59:00
95.B2bx4d+   03:59:00  03:59:00
96.P4cx4d    03:59:00  03:59:00
97.R2e-3e    03:59:00  03:59:00
98.P*8h      03:59:00  03:59:00
99.N8i-7g    03:59:00  03:59:00
100.S*4i     03:59:00  03:59:00

Moriuchi is trying everything, but even in byoyomi Sato doesn't make a mistake.

101.S*5c!    03:59:00  03:59:00

The deciding move. White can't take this silver because of R5e, which picks up
the bishop and kills white's attack.

102.K6b-7a   03:59:00  03:59:00
103.R3e-3a+  03:59:00  03:59:00
104.B*3h     03:59:00  03:59:00
105.G5h-5g   03:59:00  03:59:00
106.P8h-8i+  03:59:00  03:59:00
107.P*5h     03:59:00  03:59:00
108.B5fx4g+  03:59:00  03:59:00
109.G5gx4g   03:59:00  03:59:00
110.B3hx4g+  03:59:00  03:59:00
111.G*6b     03:59:00  03:59:00
112.R8bx6b   03:59:00  03:59:00
113.S5cx6b+  03:59:00  03:59:00
114.K7a-8b   03:59:00  03:59:00
115.B*7a     03:59:00  03:59:00
Resigns      03:59:00  03:59:00

Here Moriuchi resigned, because it is mate after 116.Gx7a +Rx7a etc, 116.K9b
R*8b K9c N8e and 116.K8c R*8b K7d Sx6e +Bx6e R8e+ etc. Sato wins the opening
game of his fifth consecutive title match challenge (a record) in exactly 115
moves, just like he predicted. "I should have been a fortune teller instead of
a professional shogi player" was his reaction. A very high level game, which
promises a lot for the rest of this match.
