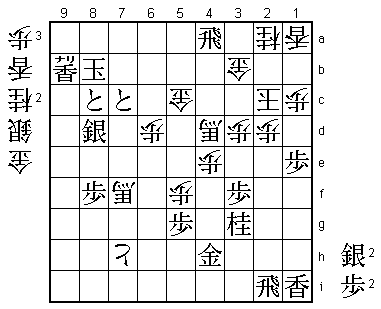
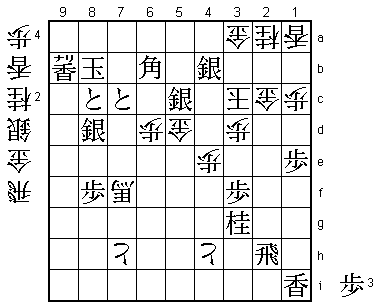
31st Kio Match Game 3
[Black "Habu Yoshiharu, Kio"]
[White "Moriuchi Toshiyuki, Challenger"]
[Event "31st Kio-sen, Game 3"]
[Date "February 26th 2006"]
1.P7g-7f     00:00:00  00:00:00
2.P3c-3d     00:00:00  00:01:00
3.P2g-2f     00:01:00  00:01:00
4.G4a-3b     00:01:00  00:01:00
5.G6i-7h     00:02:00  00:01:00
6.P8c-8d     00:02:00  00:02:00
7.P2f-2e     00:03:00  00:02:00
8.B2bx8h+    00:03:00  00:02:00
9.S7ix8h     00:03:00  00:02:00
10.S3a-2b    00:03:00  00:02:00
11.P1g-1f    00:04:00  00:02:00
12.S2b-3c    00:04:00  00:05:00
13.P1f-1e    00:04:00  00:05:00

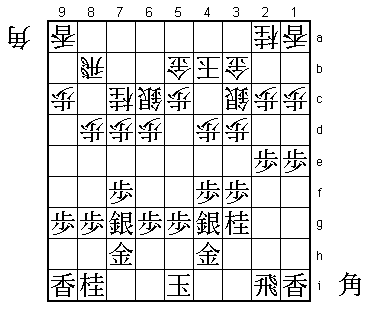
Not a normal way of playing this position, but Habu has experience with
this formation as it was also played in the 2nd game of last year's Kisei
match. Then Habu saw it from the other side of the board, because Sato had
the black pieces then. Sato won that game and Habu must have felt that it
was a promising strategy for black. Of course, Moriuchi will also have
studied this extensively.

14.S7a-6b    00:04:00  00:05:00
15.S3i-3h    00:06:00  00:05:00
16.P6c-6d    00:06:00  00:08:00
17.P4g-4f    00:09:00  00:08:00
18.S6b-6c    00:09:00  00:10:00
19.S3h-4g    00:10:00  00:10:00
20.K5a-4b    00:10:00  00:12:00
21.S8h-7g    00:10:00  00:12:00
22.G6a-5b    00:10:00  00:14:00
23.P3g-3f    00:11:00  00:14:00
24.P7c-7d    00:11:00  00:16:00
25.N2i-3g    00:12:00  00:16:00
26.P4c-4d    00:12:00  00:16:00
27.R2h-2i    00:14:00  00:16:00
28.N8a-7c    00:14:00  00:20:00
29.G4i-4h!?  00:16:00  00:20:00

The position is slightly different from that in the Kisei game, but Sato
played the straightforward 29.K4h here. The normal way of getting into the
right side king formation (which black is aiming for) is to first play the
gold to 5h, then the king to 4h. After this, in many cases the king is played
to 3h and the gold to 4h. In this development, the gold takes two moves to
get to 4h where one move is sufficient. Habu's idea is to avoid this tempo
loss by playing G4h immediately, followed by K4i and K3h.

30.P8d-8e!?  00:16:00  00:50:00

The first time either player takes considerable time for a move. Moriuchi
spent 30 minutes to come up with a counter plan for black's idea.

31.K5i-6h!?  00:48:00  00:50:00

Habu changed his mind. The point of 30.P8e is that after 31.K4i, white has
the option of playing 32.B*6i. For example, 33.G8h N6e S6f P8f Px8f Rx8f
P*8g Bx8g+ and white breaks through. Things will not be so easy for white,
but the chances that black ends up in a bad position are pretty high.
By the way, in the post-mortem analysis, Moriuchi was a little tight-lipped
about this position, only saying that he was not sure if he would have
played the bishop drop. We might see this position again in a future game...
Anyway, Habu decided to give up the idea of playing the right side king, but
in this position this is not admitting strategic defeat. The main point of
the bishop exchange opening with tempo loss is that white doesn't play P8e
to play the attack N8e. To counter the right side king, Moriuchi has pushed
the pawn to 8e, which eliminates the N8e attack. White might now just end up
with a tempo loss, which black has used for pushing the edge pawn to 1e,
which could be useful in attack later.

32.S6c-5d    00:48:00  01:03:00
33.S4g-5f    00:50:00  01:03:00
34.K4b-3a    00:50:00  01:03:00
35.P9g-9f    00:55:00  01:03:00
36.P9c-9d    00:55:00  01:21:00
37.K6h-7i    01:31:00  01:21:00

Now we have a normal double reclining silver opening, with the difference
being the gold on 4h, the rook on 2i and the pawn on 1e. Having the gold
on 4h and the rook on 2i is rarely seen these days, but actually has a good
balance. The 14th Lifetime Meijin Kimura used to play the bishop exchange
opening in this way because it defends against all possible white bishop
drops.

38.K3a-2b    01:31:00  01:37:00
39.P4f-4e    01:38:00  01:37:00

Habu starts the attack, but...

40.P9d-9e?!  01:38:00  01:38:00

Moriuchi immediately counters it. Never allowing your opponent to attack
first is the modern way of playing shogi, but here the question really is
whether the white attack is strong enough. I doubt that Moriuchi would have
played this in a two-day match or without knowing that Habu is in the middle
of a five game losing streak for the first time in his professional career.

41.P9fx9e    01:39:00  01:38:00
42.P7d-7e    01:39:00  01:38:00
43.P7fx7e    02:06:00  01:38:00
44.N7c-6e    02:06:00  02:10:00
45.S7g-6h    02:09:00  02:10:00
46.P8e-8f    02:09:00  02:44:00
47.P8gx8f    02:09:00  02:44:00
48.R8bx8f    02:09:00  02:44:00
49.P*8g      02:27:00  02:44:00
50.R8f-8a    02:27:00  02:44:00
51.P6g-6f    02:27:00  02:44:00
52.L9ax9e    02:27:00  03:02:00
53.L9ix9e    02:31:00  03:02:00
54.P*7g      02:31:00  03:02:00
55.N8ix7g    03:02:00  03:02:00
56.P*8f      03:02:00  03:03:00

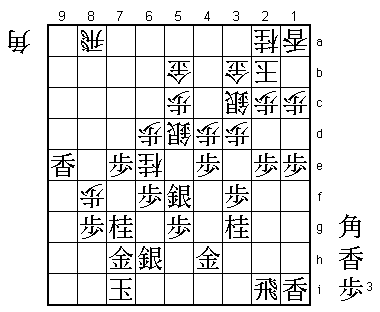
57.L9e-9b+?! 03:03:00  03:03:00

This might not have been the best move. In the press room, after 57.Px8f
Rx8f the unusual move P*9g! was found. White seems to have all kinds of
attacking options, like P*9f or P*8g, but none of them work out very well.
Both Habu and Moriuchi admitted after the game that P*9g was a good move.
Habu instead goes for pestering the rook. He already must have had the
idea of making an entering king here, but the white attack is still not
so easy to defend against.

58.R8a-8d    03:03:00  03:10:00
59.B*7c      03:06:00  03:10:00
60.R8d-8c    03:06:00  03:50:00
61.B7c-8b+   03:06:00  03:50:00
62.P8fx8g+   03:06:00  03:50:00
63.+B8bx8c   03:06:00  03:50:00
64.B*9f      03:06:00  03:50:00

White had to give up the rook but the lance on 9b or 8c are completely
out of play at the moment. The issue now becomes whether or not the white
attack is strong enough or if black can make an entering king, the only
way to involve the lance and bishop. Black has an important material
advantage, which gives him a little breathing space. Even if white wins
a piece in attack, black will win if he can make to the other side of the
board.

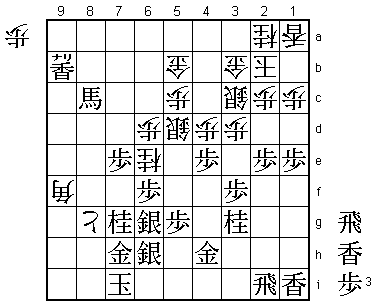
65.S5f-6g    03:06:00  03:50:00

66.+P8gx7h?  03:06:00  03:55:00

Now black succeeds in getting the king out. The only move for white here
was 66.P*7f!. For example, 67.Px6e Px7g+ Sx7g Sx6e! and even though things
are not easy for white, this also goes for black. For example, K6h +Px7h
Sx7h N*6f or R*9c +Px7g Rx9f+ P*7f N*6i S*6f and the white attack is still
strong. Of course, both players had seen P*7f, but both had missed Sx6e.
An unusual double oversight, because getting idle pieces involved in the
attack is one of the basic ideas of shogi.

67.S6gx7h    03:06:00  03:55:00
68.N6ex7g+   03:06:00  03:55:00
69.S6hx7g    03:06:00  03:55:00
70.N*8e      03:06:00  03:55:00
71.K7i-6h    03:14:00  03:55:00
72.N8ex7g+   03:14:00  03:55:00
73.K6hx7g    03:34:00  03:55:00
74.P*7f      03:34:00  03:57:00
75.K7gx7f    03:34:00  03:57:00
76.B9fx7h+   03:34:00  03:57:00
77.K7f-8e    03:34:00  03:57:00

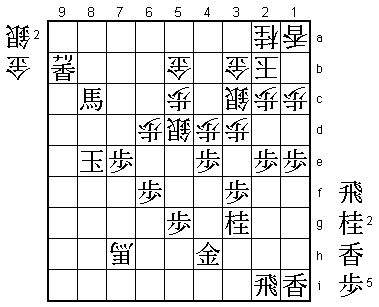
The black king can not be stopped, so Habu can no longer lose this game.
Furthermore, Habu has plenty of time (26 minutes), while Moriuchi had only
three minutes left here. It was thought that the white resignation was
imminent and the photographers made their preparations. However, Moriuchi
was not ready to resign yet.

78.S5d-6c    03:34:00  03:57:00
79.K8e-9d    03:39:00  03:57:00
80.S*7b      03:39:00  03:57:00
81.P*8d      03:39:00  03:57:00
82.+B7h-6g   03:39:00  03:57:00
83.N*8e      03:39:00  03:57:00
84.S7bx8c    03:39:00  03:58:00
85.P8dx8c+   03:39:00  03:58:00
86.+B6gx6f   03:39:00  03:58:00
87.S*8d      03:40:00  03:58:00
88.+B6f-6e   03:40:00  03:59:00
89.R2i-6i    03:42:00  03:59:00
90.+B6e-7f   03:42:00  03:59:00
91.P*8f      03:42:00  03:59:00
92.B*8g      03:42:00  03:59:00
93.R6i-7i    03:42:00  03:59:00
94.P*7g      03:42:00  03:59:00
95.K9d-9c    03:42:00  03:59:00
96.P7g-7h+   03:42:00  03:59:00
97.R7i-2i    03:43:00  03:59:00
98.+B7f-6e   03:43:00  03:59:00
99.R2i-2f    03:43:00  03:59:00
100.P4dx4e   03:43:00  03:59:00
101.N8e-7c+  03:43:00  03:59:00
102.+B6e-5d  03:43:00  03:59:00
103.L*5f     03:45:00  03:59:00
104.+B5d-4d  03:45:00  03:59:00
105.R2f-2i   03:45:00  03:59:00
106.P5c-5d   03:45:00  03:59:00
107.P7e-7d   03:47:00  03:59:00
108.B8g-7f+  03:47:00  03:59:00
109.K9c-8b   03:47:00  03:59:00
110.P5d-5e   03:47:00  03:59:00
111.+N7cx6c  03:47:00  03:59:00
112.G5bx6c   03:47:00  03:59:00
113.P7d-7c+  03:47:00  03:59:00
114.G6c-5c   03:47:00  03:59:00
115.P2e-2d   03:47:00  03:59:00
116.S3cx2d   03:47:00  03:59:00
117.N*1f     03:47:00  03:59:00
118.P5ex5f   03:47:00  03:59:00
119.N1fx2d   03:47:00  03:59:00
120.P2cx2d   03:47:00  03:59:00
121.P*2c     03:47:00  03:59:00
122.K2bx2c   03:47:00  03:59:00
123.R*4a     03:48:00  03:59:00

The black entering king is completely safe and now finally the end for
the white king is near. The two white bishops work in defense, but with
this move Habu can exchange one of them, after which the white position
collapses.

124.G*3a     03:48:00  03:59:00
125.R4ax4d+  03:49:00  03:59:00
126.G5cx4d   03:49:00  03:59:00
127.P*2e     03:49:00  03:59:00
128.K2c-3c   03:49:00  03:59:00
129.P2ex2d   03:49:00  03:59:00
130.P*2h     03:49:00  03:59:00
131.R2ix2h   03:49:00  03:59:00
132.P5fx5g+  03:49:00  03:59:00
133.S*5c     03:50:00  03:59:00
134.+P5gx4h  03:50:00  03:59:00
135.B*6b     03:50:00  03:59:00
136.G4d-5d   03:50:00  03:59:00
137.P2d-2c+  03:51:00  03:59:00
138.G3bx2c   03:51:00  03:59:00
139.S*4b     03:51:00  03:59:00
Resigns      03:51:00  03:59:00

No mate yet, but after 140.Gx4b Sx4b= Kx4b Rx2c+ there is no defense. By the way,
there was a mate after 139.Rx2c+ instead of 139.S*4b. For example, 140.Kx2c
P*2d Kx2d P*2e K3c S*2d K3b G*2c K4c P*4d Gx4d Sx4d+ K4b B5c+ K4a G*5b.
If needed, Habu would undoubtedly have found this mate, but being in a
unbeatable position for so long might have made him a little less sharp.
Habu snaps his losing streak and stays in the Kisei match even though he
still 2-1 behind and needs both games to defend his title. Moriuchi has the
black pieces in the next game and will be looking to take win the match in
that game.
