31st Kio Match Game 1
[Black "Habu Yoshiharu, Kio"]
[White "Moriuchi Toshiyuki, Challenger"]
[Event "31st Kio-sen, February 4th 2006"]
1.P7g-7f     00:00:00  00:00:00
2.P8c-8d     00:00:00  00:01:00
3.S7i-6h     00:02:00  00:01:00
4.P3c-3d     00:02:00  00:01:00
5.P6g-6f     00:02:00  00:01:00
6.S7a-6b     00:02:00  00:01:00
7.P5g-5f     00:02:00  00:01:00
8.P5c-5d     00:02:00  00:01:00
9.S3i-4h     00:03:00  00:01:00
10.S3a-4b    00:03:00  00:03:00
11.G4i-5h    00:04:00  00:03:00
12.G4a-3b    00:04:00  00:03:00
13.G6i-7h    00:05:00  00:03:00
14.K5a-4a    00:05:00  00:06:00
15.K5i-6i    00:06:00  00:06:00
16.G6a-5b    00:06:00  00:11:00
17.S6h-7g    00:08:00  00:11:00
18.S4b-3c    00:08:00  00:11:00
19.B8h-7i    00:08:00  00:11:00
20.B2b-3a    00:08:00  00:11:00
21.P3g-3f    00:12:00  00:11:00
22.P4c-4d    00:12:00  00:11:00
23.G5h-6g    00:12:00  00:11:00
24.P7c-7d    00:12:00  00:12:00
25.B7i-6h    00:14:00  00:12:00
26.G5b-4c    00:14:00  00:14:00
27.K6i-7i    00:14:00  00:14:00
28.B3a-6d    00:14:00  00:14:00
29.N2i-3g    00:19:00  00:14:00
30.K4a-3a    00:19:00  00:14:00
31.R2h-3h    00:20:00  00:14:00
32.K3a-2b    00:20:00  00:20:00
33.K7i-8h    00:23:00  00:20:00
34.P8d-8e    00:23:00  00:23:00
35.S4h-5g    00:24:00  00:23:00
36.S3c-2d    00:24:00  00:52:00
37.S5g-4f    00:25:00  00:52:00
38.S6b-5c    00:25:00  00:53:00
39.P1g-1f    00:26:00  00:53:00
40.P1c-1d    00:26:00  00:54:00
41.P2g-2f    00:27:00  00:54:00
42.P9c-9d    00:27:00  01:04:00
43.L1i-1h    00:28:00  01:04:00
44.P9d-9e    00:28:00  01:04:00
45.P6f-6e    00:40:00  01:04:00
46.B6d-7c    00:40:00  01:04:00
47.N3g-2e    00:40:00  01:04:00
48.S5c-4b    00:40:00  01:04:00
49.P3f-3e    00:46:00  01:04:00
50.S2dx3e    00:46:00  01:04:00
51.S4fx3e    00:46:00  01:04:00
52.P3dx3e    00:46:00  01:04:00
53.P1f-1e    00:46:00  01:04:00
54.P1dx1e    00:46:00  01:05:00
55.P6e-6d    00:47:00  01:05:00
56.P6cx6d    00:47:00  01:18:00
57.B6hx3e    00:54:00  01:18:00
58.P*3d      00:54:00  01:23:00
59.B3e-6h    00:56:00  01:23:00

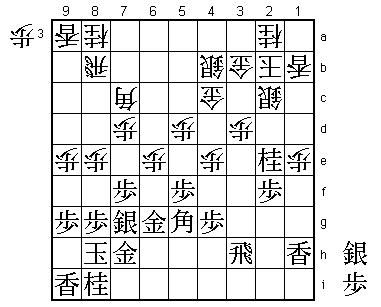
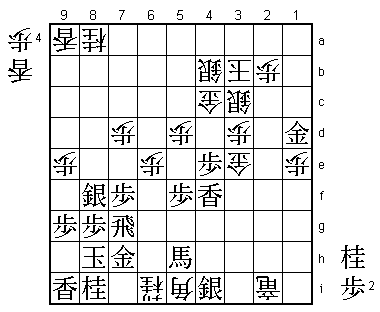
A theoretical battle in the first game of the Kio match, as this position
has been played multiple times before. The most famous example is the final
game of the 2003 Oza match between Watanabe and Habu, which Habu won after
a long struggle. The same position also appeared more recently in the final
of the Ginga tournament, also between Watanabe and Habu. That game was won
by Watanabe, which sparked Habu's run of 18 consecutive wins up to this game.
Habu had white in both these games, so Moriuchi is playing the Habu side here.

60.P2c-2d    00:56:00  01:33:00
61.P*1b      01:02:00  01:33:00
62.L1ax1b    01:02:00  01:33:00
63.B6hx2d    01:02:00  01:33:00
64.S*2c      01:02:00  01:34:00
65.B2d-4f    01:02:00  01:34:00
66.P4d-4e    01:02:00  01:43:00
67.B4f-5g    01:06:00  01:43:00
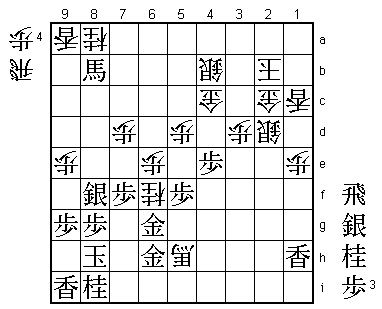
68.P6d-6e!   01:06:00  02:09:00

Good move. It invites the black attack so this needed correct judgment about
the strength of this attack. If the attack is not strong enough the white
bishop will promote and wreck havoc in the black position. It is important
that P6e is taking away the black attacking option B6f. After the game,
Habu admitted that he couldn't see any good way for black to attack from
here. White seems to have won the opening here.

69.P4g-4f    01:56:00  02:09:00
70.P*2d      01:56:00  02:27:00
71.P*1c      01:56:00  02:27:00
72.N2ax1c    01:56:00  02:27:00
73.N2ex1c+   01:56:00  02:27:00
74.L1bx1c    01:56:00  02:27:00
75.P4fx4e    01:56:00  02:27:00
76.P8e-8f    01:56:00  02:42:00
77.S7gx8f    02:24:00  02:42:00
78.N*6f      02:24:00  02:45:00
79.G7h-6h    02:29:00  02:45:00
80.B7c-1i+   02:29:00  02:48:00
81.P2f-2e    02:36:00  02:48:00
82.P*4f      02:36:00  02:49:00
83.P2ex2d    02:40:00  02:49:00
84.S2cx2d    02:40:00  02:50:00
85.R3h-4h    02:46:00  02:50:00
86.+B1i-3g   02:46:00  03:05:00
87.B5gx4f    02:46:00  03:05:00
88.+B3gx4h   02:46:00  03:14:00
89.P*2c      02:46:00  03:14:00
90.G3bx2c    02:46:00  03:22:00
91.B4fx8b+   02:47:00  03:22:00
92.+B4h-5h!  02:47:00  03:25:00

Shows clearly that white is dictating the pace here. Taking this bishop
is of course impossible because of R*7h, but in any case, black is completely
confined to defending his king.

93.S*6i      03:01:00  03:25:00

The alternative 93.S*7i is also good for white after 94.+Bx6g Gx6g G*6i.

94.+B5hx6g   03:01:00  03:44:00
95.G6hx6g    03:01:00  03:44:00
96.R*4h      03:01:00  03:44:00
97.R*6h      03:04:00  03:44:00
98.G*5h      03:04:00  03:45:00
99.S8f-7g    03:15:00  03:45:00
100.R4h-4i+  03:15:00  03:50:00
101.S6ix5h   03:15:00  03:50:00
102.N6fx5h+  03:15:00  03:50:00
103.R6h-7h   03:15:00  03:50:00
104.P*8f     03:15:00  03:53:00
105.S7gx8f   03:34:00  03:53:00
106.S*6f     03:34:00  03:53:00
107.P*6h     03:34:00  03:53:00
108.S6fx6g+  03:34:00  03:53:00
109.P6hx6g   03:34:00  03:53:00
110.P6e-6f   03:34:00  03:53:00
111.B*7g     03:35:00  03:53:00
112.S2d-3c   03:35:00  03:55:00
113.B7gx6f   03:35:00  03:55:00
114.G*6h     03:35:00  03:55:00
115.R7h-7g   03:36:00  03:55:00
116.P*6e     03:36:00  03:55:00
117.B6f-8d   03:39:00  03:55:00
118.+N5h-6i  03:39:00  03:57:00

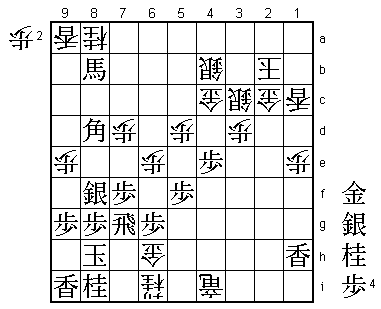
The fastest attack. If white can play +N7i next there is no defense.
Also, the white king is still surrounded by four generals, so there
seems no way to set up a counter attack. The end of the game seems near...

119.B8d-5g!  03:43:00  03:57:00

Defends against +N7i, bringing the bishop back into play.

120.+R4i-5h  03:43:00  03:57:00
121.+B8b-4f! 03:43:00  03:57:00

Puts pressure on the white attack and defense, bringing the second
bishop back into play.

122.G6hx6g   03:43:00  03:58:00
123.G*7h     03:43:00  03:58:00
124.G6gx5g   03:43:00  03:59:00
125.+B4fx5g  03:43:00  03:59:00
126.+R5hx1h  03:43:00  03:59:00

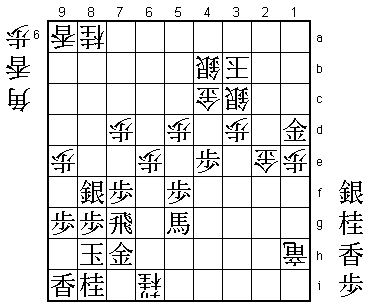
Suddenly, the white attack doesn't look like much anymore. With a little
piece of magic, Habu has stopped the white attack and created time to set
up an attack of his own. It seems like we are witnessing a typical Habu
win, but even though he is in byoyomi, Moriuchi refuses to crumble.

127.P*2d     03:44:00  03:59:00
128.G2cx2d   03:44:00  03:59:00
129.P*2e     03:44:00  03:59:00
130.G2dx2e   03:44:00  03:59:00
131.P*1d     03:44:00  03:59:00
132.L1cx1d   03:44:00  03:59:00
133.G*1c     03:44:00  03:59:00
134.K2b-3b   03:44:00  03:59:00
135.G1cx1d   03:44:00  03:59:00

Tough position for white. Giving up a bishop is impossible, because of
B*2c, so it is very difficult to attack. Furthermore, a knight drop on
4d seems pretty severe.

136.P*2b!    03:44:00  03:59:00

Great defense. Moriuchi correctly judges that 137.N*4d Sx4d Px4d Gx4d
is not so bad as it looks and that B*2c is the real problem he has to
deal with.

137.L*4h     03:57:00  03:59:00
138.B*5i     03:57:00  03:59:00
139.S*4i     03:57:00  03:59:00
140.P*4f     03:57:00  03:59:00
141.+B5g-5h  03:57:00  03:59:00
142.+R1h-2i  03:57:00  03:59:00
143.L4hx4f   03:57:00  03:59:00
144.G2e-3e!  03:57:00  03:59:00

Typical Moriuchi defense. By putting pressure on the attacking pieces, he
is forcing errors by the opponent.

145.+B5hx5i? 03:58:00  03:59:00

And Habu makes the mistake. The problem was that Habu intended to play
146.R4g here, but realized that this would be met with 147.Gx4f Rx4f B3g+
and the black attack is over. 145.+Bx5i is a change of plan, but the wrong
one. The best move was 145.P4d. For example 146.Sx4d Lx4d Gx4d S*3h +R3i
+Bx6i B2f+ and although we are over the 150 move mark, the game can still
go either way.

146.+N6ix5i  03:58:00  03:59:00
147.N*4d     03:58:00  03:59:00
148.G4cx4d   03:58:00  03:59:00
149.P4ex4d   03:58:00  03:59:00
150.G3ex4f   03:58:00  03:59:00
151.G*5b     03:58:00  03:59:00
152.P*4a     03:58:00  03:59:00
153.G5bx4b   03:58:00  03:59:00
154.P4ax4b   03:58:00  03:59:00
155.B*5b     03:58:00  03:59:00
156.N*6f     03:58:00  03:59:00

The white attack is one move faster.

157.S*4c     03:59:00  03:59:00
158.K3b-2a   03:59:00  03:59:00
159.B5b-4a+  03:59:00  03:59:00
160.P4bx4c   03:59:00  03:59:00
161.P4dx4c+  03:59:00  03:59:00
162.N6fx7h+  03:59:00  03:59:00
163.R7gx7h   03:59:00  03:59:00
164.S*6g     03:59:00  03:59:00
165.+B4a-3b  03:59:00  03:59:00
166.K2a-1a   03:59:00  03:59:00
Resigns      03:59:00  03:59:00

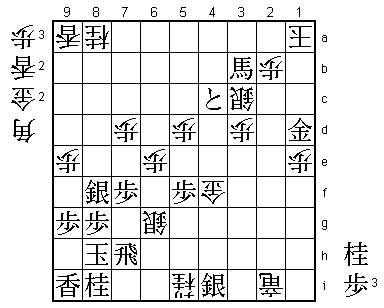
White threatens mate after Sx7h+ and there is no defense. Also, there is no
mate after 167.P*1b Kx1b P*1c K1a N*2c +Rx2c. A very good game between the
top players in the game in the best of form (Moriuchi had won 8 games coming
into this game). It seems this might be a great match, but Moriuchi winning
this first game with the white pieces might be important. Habu needs to strike
back fast in this five game match.
