29th Kio Match Game 2
[Black "Maruyama Tadahisa, Kio"]
[White "Tanigawa Koji, Challenger"]
[Event "29th Kio-sen, Game 2"]
[Date "February 22nd 2003"]
1.P7g-7f     00:00:00  00:00:00
2.P3c-3d     00:00:00  00:00:00
3.P2g-2f     00:01:00  00:00:00
4.P8c-8d     00:01:00  00:01:00
5.P2f-2e     00:01:00  00:01:00
6.P8d-8e     00:01:00  00:01:00
7.G6i-7h     00:01:00  00:01:00
8.G4a-3b     00:01:00  00:01:00
9.P2e-2d     00:01:00  00:01:00
10.P2cx2d    00:01:00  00:01:00
11.R2hx2d    00:01:00  00:01:00
12.P8e-8f    00:01:00  00:02:00
13.P8gx8f    00:01:00  00:02:00
14.R8bx8f    00:01:00  00:02:00
15.R2dx3d    00:01:00  00:02:00
16.B2b-3c    00:01:00  00:03:00
17.R3d-3f    00:02:00  00:03:00
18.S3a-2b    00:02:00  00:03:00
19.P*8g      00:02:00  00:03:00
20.R8f-8e    00:02:00  00:04:00

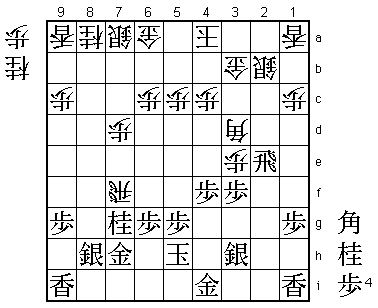
Maruyama is one of the main specialists in this opening. Here we
see a psychological game that is often played between strong shogi
professionals. Rather than avoiding the specialty of the opponent,
Tanigawa meets it head on, hoping to cause some extra psychological
damage in case of a win. The pressure is on Maruyama, who can not
really afford to lose the first two games of the short Kio match
(although that is exactly what he did against Habu last year).

21.R3f-2f    00:03:00  00:04:00
22.K5a-4a    00:03:00  00:04:00
23.K5i-5h    00:05:00  00:04:00
24.P7c-7d    00:05:00  00:27:00
25.P3g-3f    00:41:00  00:27:00
26.P*2e      00:41:00  00:48:00
27.R2f-2h    00:42:00  00:48:00
28.P*8f      00:42:00  00:48:00
29.B8hx3c+   01:03:00  00:48:00
30.N2ax3c    01:03:00  00:49:00
31.N8i-7g    01:03:00  00:49:00
32.R8e-8d    01:03:00  01:00:00
33.P8gx8f    01:12:00  01:00:00
34.R8dx8f    01:12:00  01:07:00
35.S7i-8h    01:14:00  01:07:00
36.B*6d      01:14:00  01:36:00
37.B*3g      01:23:00  01:36:00
38.B6dx3g+   01:23:00  01:41:00
39.N2ix3g    01:23:00  01:41:00
40.R8fx7f    01:23:00  01:41:00
41.S3i-3h    01:33:00  01:41:00
42.B*5e      01:33:00  02:11:00
43.B*4f      02:36:00  02:11:00
44.B5ex4f    02:36:00  02:58:00
45.P4gx4f    02:36:00  02:58:00
46.P*3e      02:36:00  02:58:00
47.N3gx2e    02:37:00  02:58:00
48.N3cx2e    02:37:00  02:58:00
49.R2hx2e    02:37:00  02:58:00
50.B*3d      02:37:00  02:59:00

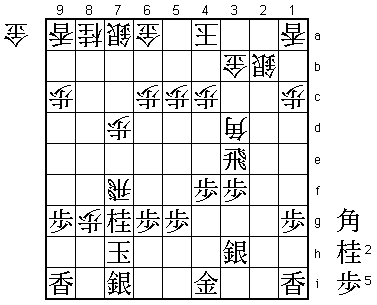
Tanigawa has been dropping his bishop a couple of times, only to
exchange it on the next move. This might look like a loss of tempo,
but trying to bring the black pieces to bad squares is more important.
If white can keep finding useful moves, he will win easily. On the
other hand, if white runs out of moves, he will be overrun. In this
position, Tanigawa felt that he was doing OK and that his attack
had a good chance of succeeding. In reality, the position is very
difficult.

51.R2ex3e    02:37:00  02:59:00
52.N*6f      02:37:00  02:59:00
53.K5h-6h    02:37:00  02:59:00
54.N6fx7h+   02:37:00  03:05:00
55.K6hx7h    02:37:00  03:05:00
56.P*8g      02:37:00  03:05:00
57.S8h-7i    03:05:00  03:05:00

58.G*4d?     03:05:00  03:19:00

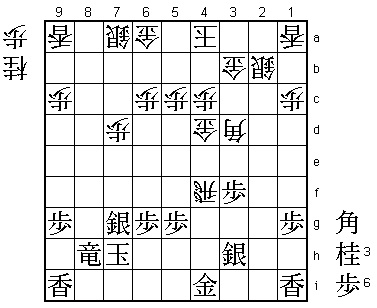
Not at all a Tanigawa move and clearly a change of plan. This position
hangs on the move 58.G*6f, which is what Tanigawa originally planned.
This threatens both Bx6g+ and Rx7g+, so it looks like black can not
defend. The only move is 59.Rx3d, after which 60.Rx7g+ 61.K6i is
forced. The problem is now how to continue for white. 62.Gx6g is
answered by P*7h and P*6h and the white attack runs out of steam.
Also, the violent 62.+Rx7i Kx7i Gx6g backfires after R*2a P*3a
Rx3b+ Kx3b Rx2b+ Kx2b N*3d and white is mated with the extra rook!
Tanigawa planned 62.N*6e, but lost confidence in the position after
he saw 63.S6h +Rx6h Kx6h Nx5g+ K7h +Nx6g Kx8g and the black escapes
in the open field. However, after the passive G*4d, the white attack
comes to a grinding halt and black can basically do as he pleases
the rest of the way. Do or die, 58.G*6f was the only move here.

59.R3e-8e    03:28:00  03:19:00
60.N8a-7c    03:28:00  03:19:00
61.R8e-8a+   03:28:00  03:19:00
62.N7c-6e    03:28:00  03:19:00
63.S7i-6h    03:28:00  03:19:00
64.P8g-8h+   03:28:00  03:22:00
65.+R8ax8h   03:28:00  03:22:00
66.N6ex7g+   03:28:00  03:22:00
67.S6hx7g    03:28:00  03:22:00
68.R7fx4f    03:28:00  03:22:00

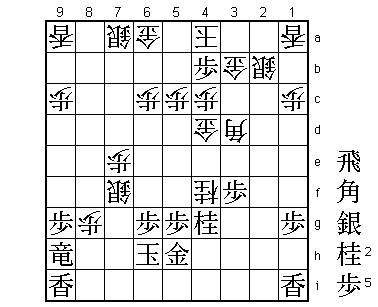
It looks like white still has something here, because of the double
threat P*3g and P*8g +Rx8g N*7e.

69.N*5i!     03:43:00  03:22:00

Perfect defense to both threats. 70.P*3g can now be answered by S4g
and the knight on 5i also defends 6g, which takes care of the other
threat. Here Maruyama was confident that he would win this game.

70.P7d-7e    03:43:00  03:45:00
71.S3h-4g    03:50:00  03:45:00
72.R4fx4g+   03:50:00  03:47:00
73.N5ix4g    03:50:00  03:47:00
74.S*7f      03:50:00  03:47:00
75.G4i-5h    03:55:00  03:47:00
76.P*8g      03:55:00  03:47:00
77.+R8h-9h   03:55:00  03:47:00
78.S7fx7g+   03:55:00  03:51:00
79.K7hx7g    03:55:00  03:51:00
80.S*7f      03:55:00  03:54:00
81.K7g-6h    03:55:00  03:54:00
82.N*4f      03:55:00  03:54:00
83.P*4b      03:55:00  03:54:00
Resigns      03:55:00  03:54:00

Not mate, but 84.Kx4b fails to B*2d followed by Bx4f, while 84.Gx4b
fails to R*2a. There is no way that white can get to the black king,
so here Tanigawa resigned. He can try again with the black pieces in
the third game, which is a pivotal one.
