29th Kio Match Game 1
[Black "Tanigawa Koji, Challenger"]
[White "Maruyama Tadahisa, Kio"]
[Event "29th Kio-sen, Game 1"]
[Date "February 8th 2004"]
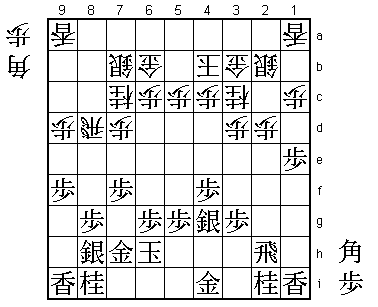
1.P2g-2f 00:00:00 00:00:00
2.P8c-8d 00:00:00 00:01:00
Both Maruyama and Tanigawa are specialists in the Kakugawari and
R8e Yokofudori. There was a time when Maruyama only played a very
limited number of openings, but this has changed lately. These
days, he even plays Aifuribisha. Still, 2.P8d came as a complete
surprise. He has not played this move in an official game in three
and a half years.
3.P2f-2e 00:01:00 00:01:00
4.P8d-8e 00:01:00 00:01:00
5.G6i-7h 00:01:00 00:01:00
6.G4a-3b 00:01:00 00:01:00
7.P2e-2d 00:01:00 00:01:00
8.P2cx2d 00:01:00 00:01:00
9.R2hx2d 00:01:00 00:01:00
10.P*2c 00:01:00 00:01:00
11.R2d-2h 00:01:00 00:01:00
12.P8e-8f 00:01:00 00:01:00
13.P8gx8f 00:01:00 00:01:00
14.R8bx8f 00:01:00 00:01:00
15.P*8g 00:01:00 00:01:00
16.R8f-8d 00:01:00 00:02:00
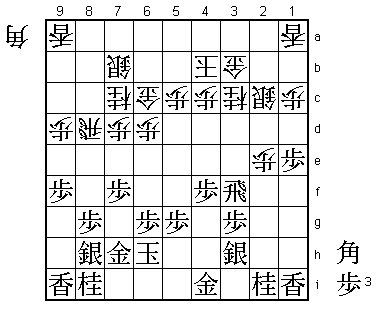
17.S3i-3h 00:02:00 00:02:00
A popular opening these days, but not when Maruyama still played
2.P8d. This means that this is the first time he plays this position.
He clearly wanted to surprise Tanigawa, but there is a risk in
playing a position that the opponent has much more experience with.
18.P9c-9d 00:02:00 00:02:00
19.P9g-9f 00:03:00 00:02:00
20.P3c-3d 00:03:00 00:03:00
21.S3h-2g 00:06:00 00:03:00
22.P7c-7d 00:06:00 00:07:00
23.P7g-7f 00:11:00 00:07:00
24.B2bx8h+ 00:11:00 00:08:00
25.S7ix8h 00:13:00 00:08:00
26.S3a-2b 00:13:00 00:08:00
27.S2g-3f 00:18:00 00:08:00
28.N2a-3c 00:18:00 00:09:00
29.P1g-1f 00:31:00 00:09:00
30.S7a-7b 00:31:00 00:14:00
31.P1f-1e 00:35:00 00:14:00
32.K5a-4b 00:35:00 00:16:00
33.P4g-4f 00:41:00 00:16:00
34.N8a-7c 00:41:00 00:19:00
35.K5i-6h 00:55:00 00:19:00
36.G6a-6b 00:55:00 00:20:00
37.S3f-4g 01:04:00 00:20:00
38.P2c-2d 01:04:00 00:24:00
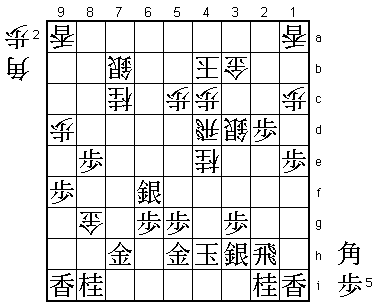
39.R2hx2d!   01:19:00  00:24:00

We will not know what Maruyama prepared in this opening, because
Tanigawa is the first one with a surprise. Taking this pawn is
almost never good. The rook gets into trouble and an exchange of
bishop and rook is almost always good for white. However, this
position is an exception.

40.P*2e      01:19:00  00:33:00

Tempting is 40.B*2e, but after 41.S3f P*2c Rx2e Nx2e G3i white can
not use the rook and black has the advantage. For black, it is
important not to play 41.B*6f instead of 41.S3f. This bishop drop
looks good because of 42.R8a Bx3c+ followed by Rx2e, but if white
plays 42.Bx4g+, then 43.Bx8d S*2e leads to a wild position which
is impossible to judge.

41.R2dx3d    01:19:00  00:33:00
42.S2b-2c    01:19:00  00:47:00
43.R3d-3f    01:20:00  00:47:00
44.P6c-6d    01:20:00  00:48:00

A typical Maruyama move. He could have played 44.B*2g here to get
the rook in hand, but there is nothing much he can do with it.
Instead, he decides to cut his losses (two pawns down) and wait
for a Tanigawa mistake. With the limited time per player (4 hours)
and the unusual atmosphere (the second half of the game is played
in front of an audience), this probably is his best option.

45.S4g-3h    01:28:00  00:48:00
46.G6b-6c!   01:28:00  01:07:00
Looks terrible, but is Maruyama's best chance. Suzuki, 8-dan, who
commented the game draw some laughs by saying that the white
position looks like played by someone below 1-dan level. However,
after seeing the rest he had to admit that Maruyama skillfully
makes something out of nothing. 46.S6c is the natural move, but
fails to 47.P9e Px9e P*9b Lx9b P*9c Lx9c B*7a.

47.R3f-1f?!  01:38:00  01:07:00

A small mistake. Black wants to play P3f followed by P3e, but it
was better to keep the rook on 3f to help in the attack.

48.P6d-6e    01:38:00  01:08:00
49.S8h-7g    01:53:00  01:08:00
50.G6c-6d    01:53:00  01:23:00
51.G4i-5h    02:00:00  01:23:00
52.P7d-7e    02:00:00  01:26:00
53.P7fx7e    02:00:00  01:26:00
54.G6dx7e    02:00:00  01:26:00
55.P4f-4e    02:00:00  01:26:00
56.P6e-6f    02:00:00  01:43:00
57.S7gx6f    02:37:00  01:43:00
58.G7e-7f    02:37:00  01:47:00

The awful looking gold on 6c has become an important attacking force.

59.K6h-5i    02:37:00  01:47:00
60.N3cx4e    02:37:00  02:21:00
61.K5i-4h    02:41:00  02:21:00
62.P2e-2f!   02:41:00  03:15:00
63.R1fx2f    02:42:00  03:15:00
64.P*2h!     02:42:00  03:15:00

With two pawn sacrifices, Maruyama gets the black rook where he
wants it.

65.R2fx2h    02:46:00  03:15:00
66.G7fx8g    02:46:00  03:15:00
67.P*2d      03:14:00  03:15:00
68.S2c-3d    03:14:00  03:18:00
69.P*8e      03:15:00  03:18:00
70.R8d-4d    03:15:00  03:18:00
71.G7hx8g    03:16:00  03:18:00

Risky. The expected line was 71.P4f Gx7h B*5e. In character,
Tanigawa chooses the sharpest line.

72.N4ex3g+   03:16:00  03:23:00
73.K4hx3g    03:16:00  03:23:00
74.B*4f      03:16:00  03:29:00
75.K3g-2g    03:16:00  03:29:00
76.P*2f      03:16:00  03:29:00
77.K2g-1h    03:16:00  03:29:00
78.B4fx2h+   03:16:00  03:30:00
79.K1hx2h    03:16:00  03:30:00
80.P*3g      03:16:00  03:30:00
81.K2hx3g    03:19:00  03:30:00
82.R*3i      03:19:00  03:32:00
83.P*4f      03:24:00  03:32:00
84.S3d-3e    03:24:00  03:33:00
85.P*3c      03:32:00  03:33:00
86.P2f-2g+   03:32:00  03:36:00
87.K3gx2g    03:32:00  03:36:00
88.R4dx2d    03:32:00  03:36:00
89.P*2e      03:32:00  03:36:00
90.R2dx2e    03:32:00  03:36:00
91.K2g-1f    03:32:00  03:36:00
92.R2e-2f    03:32:00  03:36:00
93.K1f-1g    03:32:00  03:36:00

94.G3bx3c 03:32:00 03:54:00
Luck or skill? Tanigawa can just survive the obvious hisshi moves.
For example, 94.Rx3h+ Px3b+ and with a couple of checks black can
force the white king to a square where either B*7d or B*5f forks
the king and the promoted rook on 3h. Furthermore, 94.R2ex2i+ (then
Sx2i R3g+ leads to mate) Px3b+ Kx3b P*3c K4a B*3b K5a G*5b leads
to mate. The mates here are rather difficult, so Maruyama could
have tried his luck here, but he decided to wait.
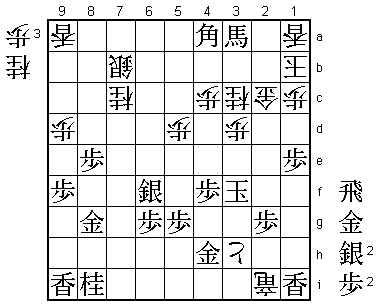
95.G5h-4h! 03:46:00 03:54:00
Great defense, but not played with much confidence. It is the only
move that has a chance of winning.
96.P*3g? 03:46:00 03:59:00

The decisive mistake. In a razor sharp endgame like this, one
mistake decides the outcome. After the game, it was concluded
that 96.Rx3h+ Gx3h Rx2i+ would be difficult, but winning for
white. After 96.P*3g, white has no mate, even if black gives
up a bishop.

97.N*5d      03:59:00  03:59:00
98.P5cx5d    03:59:00  03:59:00
99.B*6d      03:59:00  03:59:00
100.K4b-3b   03:59:00  03:59:00
101.B*4a     03:59:00  03:59:00
102.K3b-2a   03:59:00  03:59:00
103.P*2c     03:59:00  03:59:00
104.G3cx2c   03:59:00  03:59:00
105.B6d-3a+  03:59:00  03:59:00
106.K2a-1b   03:59:00  03:59:00
107.P*2g!    03:59:00  03:59:00

The winning move. Black has no defense after 108.N*2e K1h Px3h+, but
because the knight on 2e blocks the rook, black has a simple mate
after G*2b Gx2b +Bx2b Kx2b G*2c.

108.P3gx3h+  03:59:00  03:59:00
109.P2gx2f   03:59:00  03:59:00
110.S3ex2f   03:59:00  03:59:00
111.K1gx2f   03:59:00  03:59:00
112.R3ix2i+  03:59:00  03:59:00
113.P*2g     03:59:00  03:59:00
114.S*2e     03:59:00  03:59:00
115.K2fx2e   03:59:00  03:59:00
116.N*3c     03:59:00  03:59:00
117.K2e-3f   03:59:00  03:59:00
118.P*3e     03:59:00  03:59:00
119.K3fx3e   03:59:00  03:59:00
120.P*3d     03:59:00  03:59:00
121.K3e-3f   03:59:00  03:59:00
Resigns      03:59:00  03:59:00
No mate after 122.N*4d K2f (K4g?? +Px4h and mate) or 122.N*2d K4g
(K2f?? P*2e and mate) +Px4h K5f. A very exciting game that could
have gone either way. Maruyama will be sorry to drop this one,
but has the black pieces in game 2 to try and equalize.