28th Kio Match Game 4
[Black "Maruyama Tadahisa, Challenger"]
[White "Habu Yoshiharu, Kio"]
[Event "28th Kio-sen, Game 4"]
[Date "March 5th 2003"]
1.P7g-7f 00:00:00 00:00:00
2.P8c-8d 00:00:00 00:01:00
3.P2g-2f 00:00:00 00:01:00
4.G4a-3b 00:00:00 00:02:00
5.G6i-7h 00:00:00 00:02:00
6.P8d-8e 00:00:00 00:02:00
7.B8h-7g 00:00:00 00:02:00
8.P3c-3d 00:00:00 00:02:00
9.S7i-8h 00:00:00 00:02:00
10.B2bx7g+ 00:00:00 00:02:00
In game 2 Habu played the Shikenbisha, but this time he is meeting
Maruyama head on. The Kakugawari is Maruyama's favourite opening with black.
11.S8hx7g 00:00:00 00:02:00
12.S3a-4b 00:00:00 00:02:00
13.P9g-9f 00:00:00 00:02:00
14.P9c-9d 00:00:00 00:02:00
15.S3i-3h 00:00:00 00:02:00
16.S7a-7b 00:00:00 00:02:00
17.P4g-4f 00:00:00 00:02:00
18.P6c-6d 00:00:00 00:02:00
19.S3h-4g 00:00:00 00:02:00
20.S7b-6c 00:00:00 00:02:00
21.K5i-6h 00:00:00 00:02:00
22.K5a-4a 00:00:00 00:03:00
23.P1g-1f 00:00:00 00:03:00
24.P1c-1d 00:00:00 00:03:00
25.K6h-7i 00:02:00 00:03:00
26.K4a-3a 00:02:00 00:03:00
27.S4g-5f 00:12:00 00:03:00
28.S6c-5d 00:12:00 00:03:00
29.P6g-6f 00:12:00 00:03:00
30.P4c-4d 00:12:00 00:03:00
31.G4i-5h 00:12:00 00:03:00
32.G6a-5b 00:12:00 00:03:00
33.P3g-3f 00:12:00 00:03:00
34.P7c-7d 00:12:00 00:03:00
35.N2i-3g 00:21:00 00:03:00
36.N8a-7c 00:21:00 00:03:00
37.P2f-2e 00:25:00 00:03:00
38.S4b-3c 00:25:00 00:03:00
39.P4f-4e 00:27:00 00:03:00
40.P4dx4e 00:27:00 00:03:00
41.P3f-3e 00:28:00 00:03:00
42.S3c-4d 00:28:00 00:03:00
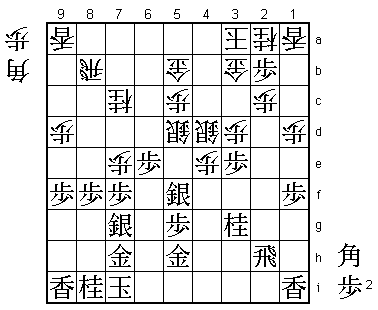
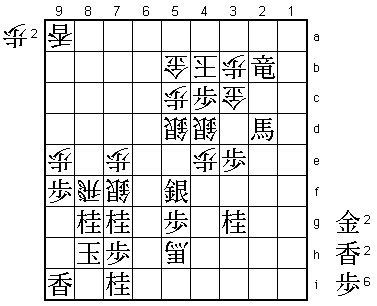
43.P2e-2d?! 00:30:00 00:03:00
The main line is to sacrifice pawns on 1e and 7e before exchanging pawns
on the 2nd file. Of course, Maruyama knows this, but he has prepared
something in a line that is less well known.
44.P2cx2d 00:30:00 00:03:00
45.R2hx2d 00:30:00 00:03:00
46.P*2c 00:30:00 00:03:00
47.R2d-2h 00:30:00 00:03:00
48.P6d-6e 00:30:00 00:28:00
49.P6fx6e 00:44:00 00:28:00
50.P8e-8f 00:44:00 00:51:00
51.P8gx8f 00:49:00 00:51:00
52.P7d-7e 00:49:00 00:53:00
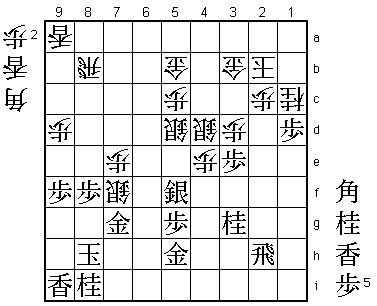
53.P*2b!? 02:28:00 00:53:00
The Reclining Silver variation of the Kakugawari has been analysed so
deeply that new moves are often played very late in the game. So far the
position is identical to the position in a game that Maruyama and Habu
played 10 years ago. There are two moves that are considered the main
line here: 53.S6f and 53.P1e (with or without the pawn exchange on 8f).
53.S6f is good for white after 54.P9e Px9e P*9g Lx9g Rx8f (or P8f Px8f
Rx8f if the pawns have not yet been exchanged) B*6a (P*8g R8a followed
by N8e gives white an unstoppable attack) G5b-4c P*8g R8b P9d N8e.
However, 53.P1e is also not very appealing for black as 54.Nx6e S6f
Px7f (or P8f Px8f Px7f if the pawns have not been exchanged) P*2b P7g+
Sx7g Nx7g+ Gx7g P*7f Gx7f P*7e G7g S*7f G5b-6g ends in sennichite
(Sx7g+ Gx7g G*7f etc.). The problem for black is that his pawn drop
on 2b is simply ignored. Maruyama's idea is to play this pawn drop at
a time when it can't be ignored. This certainly improves the black
position, but this game seems to show that white still can get the
upper hand.
54.K3ax2b 02:28:00 01:18:00
55.P1f-1e 02:28:00 01:18:00
56.N7cx6e 02:28:00 01:43:00
57.S7g-6f 03:15:00 01:43:00
58.P*8h 03:15:00 01:47:00
59.K7ix8h 03:15:00 01:47:00
60.P7ex7f 03:15:00 01:47:00
61.P1ex1d 03:15:00 01:47:00
62.P7f-7g+ 03:15:00 02:06:00
63.S6fx7g 03:15:00 02:06:00
64.N6ex7g+ 03:15:00 02:06:00
65.G7hx7g 03:15:00 02:06:00
66.P*7f 03:15:00 02:06:00
67.G7gx7f 03:15:00 02:06:00
68.P*7e 03:15:00 02:07:00
69.G7f-7g 03:15:00 02:07:00
70.S*7f 03:15:00 02:07:00
71.P1d-1c+ 03:18:00 02:07:00
72.L1ax1c 03:18:00 02:15:00
73.L1ix1c+ 03:24:00 02:15:00
74.N2ax1c 03:24:00 02:20:00
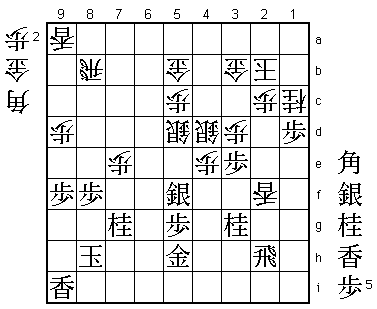
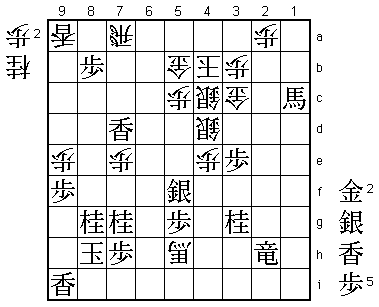
75.P*1d 03:24:00 02:20:00
The critical position. If black gets the time to play Px1c+ followed
by +Px2c, the white position collapses. Can white use the two moves he
has to give his attack decisive power?

76.S7fx7g+   03:24:00  03:04:00

Habu took a long time for a move that the commentators thought obvious.
The conclusion in the press room was: 76.Sx7g+ Nx7g (Kx7g L*7f K6h Rx8f
wins because it threatens mate after G*6i) P*8g (not B*6i Px1c+ K3a P*7h
and it is hard to find a good move) K7h L*2d! and white wins because
the black attack is slowed down too much after Px1c+ K3a P*2e. Habu
didn't like the position after P*2e, but it seems Rx8f P*8i P7f Px2d
P8h+ Px8h B*8i is winning for white.

77.N8ix7g    03:24:00  03:04:00
78.L*2f!?    03:24:00  03:20:00
A big surprise for everyone. If Habu would have won this game, it would
have been considered a brilliant move. It is not bad, as it seems that
white can still win with it. However, in hindsight Habu would probably
have preferred to play the line with L*2d given above.

79.R2hx2f    03:51:00  03:20:00

No choice. After 79.R1h P*8g K7h B*3f white wins.

80.B*6i      03:51:00  03:20:00

The first point of forcing the rook to 2f is that white can now take
the gold on 5h at any convenient moment. The second point is that black
can't play 81.G6h because of 82.Rx8f K7i P*6g! (Bx8g+? P*7h gives black
chances to get back in the game) and because the rook is hanging on 2f,
black can't take this pawn with the silver. Furthermore, white also wins
after Kx6i Px6h+.

81.P1dx1c+   03:51:00  03:20:00
82.K2b-3a    03:51:00  03:20:00
83.S*7h      03:51:00  03:20:00
84.P*8g      03:51:00  03:37:00
85.S7hx8g    03:51:00  03:37:00
86.G*7f      03:51:00  03:40:00
87.N*7i      03:51:00  03:40:00
88.G7fx8g    03:51:00  03:40:00
89.N7ix8g    03:51:00  03:40:00
90.S*7f      03:51:00  03:41:00
91.N*7i      03:54:00  03:41:00
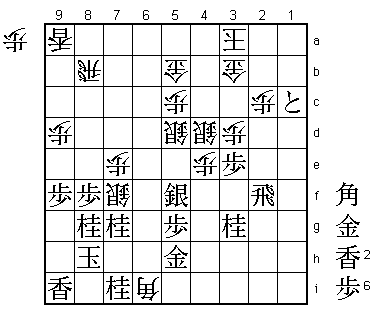
92.R8bx8f?   03:54:00  03:56:00

An uncharacteristic blunder in the endgame. Habu takes 15 minutes, but
is unable to find the hidden win he had in this position. 92.Sx8g+ Nx8g
N*7f K9h Rx8f G*9g B7h+ P*8i N8h+! and now Px8h is answered by Rx5f R2i
R2f! and white wins.

93.P*7h      03:54:00  03:56:00

Now white is unable to keep threatening mate and black gets the time to
take over the attack.

94.B6ix5h+   03:54:00  03:56:00
95.+P1cx2c   03:54:00  03:56:00
96.P9d-9e    03:54:00  03:57:00
97.+P2cx3b   03:56:00  03:57:00
98.K3ax3b    03:56:00  03:57:00
99.B*2c      03:56:00  03:57:00
100.K3b-4c   03:56:00  03:57:00
101.B2cx3d+  03:56:00  03:57:00
102.K4c-4b   03:56:00  03:57:00
103.R2f-2b+  03:56:00  03:57:00
104.P*3b     03:56:00  03:57:00
105.+B3d-2d  03:56:00  03:57:00
106.G*3c     03:56:00  03:57:00
107.P*4c!    03:56:00  03:57:00
Winning. 108.Gx4c is answered by G*6b, 108.Kx4c by G*3d Gx3d (K4b Gx3c)
G*4b Gx4b +Bx3d and 108.K5a by G*7b.

108.S5dx4c   03:56:00  03:57:00
109.+B2d-1c  03:56:00  03:57:00

Moves the attacked bishop and threatens mate at the same time. The black
attack isn't slowed down at all.

110.R8f-8a   03:56:00  03:57:00
111.P*8b     03:56:00  03:57:00
112.R8a-7a   03:56:00  03:59:00
113.L*7d     03:56:00  03:59:00
114.P*2a     03:56:00  03:59:00
115.+R2b-2h  03:58:00  03:59:00

This makes the black position completely safe.

116.S7fx8g=  03:58:00  03:59:00
117.N7ix8g   03:58:00  03:59:00
Resigns      03:58:00  03:59:00
Habu has no choice but to resign, even though he still has four generals
around his king while Maruyama has only two knights. Maruyama now levels
the match at two games all and is only one win away from pulling off an
amazing comeback. Judging from this game, he seems to have luck on his
side at the moment. Will this last long enough to take the Kio title
from Habu?