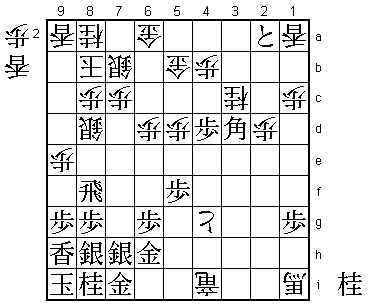
28th Kio Match Game 2
[Black "Maruyama Tadahisa, Challenger"]
[White "Habu Yoshiharu, Kio"]
[Event "28th Kio-sen, Game 2"]
[Date "February 8th 2003"]
1.P7g-7f     00:00:00  00:00:00
2.P3c-3d     00:00:00  00:02:00
3.P2g-2f     00:00:00  00:02:00
4.P4c-4d     00:00:00  00:02:00
5.P2f-2e     00:00:00  00:02:00
6.B2b-3c     00:00:00  00:03:00
7.S3i-4h     00:00:00  00:03:00
8.P9c-9d     00:00:00  00:04:00
9.K5i-6h     00:01:00  00:04:00
10.R8b-4b    00:01:00  00:05:00

Before the game, most commentators expected that Habu would play the
Kakugawari here. Maruyama's favourite openings are the R8e Yokofudori
with white and the Kakugawari with black. Beating him in both of his
favourite openings would not only certainly win the match, but also
send a message to Maruyama that whatever he plays, Habu can beat it.
This would certainly carry over to future encounters. In a small world
like the professional shogi scene, this type of thinking is quite
common. However, in the end Habu decided to play the Shikenbisha opening
instead. It has been a while since Habu played the 4th file rook in
a title match game, as he didn't use it in both the Ryu-O match and
the Osho match.

11.K6h-7h    00:01:00  00:05:00
12.S7a-7b    00:01:00  00:05:00
13.P5g-5f    00:02:00  00:05:00
14.G4a-5b    00:02:00  00:06:00
15.S4h-5g    00:04:00  00:06:00
16.S3a-3b    00:04:00  00:27:00
17.G4i-5h    00:05:00  00:27:00
18.P9d-9e    00:05:00  00:43:00
19.P3g-3f    00:09:00  00:43:00
20.K5a-6b    00:09:00  00:44:00
21.B8h-7g    00:12:00  00:44:00
22.K6b-7a    00:12:00  00:46:00
23.K7h-8h    00:13:00  00:46:00
24.S3b-4c    00:13:00  00:46:00
25.L9i-9h    00:16:00  00:46:00
26.R4b-3b    00:16:00  00:47:00
27.S7i-7h    00:20:00  00:47:00
28.K7a-8b    00:20:00  00:51:00
29.S5g-6f    00:24:00  00:51:00
30.P4d-4e    00:24:00  00:53:00
31.K8h-9i    00:25:00  00:53:00
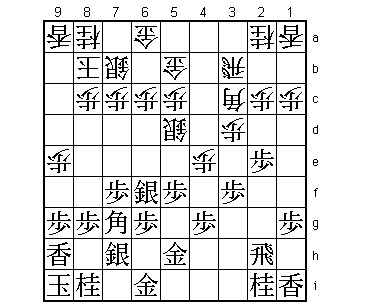
32.S4c-5d?!  00:25:00  00:56:00

So far, the position was identical to the final of the JT Series between
Maruyama and Fujii that was played on November 10th last year. There
Fujii played 32.P5d and the game developed as follows: 33.B6h B4b N3g
S4d R3h P6d S6f-7g P6e S8h. Black wants to pull back the silver into
the anaguma castle and Habu's 32.S5d is an attempt to prevent this.
Because the bishop line is open, 33.B6h can be answered by 34.S6e.
After the game, Maruyama admitted that he didn't expect 32.S5d.
Rightly so, as this move is quite likely an overplay. Habu said after
the game that either 32.P6d or 32.P5d would have been better.

33.G5h-6h    01:21:00  00:56:00
34.P6c-6d    01:21:00  01:23:00
35.G6i-7i?   01:23:00  01:23:00

A mistake that turns 32.S5d into a good move. Habu feared 35.S5g here.
Then after 36.P3e P2d Px2d Bx3c+ Rx3c Rx2d P*2c R2e Px3f P*3d R4c B*3b
white looks to be in trouble.

36.P3d-3e    01:23:00  01:34:00
37.S6f-5e    01:33:00  01:34:00
38.P3ex3f    01:33:00  02:07:00
39.P2e-2d    01:42:00  02:07:00
40.P2cx2d    01:42:00  02:07:00
41.S5ex5d    01:44:00  02:07:00
42.P5cx5d    01:44:00  02:07:00
43.B7gx3c+   01:52:00  02:07:00
44.R3bx3c    01:52:00  02:07:00
45.R2hx2d    02:00:00  02:07:00
46.P*2c      02:00:00  02:07:00
47.R2d-2e    02:00:00  02:07:00
48.S*3d      02:00:00  02:23:00
49.R2e-2h    02:04:00  02:23:00
50.P3f-3g+   02:04:00  02:23:00
51.N2ix3g    02:04:00  02:23:00
52.P*3f      02:04:00  02:23:00
53.N3gx4e    02:41:00  02:23:00
54.S3dx4e    02:41:00  02:29:00
55.R2h-2e    02:41:00  02:29:00
56.S4e-3d    02:41:00  02:50:00
57.R2e-8e    02:48:00  02:50:00

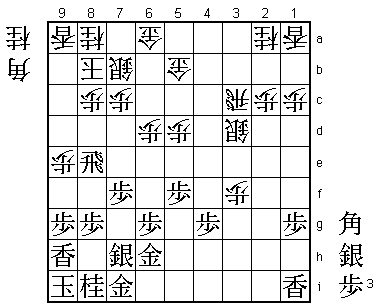
Looks dangerous, because white can win this rook. However, after 58.B*6c
R7e P7d R8e N7c R8f N*9d P7e Nx8f Px8f white is a rook up, but the head
of the knight is weak and the rook on 3c and the silver on 3d are not
working at all, so black has the better chances here.

58.R3c-4c!   02:48:00  02:50:00

This needed some careful calculation, as black seems to have a nice
counter against this.

59.B*1f      02:50:00  02:50:00
60.R4c-4d    02:50:00  02:51:00
61.S*3e      03:17:00  02:51:00
62.S3dx3e    03:17:00  03:01:00
63.R8ex3e    03:17:00  03:01:00
64.N*3c!     03:17:00  03:02:00

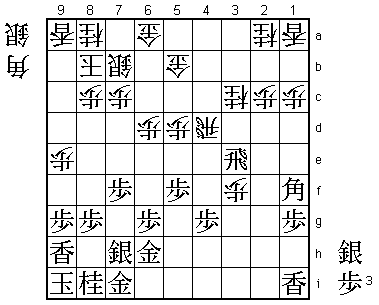
Maruyama probably underestimated the strength of this move. Dropping
a piece far away from the king like this is usually in black's favour,
but in this case it takes away almost all of black's options. Habu even
considered 64.S*3c here, because he also wanted to take away the option
P*2b from black, but then after 65.S*4e R2d Bx5b+ Gx5b P*2e R1d P1f it
is hard to save the rook.

65.P*2b      03:40:00  03:02:00
66.R4dx4g+   03:40:00  03:16:00
67.S*8h?     03:40:00  03:16:00

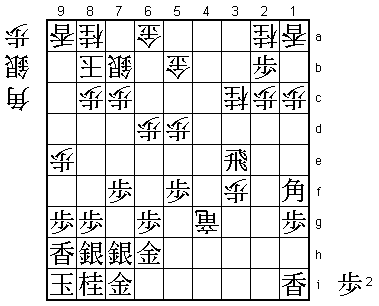
An important mistake caused by the psychological superiority of Habu in
this game. He is 1-0 up in the match and in this game has made it very
difficult for Maruyama to find good moves, dictating the pace despite
having the white pieces. Maruyama had already more or less given up on
this game and doesn't see that he still has a chance to fight back.
Of course white needs to do something about the fork B*4d, but 67.P*4d!
would have been the perfect reply. For example, 68.B*2f (the move Habu
intended to play) R3d S*4e P4c+ Gx4c R2d Px2d Bx4c+ Sx5f +B3d and black
still has a lot to play for. After picking up the knights one 2a and 3c
and/or the lance on 1a, black has all kinds of interesting attacking
options like N*8f followed by N*9d.

68.B*4f      03:40:00  03:22:00
69.R3e-8e    03:41:00  03:22:00
70.S*7d!     03:41:00  03:23:00

Now the game becomes a blow-out. White chases the rook, strengthening
his own position at the same time.

71.R8e-8f    03:41:00  03:23:00
72.B4fx1i+   03:41:00  03:23:00

Threatening to win the rook with L*8d.

73.P7f-7e    03:44:00  03:23:00
74.S7dx7e    03:44:00  03:26:00
75.R8f-8e    03:44:00  03:26:00
76.S7e-8d    03:44:00  03:26:00
77.R8e-8f    03:45:00  03:26:00
78.P3f-3g+   03:45:00  03:33:00
79.P*4i      03:46:00  03:33:00
80.P2c-2d    03:46:00  03:36:00
81.B1f-3d    03:50:00  03:36:00
82.+R4gx4i   03:50:00  03:36:00
83.P2bx2a+   03:50:00  03:36:00
84.+P3g-4g   03:50:00  03:36:00
85.P*4d      03:50:00  03:36:00
86.P*4b      03:50:00  03:37:00
Resigns      03:51:00  03:37:00

Maruyama had enough. He has no reasonable moves and can only wait
helplessly until his king is smoked out of the anaguma. A game that
Maruyama would rather forget, as it made him look pretty bad, showing
both technical and psychological weaknesses. He needs to change a lot
if he wants to have a chance of keeping Habu from winning his 13th
consecutive Kio title.
