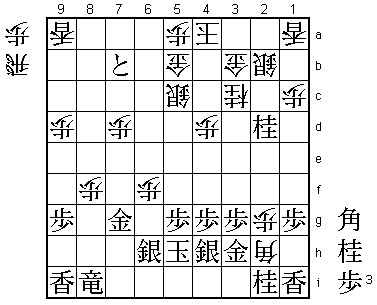
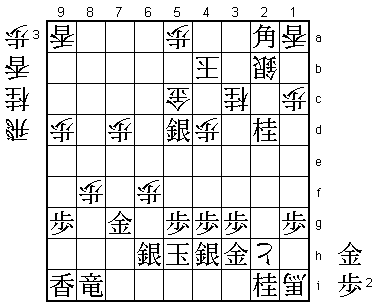
28th Kio Match Game 1
[Black "Habu Yoshiharu, Kio"]
[White "Maruyama Tadahisa, Challenger"]
[Event "28th Kio-sen, Game 1"]
[Date "February 1st 2003"]
1.P7g-7f     00:00:00  00:00:00
2.P3c-3d     00:00:00  00:00:00
3.P2g-2f     00:00:00  00:00:00
4.P8c-8d     00:00:00  00:00:00
5.P2f-2e     00:02:00  00:00:00
6.P8d-8e     00:02:00  00:00:00
7.G6i-7h     00:02:00  00:00:00
8.G4a-3b     00:02:00  00:00:00
9.P2e-2d     00:02:00  00:00:00
10.P2cx2d    00:02:00  00:00:00
11.R2hx2d    00:02:00  00:00:00
12.P8e-8f    00:02:00  00:00:00
13.P8gx8f    00:02:00  00:00:00
14.R8bx8f    00:02:00  00:00:00
15.R2dx3d    00:04:00  00:00:00
16.B2b-3c    00:04:00  00:00:00
17.R3d-3f    00:06:00  00:00:00
18.K5a-4a    00:06:00  00:00:00
19.K5i-5h    00:06:00  00:00:00
20.S3a-2b    00:06:00  00:01:00
21.G4i-3h    00:22:00  00:01:00
22.G6a-5a    00:22:00  00:02:00
23.P*8g      00:23:00  00:02:00
24.R8f-8e    00:23:00  00:03:00

Maruyama is a specialist in this opening, but Habu doesn't make any
effort to avoid his opponent's favourite strategy. It is the "come and
get me if you can" attitude of modern shogi.

25.B8hx3c+   00:24:00  00:03:00
26.N2ax3c    00:24:00  00:04:00
27.N8i-7g    00:24:00  00:04:00

This bishop exchange followed by N7g is not the main line, but there
are still about 10 games that have been played with this position.

28.R8e-8d    00:24:00  00:06:00
29.P7f-7e    00:25:00  00:06:00
30.S7a-6b    00:25:00  00:07:00
31.P7e-7d    00:28:00  00:07:00

Simple, but positive play by black. 32.Rx7d is answered by 33.B*8b
and 32.Px7d by 33.P*2c Gx2c P*2d Gx2d B*6f.

32.P4c-4d    00:28:00  00:13:00

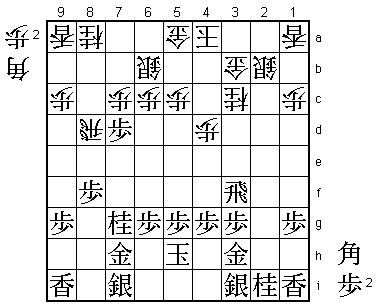
The more usual reply is 32.B*4d, but 32.P*4d was played about one
week earlier and Maruyama decided to use this idea. If he was hoping
to surprise Habu with it, he failed as Habu after the game told that
despite his busy schedule, he had seen the game in which P4d was
played as well.

33.P8g-8f!?  00:42:00  00:13:00

It is unclear if Habu prepared this move or if he found it behind the
board, but this is a new idea.

34.P7cx7d    00:42:00  00:18:00
35.P8f-8e    00:43:00  00:18:00
36.R8d-8b    00:43:00  00:18:00
37.R3f-8f    00:43:00  00:18:00
38.N8a-7c    00:43:00  01:27:00
39.S3i-4h    00:49:00  01:27:00
40.B*6d      00:49:00  01:46:00
41.R8f-8i    01:06:00  01:46:00
42.P*8f      01:06:00  02:38:00
43.S7i-6h    01:13:00  02:38:00
44.P9c-9d    01:13:00  03:00:00

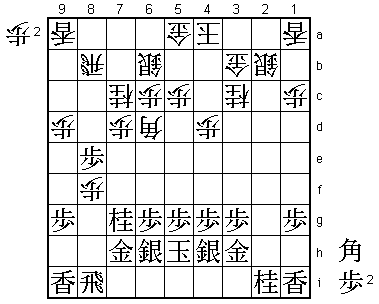
Here white wants to play 44.Nx8e, but after 45.N6e! black has a strong
attack, threatening for example P*7c followed by P*8d. The idea behind
P9d is to prepare an edge attack that makes Nx8e possible. If black
waits until white plays P9e followed by Nx8e, a move like N6e will
have no effect and black will be overrun.

45.P6g-6f!   01:56:00  03:00:00

Played after 43 minutes, which is quite long for a Kio title match game
in which both players only have 4 hours. Some commentators even wondered
if Habu realized he was in trouble and desperately tried to find a way
out. The truth is that Habu found a dangerous looking counter to
Maruyama's edge attack plan and spent his time on checking that it
was the right way to play. 45.P6f is difficult to play, as it opens
op a diagonal to the king.

46.P5c-5d    01:56:00  03:00:00

Necessary to make an escape route for the bishop.

47.G7h-6g!   01:58:00  03:00:00

This is the one-two punch that Habu intended. 47.G6g is also difficult
to play, because it seems to abandon the 8th file and leaves a gaping
hole on 7h. However, black's plan is to play G7f next, forcing white
into action at an inconvenient time.

48.N7cx8e    01:58:00  03:17:00

If Maruyama allows G7f, he will never be able to take this pawn, so he
has to take it now, without the support of P9e.

49.N7g-6e    02:07:00  03:17:00
50.P*2h      02:07:00  03:21:00
51.G3hx2h    02:18:00  03:21:00
52.B6d-4b!   02:18:00  03:25:00

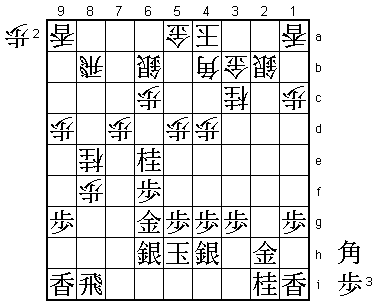
Maruyama shows that he will not go down without a fight. 52.B4b gives
the initiative to Habu, but is also a trap...

53.P*8c!     03:22:00  03:25:00

Avoids the first trap. 53.P*7c P6d P7b+ Rx7b B*8c is tempting, but after
S6c Bx7b+ Sx7b R*8b Px6e Rx7b+ P*2g things are not easy for black.

54.R8bx8c    03:22:00  03:26:00
55.P*7c!     03:22:00  03:26:00

Avoids the second trap. 55.B*7b R8d N7c+ looks good, but again things
are complicated after Nx9g+ B8c+ Rx8c +Nx8c P8g+. It is interesting that
the way Habu plays looks like a flawed combination of the previous two
ideas. Black promoted a bishop by dropping it on the square where the
pawn is supposed to promote. Only a player like Habu can make the
judgement that it is an enhanced version instead of a flawed one.

56.P6c-6d    03:22:00  03:27:00
57.B*7b      03:25:00  03:27:00
58.R8c-8d    03:25:00  03:29:00
59.B7bx5d+   03:25:00  03:29:00
60.P6dx6e!   03:25:00  03:39:00

Maruyama could have made this a long and painful struggle by playing
60.G5b here. It is a proof of his will to win that he didn't even
consider this. He is planning to sacrifice a full bishop to create
winning chances.

61.P7c-7b+   03:25:00  03:39:00
62.S6b-5c    03:25:00  03:51:00
63.+B5d-6c   03:25:00  03:51:00
64.G5a-5b    03:25:00  03:51:00
65.+B6c-7c   03:26:00  03:51:00
66.B4b-5a    03:26:00  03:51:00
67.+B7cx8d   03:27:00  03:51:00
68.B5ax8d    03:27:00  03:51:00
69.R*8a      03:27:00  03:51:00
70.P*5a      03:27:00  03:51:00
71.R8ax8d+   03:27:00  03:51:00
72.N*7e?     03:27:00  03:52:00

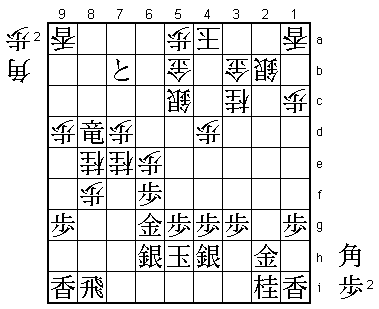
Too bad. White is way behind in material, but still has a solid defence
with four generals and an anchor pawn on 5a. The margin of error is
extremely small, but Maruyama could have made it very difficult for
Habu had he played 72.P*2g here. After 73.G3h Px6f Gx6f P*6f black
has the unpleasant choice between G6g N*6f or Gx6e B*7f P*6g Bx6e and
white threatens N*4f next. It seems like Habu underestimated this line.
In the post-mortem analysis quite some time was spent on this position,
but a clear win for black was not found.

73.+R8dx8e   03:32:00  03:52:00
74.P8f-8g+   03:32:00  03:52:00
75.R8ix8g    03:33:00  03:52:00

Seems like a waste of a rook, but kills white's attack long enough
for a devastating counter attack.

76.P6ex6f    03:33:00  03:52:00
77.G6g-7g    03:33:00  03:52:00
78.N7ex8g+   03:33:00  03:52:00
79.+R8ex8g   03:33:00  03:52:00
80.P*8f      03:33:00  03:52:00
81.+R8g-8i   03:33:00  03:52:00
82.P*2g      03:33:00  03:52:00
83.G2h-3h    03:33:00  03:52:00
84.B*2h      03:33:00  03:52:00
85.N*2d      03:37:00  03:52:00

The decisive move. Black is one move earlier than white.

86.G3b-4b    03:37:00  03:53:00
87.P*6c      03:42:00  03:53:00
88.B2hx1i+   03:42:00  03:56:00
89.P6c-6b+   03:42:00  03:56:00
90.S5cx6b    03:42:00  03:56:00
91.+P7bx6b   03:42:00  03:56:00
92.G5bx6b    03:42:00  03:56:00
93.N*5d      03:42:00  03:56:00
94.G6b-5c    03:42:00  03:56:00
95.B*2a      03:46:00  03:56:00
96.P2g-2h+   03:46:00  03:56:00
97.N5dx4b+   03:47:00  03:56:00
98.K4ax4b    03:47:00  03:56:00
99.S*5d      03:47:00  03:56:00
Resigns      03:47:00  03:56:00

Black threatens mate with 101.G*4c and after 100.L*4c, 101.G*6c is
hisshi. A fine win for Habu to start his bid for a 13th consecutive
Kio title. Winning the first game in a 5-game title match is big and
beating Maruyama in his favourite opening is even more important. There
is now a lot of pressure on Maruyama to win the second game.
