27th Kio Match Game 3
Black: Sato Yasumitsu, Challenger
White: Habu Yoshiharu, Kio
27th Kio-sen, Game 3, February 25th 2002
1.P7g-7f     00:00:00  00:00:00
2.P3c-3d     00:00:00  00:01:00
3.P2g-2f     00:00:00  00:01:00
4.P4c-4d     00:00:00  00:01:00
5.P2f-2e     00:00:00  00:01:00
6.B2b-3c     00:00:00  00:01:00
7.S3i-4h     00:01:00  00:01:00
8.R8b-4b     00:01:00  00:02:00

Habu and Sato change openings every game. This time it is Habu's turn
to play the ranging rook.

9.K5i-6h     00:01:00  00:02:00
10.P9c-9d    00:01:00  00:02:00
11.K6h-7h    00:05:00  00:02:00
12.S3a-3b    00:05:00  00:02:00
13.P5g-5f    00:05:00  00:02:00
14.S3b-4c    00:05:00  00:03:00
15.S4h-5g    00:09:00  00:03:00
16.S7a-7b    00:09:00  00:05:00
17.P3g-3f    00:09:00  00:05:00
18.K5a-6b    00:09:00  00:11:00
19.B8h-7g    00:09:00  00:11:00
20.K6b-7a    00:09:00  00:15:00
21.K7h-8h    00:09:00  00:15:00
22.K7a-8b    00:09:00  00:28:00
23.L9i-9h?!  00:11:00  00:28:00

Sato aims for the anaguma, but in this game this castle is never
realized. In the end, having the lance on 9h instead of 9i becomes
significant, so after the game Sato said he regretted the timing of
this move.

24.S4c-5d    00:11:00  00:29:00
25.P6g-6f    01:01:00  00:29:00
26.R4b-3b    01:01:00  00:51:00
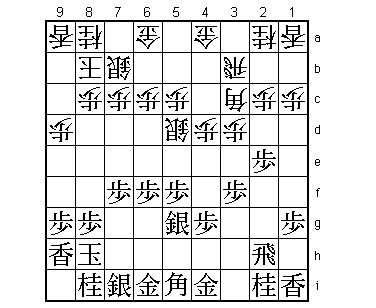
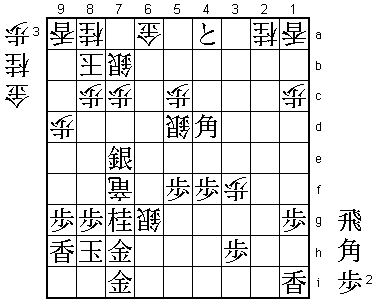
27.B7g-5i!?  01:18:00  00:51:00

The most important moment in the opening. Habu has just moved the rook
to 3b to change the attack to the third file. Sato is defending against
this with 27.B5i, as 28.B4b can be answered with 29.B2f and because
white now has to defend the pawn on 4d with 30.S4c, black gets the
time to move in the anaguma with 31.K9i. Of course, Habu can't allow
that and with the bishop no longer on the main diagonal, this is the
time to try and attack. Sato of course knew this before playing 27.B5i,
so he felt confident that he could counter this attack: a "come and get
me if you can" strategy.

28.P4d-4e    01:18:00  01:33:00
29.G4i-5h    01:21:00  01:33:00
30.P6c-6d    01:21:00  01:34:00
31.G6i-7h    01:37:00  01:34:00
32.P6d-6e    01:37:00  02:02:00
33.B5i-7g    01:42:00  02:02:00

Moving back, but Sato has achieved his objective of an early fight, so
the bishop maneuver has not been a waste of time.

34.P6ex6f    01:42:00  02:05:00
35.S5gx6f    01:44:00  02:05:00
36.P*6e      01:44:00  02:11:00
37.S6f-7e    01:50:00  02:11:00
38.B3cx7g+   01:50:00  02:18:00
39.N8ix7g    01:50:00  02:18:00
40.R3b-4b    01:50:00  02:18:00
41.B*5g      02:12:00  02:18:00
42.P4e-4f    02:12:00  02:26:00
43.P4gx4f    02:13:00  02:26:00
44.P3d-3e    02:13:00  02:26:00
45.P2e-2d    02:15:00  02:26:00
46.P3ex3f    02:15:00  02:28:00
47.P2dx2c+   02:16:00  02:28:00

This is an important tokin, so black seems to have the upper hand here.

48.P*2g      02:16:00  02:30:00
49.R2hx2g    02:22:00  02:30:00
50.B*4i      02:22:00  02:30:00
51.R2g-2h    02:22:00  02:30:00
52.B4ix5h+   02:22:00  02:31:00
53.R2hx5h    02:22:00  02:31:00
54.G*4g      02:22:00  02:31:00
55.R5h-5i    02:28:00  02:31:00
56.G4gx5g    02:28:00  02:36:00
57.R5ix5g    02:28:00  02:36:00
58.R4bx4f    02:28:00  02:36:00
59.P*4g      02:47:00  02:36:00
60.B*4h      02:47:00  02:46:00

61.P4gx4f    03:10:00  02:46:00

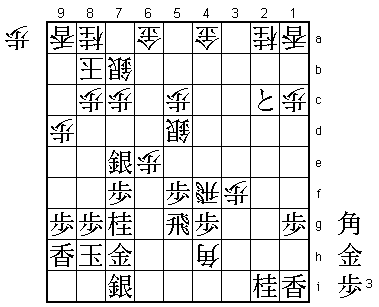
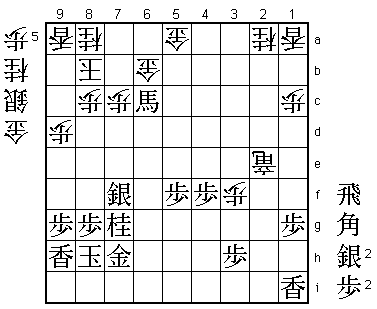
So far things have been going well for black, but in the previous moves
there must have been some mistake in Sato's calculations. Exchanging the
rook is not what black wants in this position, but 61.R6g fails to 62.Rx5f.
It is now Habu who seems to be in control again.

62.B4hx5g+   03:10:00  02:46:00
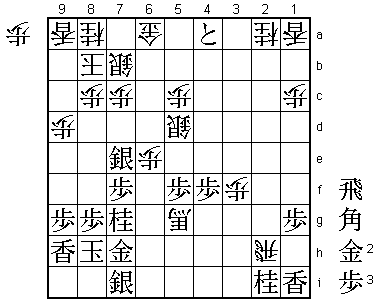
63.+P2c-3b?  03:11:00  02:46:00

Better was 63.P*6b G7a G*6a R*2h Gx7a Kx7a G*6a Sx6a Px6a+ and the white
king is quite exposed.

64.R*2h      03:11:00  03:02:00
65.+P3bx4a?  03:11:00  03:02:00

Underestimates the next move.

66.P6e-6f!   03:11:00  03:08:00

Sato only considered 66.Rx2i+ after which 67.G*8i is a good defense.
Habu's move is much stronger.

67.G*6h      03:24:00  03:08:00
68.+B5gx6h   03:24:00  03:12:00
69.S7ix6h    03:24:00  03:12:00
70.G*6g      03:24:00  03:12:00
71.G*7i      03:24:00  03:12:00
72.G6gx7h    03:24:00  03:13:00
73.G7ix7h    03:24:00  03:13:00
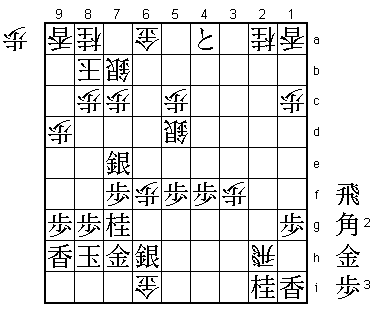
74.G*6i!?    03:24:00  03:15:00

A difficult decision. White has the option here to make sennichite
with 74.G*6g G*7i Gx7h Gx7h G*6g etc. Habu is a little ahead of time
and also playing with the white pieces, so a sennichite is not bad for
him. Also, it is far from clear in this position that white has anything
more than the replay with reversed colors. Avoiding sennichite here is
a good sign of Habu's fighting spirit and also has the psychological
effect of showing Sato that Habu thinks he can win this position.
Objectively, this may not be the case, but Sato might lose some
confidence in his position here. This effect is further enhanced by
Habu taking only 2 minutes to make this decision.

75.P*3h      03:33:00  03:15:00

Sato actually thought that white should have taken the sennichite.
Here, he considered 75.B*5g but didn't play this, as 76.Gx6h Bx6h
followed by another drop on 6g will again lead to sennichite. Sato
didn't want to give Habu another chance for a replay here, so he
played this pawn drop defense tesuji.

76.G6ix6h    03:33:00  03:36:00

Not good is 76.+Rx3h G*5i Gx5i B*1f +Rx2i Bx6a+ Sx6a R*3b G*6b +P5a
G5h P*6i! as it now becomes very difficult to attack the black king.

77.G7hx6h    03:33:00  03:36:00
78.R2hx2i+   03:33:00  03:36:00
79.P*6i?     03:34:00  03:36:00

A serious mistake. After 79.G*8i S*6g P*6i Sx7f+ +P5a Gx5a G*7h
+Sx7e B*6d it seems that black has the initiative in the attacking
race.

80.P6f-6g+   03:34:00  03:36:00
81.G6hx6g    03:36:00  03:36:00
82.+R2ix6i   03:36:00  03:36:00
83.G*7i      03:38:00  03:36:00
84.+R6ix6g   03:38:00  03:36:00
85.G*7h      03:38:00  03:36:00
86.+R6gx7f   03:38:00  03:36:00
87.B*4d      03:44:00  03:36:00
88.S*6g?     03:44:00  03:41:00

The thick defense 88.S*6b was better. After 88.S*6g, winning has
gotten quite complicated.

89.+P4a-5a   03:47:00  03:41:00
90.G6ax5a    03:47:00  03:43:00
91.B4dx5c+   03:48:00  03:43:00
92.G*6b      03:48:00  03:44:00
93.+B5cx5d   03:52:00  03:44:00
94.S6gx7h+   03:52:00  03:44:00
95.G7ix7h    03:52:00  03:44:00
96.+R7fx7e   03:52:00  03:44:00
97.S*7f      03:52:00  03:44:00
98.+R7e-2e   03:52:00  03:46:00
99.P*6c      03:54:00  03:46:00
100.S7bx6c   03:54:00  03:51:00
101.+B5dx6c  03:54:00  03:51:00

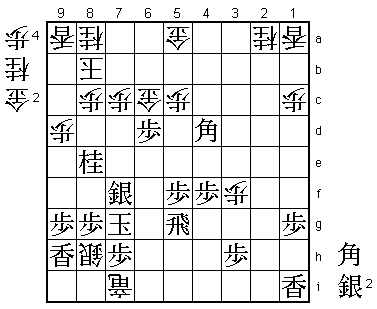
102.+R2e-2i! 03:54:00  03:54:00

Only this move keeps the advantage. Taking the promoted bishop
without thinking would throw away everything: 102.Gx6c P*6d G6c-6b
P*7b!. This threatens B*7a and Kx7b fails to S*6c. Therefore, white
has to take sennichite after Gx7b S*6c G*7a Sx7b+ etc.

103.P*7i     03:58:00  03:54:00

The difference. Because of the bad position of the lance on 9h, white
is threatening mate in one. To defend against this, black has to drop
a pawn here that he can no longer use on 7b.

104.G6bx6c   03:58:00  03:54:00
105.P*6d     03:58:00  03:54:00
106.G6c-6b   03:58:00  03:54:00
107.B*4d?    03:59:00  03:54:00

This makes things too easy for white. Better was 107.S*6c which
threatens mate after R*7b Gx7b sx7b+ Kx7b B*5d. To defend against
this, white's best defense seems to be 108.G*6a, but using this gold
in defense makes it much harder to mate the black king.

108.P*5c     03:59:00  03:56:00
109.S*6c     03:59:00  03:56:00
110.S*6i     03:59:00  03:56:00
111.N7g-8e   03:59:00  03:56:00
112.B*5g     03:59:00  03:56:00
113.R*6g     03:59:00  03:56:00
114.S6ix7h+  03:59:00  03:57:00
115.P7ix7h   03:59:00  03:57:00
116.+R2i-7i  03:59:00  03:57:00
117.K8h-7g   03:59:00  03:57:00
118.G6bx6c   03:59:00  03:57:00
119.R6gx5g   03:59:00  03:57:00
120.S*8h     03:59:00  03:57:00
Resigns      03:59:00  03:57:00

Simple mate after 121.K6g G*6h K6f N*7d K7e G*8d K6e G5d. Another
interesting game, but definitely not a flawless game, especially not
by Sato. An important win with the white pieces for Habu, as he is
now 2-1 up and only one win away from his 12th consecutive Kio title.
