27th Kio Match Game 2
Black: Habu Yoshiharu, Kio
White: Sato Yasumitsu, Challenger
27th Kio-sen, Game 2, February 16th 2002
1.P7g-7f     00:00:00  00:00:00
2.P8c-8d     00:00:00  00:01:00
3.S7i-6h     00:01:00  00:01:00
4.P3c-3d     00:01:00  00:01:00
5.S6h-7g     00:01:00  00:01:00
6.S7a-6b     00:01:00  00:01:00
7.P5g-5f     00:02:00  00:01:00
8.P5c-5d     00:02:00  00:01:00
9.S3i-4h     00:02:00  00:01:00
10.G6a-5b    00:02:00  00:06:00
11.G6i-7h    00:05:00  00:06:00
12.P4c-4d    00:05:00  00:09:00
13.K5i-6i    00:06:00  00:09:00
14.G5b-4c    00:06:00  00:09:00
15.G4i-5h    00:08:00  00:09:00
16.S3a-3b    00:08:00  00:10:00
17.B8h-7i    00:10:00  00:10:00
18.B2b-3a    00:10:00  00:10:00
19.P3g-3f    00:11:00  00:10:00
20.B3a-6d    00:11:00  00:24:00
21.N2i-3g    00:19:00  00:24:00
22.K5a-4b    00:19:00  00:32:00
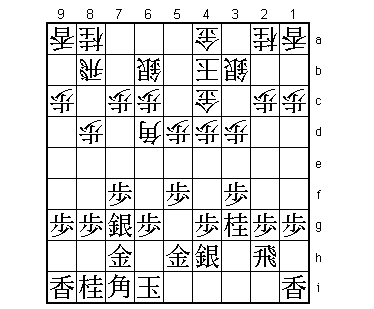
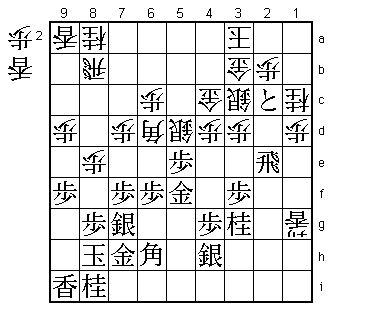
The first Yagura game in this double title match between Habu and
Sato (they also play in the Osho). Sato plays one of his new ideas
that he has been using with quite a lot of success: a left mino castle
where the silver is not moving up to 3c. The general strategic idea is
that keeping the silver on 3b and the gold on 4a strengthens the center
and also saves two moves. White wants to use these extra moves to start
a quick fight in the center.

23.P6g-6f    00:24:00  00:32:00
24.K4b-3a    00:24:00  00:32:00
25.G5h-6g    00:24:00  00:32:00
26.P7c-7d    00:24:00  00:33:00
27.B7i-6h    00:25:00  00:33:00
28.P8d-8e    00:25:00  00:37:00
29.P1g-1f    00:44:00  00:37:00
30.S6b-5c    00:44:00  00:44:00
31.K6i-7i    00:47:00  00:44:00
32.P5d-5e    00:47:00  01:17:00
33.P5fx5e    01:26:00  01:17:00
34.B6dx5e    01:26:00  01:17:00
35.P1f-1e    01:26:00  01:17:00
36.S5c-5d    01:26:00  01:33:00
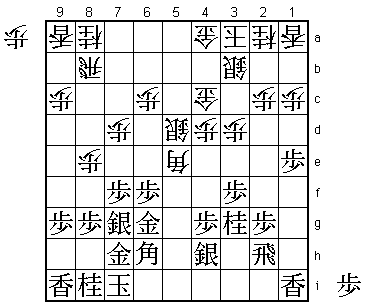
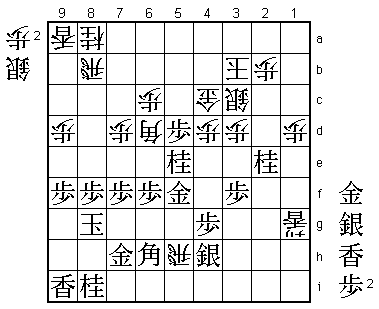
Black wants to play L1g followed by R1h here to start an edge attack.
However, after 37.L1g, white can play 38.S4e and the pawn on 3f is lost.
This is one of the other points of the system that Sato is playing. The
silver on 5d is indirectly defending against the black edge attack.
Hashimoto (4-dan) thought that Habu only had something like 37.R2i here,
but instead Habu strongly pushes forward on the edge.
37.P1e-1d!? 01:42:00 01:33:00
The other alternative 37.R1h is not very effective as white can just
play S3c followed by S2d and move in a normal yagura castle. In that
case, black's edge attack will not be successful.
38.P1cx1d 01:42:00 01:33:00
39.P*1c 01:42:00 01:33:00
40.L1ax1c 01:42:00 01:42:00
41.R2h-1h 01:46:00 01:42:00
42.P2c-2d 01:46:00 01:47:00
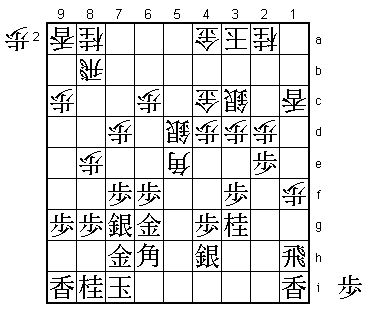
Defending against major pieces by getting them closer.
43.B6hx2d 01:49:00 01:47:00
44.S3b-3c 01:49:00 01:55:00
45.B2d-6h 01:58:00 01:55:00
46.P*2d 01:58:00 02:36:00
Here the commentators in the press room expected 46.R2b, which looks
very strong as it defends against N2e and threatens to promote the
rook. For example, 47.R2h is followed by 48.S4e and black is in
trouble. However, Sato realized in time that black had the hidden
reply 47.P*1b! against 46.R2b. Then, 48.Rx1b N2e and 48.Rx2g+ P1a+
are both good for black. Normally a promoted rook is worth more than
a promoted pawn, but in this case the threat of +Px2a followed by
Bx1c+ is quite severe. After 41 minutes Sato decided to play the
defensive 46.P*2d instead. Habu has won the opening battle.
47.P2g-2f 02:09:00 02:36:00
48.P1d-1e 02:09:00 02:43:00
49.P2f-2e 02:22:00 02:43:00
50.P1e-1f 02:22:00 02:44:00
White may be in trouble, Sato stills defends strongly and actively.
Black has a lot of options and that is not always a good thing.
51.P*1e 02:55:00 02:44:00
52.L1cx1e 02:55:00 02:45:00
53.R1h-2h 02:55:00 02:45:00
54.P1f-1g+ 02:55:00 02:51:00
55.R2h-2f 02:55:00 02:51:00
56.P2dx2e 02:55:00 02:59:00
57.R2fx2e 02:55:00 02:59:00
58.P*1d 02:55:00 03:00:00
59.P*2d 03:12:00 03:00:00
60.P*2b 03:12:00 03:00:00
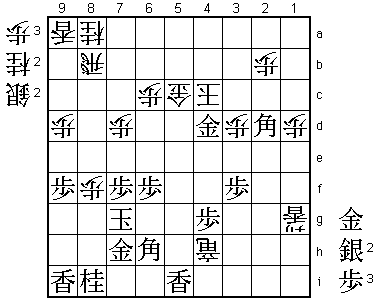
61.K7i-8h! 03:16:00 03:00:00
62.G4a-3b 03:16:00 03:06:00
63.P9g-9f! 03:18:00 03:06:00
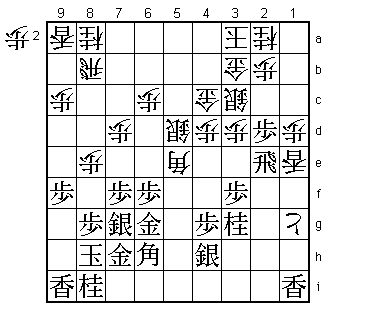
High class play. The timing for playing two defense strengthening
moves like K8h and P9f is extremely difficult. Most players would
try to cash in on their advantage by playing Lx1g followed by G5f
without taking these preliminary defensive measures. The problem is
to judge that the opponent has no moves to improve his position.
This requires a deep understanding of the dynamics of shogi. Actually,
in the press room there were also doubts about black's positions.
Without pawns, wouldn't it be hard to attack? Habu shows why he is Habu.

64.P9c-9d    03:18:00  03:08:00
65.L1ix1g    03:26:00  03:08:00
66.L1ex1g+   03:26:00  03:08:00
67.G6g-5f    03:26:00  03:08:00
68.B5e-6d    03:26:00  03:16:00
69.P*5e      03:28:00  03:16:00
70.N2a-1c?!  03:28:00  03:18:00

Sato judges that he can no longer wait and goes for the mutual
attack. Although Shukan Shogi doesn't give an alternative, it seems
that white can not win the following mating race.

71.P2d-2c+!  03:28:00  03:18:00
Strong. Even with the rook, white's attack is not strong enough.

72.N1cx2e    03:28:00  03:21:00
73.+P2cx3b   03:28:00  03:21:00
74.K3ax3b    03:28:00  03:21:00
75.N3gx2e    03:28:00  03:21:00
76.P8e-8f    03:28:00  03:39:00
77.S7gx8f    03:32:00  03:39:00
78.L*8d      03:32:00  03:41:00
79.P5ex5d    03:36:00  03:41:00
80.L8dx8f    03:36:00  03:41:00
81.P8gx8f    03:36:00  03:41:00
82.P*8g      03:36:00  03:41:00
83.K8hx8g    03:36:00  03:41:00
84.R*5h      03:36:00  03:46:00

It seems that white also has something going here as there is the
strong threat of 86.Rx6h+ Gx6h Bx8f.

85.N*5e!     03:39:00  03:46:00
The perfect reply. 86.Rx6h+ now fails to 87.Nx4c+ Kx4c G*5c and now
either Bx5c Px5c+ Kx5c Gx6h or K3b Gx6h Bx8f S*4c (leading to mate)
and black wins.

86.B6dx5e    03:39:00  03:49:00
87.P5d-5c+!  03:40:00  03:49:00

Another good move to decide the game. 88.Rx5f+ +Px4c Kx4c S*6g
completely stops the white attack.

88.G4cx5c    03:40:00  03:59:00
89.G5fx5e    03:42:00  03:59:00
90.P*8e      03:42:00  03:59:00
91.N2ex3c+   03:49:00  03:59:00
92.K3bx3c    03:49:00  03:59:00
93.B*2d      03:49:00  03:59:00
94.K3c-4c    03:49:00  03:59:00
95.L*5i      03:50:00  03:59:00
96.P8ex8f    03:50:00  03:59:00
97.K8g-7g    03:50:00  03:59:00
98.R5hx4h+   03:50:00  03:59:00
99.G5ex4d    03:50:00  03:59:00
Resigns      03:50:00  03:59:00
And mate after 99.Kx4d (Gx4d G*3c mate) S*3c K4c G*4b Rx4b Sx4b+
K4d S*3c K4e R*4f or 99.K5b Gx5c K6a G*6b Rx6b Gx6b Kx6b B5a+ etc.
A fine win for Habu, to even the match at 1-1. The third game will
be very important in this short best-of-five match.