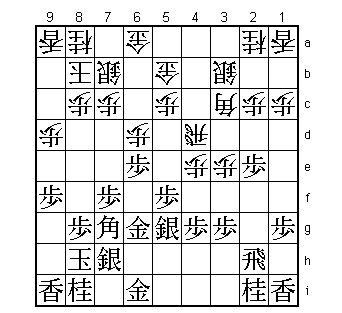
26th Kio Match Game 4
Black: Habu Yoshiharu, Kio
White: Kubo Toshiaki, Challenger
26th Kio-sen, Game 4, March 19th 2001
1.P7g-7f 00:00:00 00:00:00
2.P3c-3d 00:00:00 00:03:00
3.P2g-2f 00:01:00 00:03:00
4.P4c-4d 00:01:00 00:04:00
5.S3i-4h 00:02:00 00:04:00
6.R8b-4b 00:02:00 00:05:00
7.K5i-6h 00:03:00 00:05:00
8.S7a-7b 00:03:00 00:06:00
9.K6h-7h 00:05:00 00:06:00
10.S3a-3b 00:05:00 00:07:00
11.P5g-5f 00:10:00 00:07:00
12.P9c-9d 00:10:00 00:09:00
13.P9g-9f 00:13:00 00:09:00
14.G4a-5b 00:13:00 00:11:00
15.G4i-5h 00:17:00 00:11:00
16.K5a-6b 00:17:00 00:13:00
17.S4h-5g 00:20:00 00:13:00
18.P6c-6d 00:20:00 00:19:00
19.P2f-2e 00:24:00 00:19:00
20.B2b-3c 00:24:00 00:19:00
21.B8h-7g 00:24:00 00:19:00
22.K6b-7a 00:24:00 00:29:00
23.K7h-8h 00:25:00 00:29:00
24.P4d-4e 00:25:00 00:46:00
25.P6g-6f 00:56:00 00:46:00
26.P3d-3e 00:56:00 00:51:00
27.G5h-6g 01:09:00 00:51:00
28.K7a-8b 01:09:00 00:56:00
29.S7i-7h 01:14:00 00:56:00
30.R4b-4d 01:14:00 01:15:00
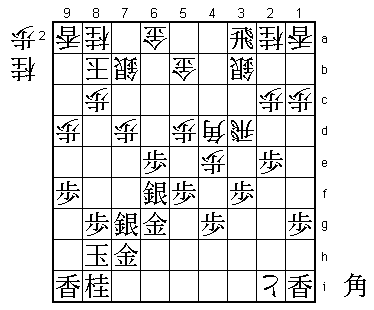
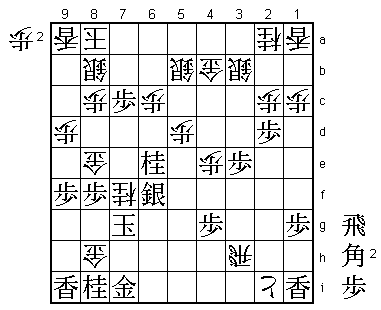
31.P6f-6e? 01:37:00 01:15:00
Positive play, but not good. Black's position is not strong enough for
this early attack. 31.P5e is the normal way to continue here. This leads
to a quiet game with chances for both sides.
32.P6dx6e 01:37:00 01:22:00
33.B7gx4d 01:38:00 01:22:00
34.B3cx4d 01:38:00 01:22:00
35.S7h-7g 01:38:00 01:22:00
36.P5c-5d 01:38:00 01:47:00
37.G6i-7h 01:49:00 01:47:00
38.P3e-3f 01:49:00 01:58:00
39.P3gx3f 02:00:00 01:58:00
40.B*6d 02:00:00 01:58:00
41.R2h-1h 02:00:00 01:58:00
42.P*3g 02:00:00 01:59:00
43.P*6f? 02:21:00 01:59:00
The first of a series of mistakes that change black's position from
difficult to lost. Here 43.R*3i P3h+ R1hx3h Bx1i+ N3g L*1h would still
have been better for white, but black would have had fighting chances.
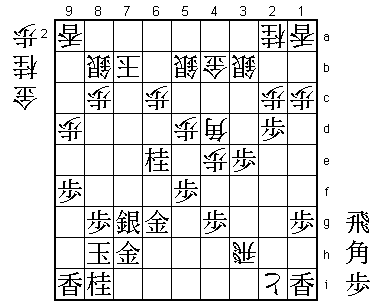
44.P6ex6f 02:21:00 02:07:00
45.S5gx6f 02:21:00 02:07:00
46.P3g-3h+ 02:21:00 02:08:00
47.P*6e 02:22:00 02:08:00
48.B6d-2h+ 02:22:00 02:09:00
49.R1hx2h 02:31:00 02:09:00
50.+P3hx2h 02:31:00 02:09:00
51.P7f-7e? 02:31:00 02:09:00
Better is the knight escape 51.N3g.
52.+P2hx2i 02:31:00 02:40:00
53.P7e-7d 02:31:00 02:40:00
54.P7cx7d 02:31:00 02:40:00
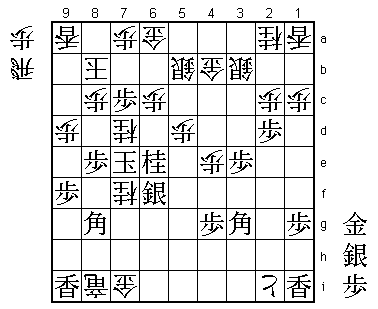
55.R*3a? 02:43:00 02:40:00
Here black should have played 55.B*6d N7c B3a+ instead.
56.R*3d! 02:43:00 02:51:00
Here Habu realised that he had been following the wrong plan. This rook
defends everything and the double threat of winning the rook by B5c or
B2b forces black to take drastic action.
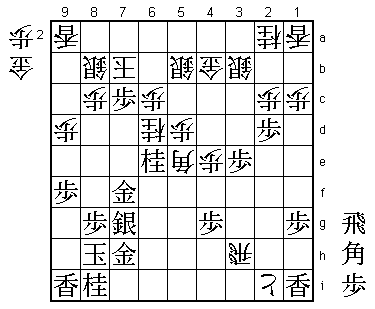
57.B*4a 03:09:00 02:51:00
58.G5b-4b 03:09:00 02:53:00
59.B4a-6c+ 03:09:00 02:53:00
60.S7bx6c 03:09:00 02:58:00
61.R3ax6a+ 03:12:00 02:58:00
62.B*7b 03:12:00 03:05:00
63.P6e-6d 03:13:00 03:05:00
64.S6c-5b 03:13:00 03:05:00
65.+R6ax7b 03:13:00 03:05:00
66.K8bx7b 03:13:00 03:05:00
67.S6f-6e 03:13:00 03:05:00
68.P*6b 03:13:00 03:07:00
69.S6ex7d 03:27:00 03:07:00
70.P*7c 03:27:00 03:09:00
71.P6d-6c+ 03:27:00 03:09:00
72.P6bx6c 03:27:00 03:14:00
73.S7dx7c+ 03:27:00 03:14:00
74.N8ax7c 03:27:00 03:16:00
75.P*7d 03:27:00 03:16:00
76.S*6b 03:27:00 03:20:00
77.P7dx7c+ 03:27:00 03:20:00
78.S6bx7c 03:27:00 03:20:00
79.G*3e 03:31:00 03:20:00
80.R3dx3e 03:31:00 03:21:00
81.P3fx3e 03:31:00 03:21:00
82.R*3h 03:31:00 03:23:00
83.N*6e 03:35:00 03:23:00
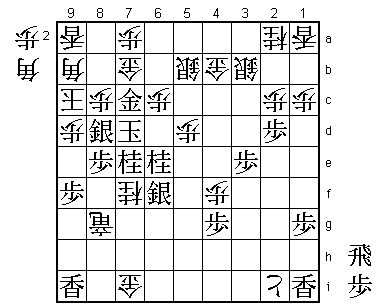
84.S7c-8b 03:35:00 03:28:00
Kubo has defended naturally and Habu's attack has finally run out of
steam. Kubo is winning, but the next move is truly amazing.
85.P2e-2d! 03:37:00 03:28:00
This move can only be called a Habu special. It seems to be a completely
random move far away from the king. In shogi it is impossible to pass,
so black has to play something and P2d just seems a move to obey this
rule. Still, this move is probably the reason for what follows.

86.P*7f      03:37:00  03:33:00

Of course, a professional ignores a move like 85.P2d. However, one
wonders what Habu would have played after 86.Px2d.

87.G6gx7f    03:38:00  03:33:00
88.N*6d      03:38:00  03:35:00
89.P5f-5e    03:41:00  03:35:00
90.B4dx5e    03:41:00  03:43:00
91.P*7c      03:48:00  03:43:00
92.K7b-8a??  03:48:00  03:47:00

It is very unfortunate for Kubo that several mistakes by Habu are wiped
out by one blunder. After 92.K6a R*7d Nx7f Rx7f G*8e P7b+ K5a white
clearly wins. For example, B*1f Rx7h+ Kx7h Gx7f and white's king can
not be mated while black's king can not be defended. On his homepage,
Kanzaki (6-dan) suggested that the reason for Kubo's blunder might have
been the pawn on 2d, which looks like it will play a role in attack if
white's king tries to escape to that side of the board. If this is the
case, 85.P2d must be a textbook example of endgame psychology in shogi.

93.G7f-6f    03:50:00  03:47:00
94.B5ex6f    03:50:00  03:55:00
95.S7gx6f    03:51:00  03:55:00
96.N6d-7f    03:51:00  03:56:00
97.K8h-7g    03:52:00  03:56:00
98.G*8e      03:52:00  03:56:00
99.P8g-8f    03:53:00  03:56:00
100.G*8h     03:53:00  03:57:00

Here Kubo thought he had won. The next move must have hit him hard.

101.G7h-7i!! 03:56:00  03:57:00
Brilliant. Suddenly it becomes clear that white is not winning anymore.
Black's king miraculously finds a way to escape up the board.

102.G8hx7i   03:56:00  03:57:00
103.P8fx8e   03:56:00  03:57:00
104.R3h-7h+  03:56:00  03:57:00
105.K7g-8f   03:56:00  03:57:00
106.+R7hx8i  03:56:00  03:57:00
107.B*8g     03:56:00  03:57:00
108.N*7d?    03:56:00  03:59:00

After this it becomes easy. 108.P*7a would have been white's best chance,
but after 109.R*7d S6a P*6b N8h+ B7f +N7h B*8g black still wins.

109.K8f-7e   03:56:00  03:59:00
110.P*7a     03:56:00  03:59:00
111.R*6b     03:58:00  03:59:00
112.G*6a     03:58:00  03:59:00
113.R6bx8b+  03:58:00  03:59:00
114.K8ax8b   03:58:00  03:59:00
115.B*3g     03:58:00  03:59:00
The decisive move.

116.R*4f     03:58:00  03:59:00

Or 116.R*6d Kx7f and black wins.

117.K7ex7d   03:58:00  03:59:00
118.+R8ix8g  03:58:00  03:59:00
119.N*7e     03:58:00  03:59:00
120.B*9b     03:58:00  03:59:00
121.B3gx4f   03:58:00  03:59:00
122.P4ex4f   03:58:00  03:59:00
123.P7c-7b+  03:58:00  03:59:00
124.G6ax7b   03:58:00  03:59:00
125.G*7c     03:58:00  03:59:00
126.K8b-9c   03:58:00  03:59:00
127.S*8d     03:58:00  03:59:00
Resigns      03:58:00  03:59:00
128.Px8d is a check, but then 129.R*8c leads to mate. After the game
both players looked like they had lost. Kubo will be kicking himself
for missing such a good opportunity to take the match to the final
game. Habu will be very relieved he won, thus gaining his 11th
consecutive Kio title.