26th Kio Match Game 3
Black: Kubo Toshiaki, Challenger
White: Habu Yoshiharu, Kio
26th Kio-sen, Game 3, March 5th 2001
1.P7g-7f     00:00:00  00:00:00
2.P3c-3d     00:00:00  00:01:00
3.P6g-6f     00:01:00  00:01:00
4.P3d-3e     00:01:00  00:02:00

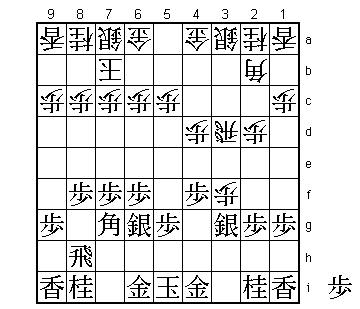
The Ai-furisbisha or Double Ranging Rook. A rarity at this level, although
with the growing popularity of the furibisha, we might see this more and
more. It shows that Habu felt really confident with 2-0 up and never
having lost against Kubo. The ai-furibisha means that he will be
completely playing Kubo's game. A calculated risk, as a loss with white
would not mean too much and a win with this strategy could give Habu a
major psychological advantage in future games.

5.S7i-6h     00:03:00  00:02:00
6.R8b-3b     00:03:00  00:03:00
7.S6h-6g     00:04:00  00:03:00
8.K5a-6b     00:04:00  00:05:00
9.B8h-7g     00:06:00  00:05:00
10.K6b-7b    00:06:00  00:08:00
11.R2h-8h    00:09:00  00:08:00
12.P2c-2d    00:09:00  00:30:00
13.P8g-8f    00:16:00  00:30:00
14.P3e-3f    00:16:00  00:33:00
15.P3gx3f    00:26:00  00:33:00
16.R3bx3f    00:26:00  00:33:00
17.S3i-2h    00:26:00  00:33:00
18.R3f-3d    00:26:00  00:34:00
19.S2h-3g    00:36:00  00:34:00
20.P4c-4d    00:36:00  00:50:00
21.P4g-4f    00:53:00  00:50:00
22.P*3f      00:53:00  01:05:00

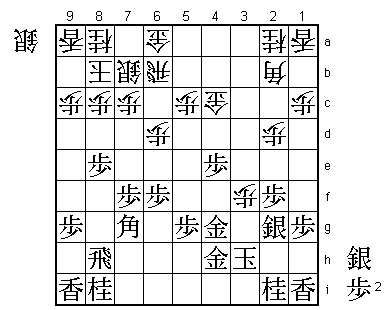
Building a right yagura is generally considered one of the best ways
for black to play the ai-furibisha opening. It requires quite a long
time to build, so in general only black can play this castle. Habu wants
to make this the major point of the opening. By dropping this pawn, he
makes it more difficult for black to finish the castle. However, this
pawn is also very hard to defend and will get lost or exchanged at some
point. The opening battle is if white can use the extra time to get
compensation for this. After the game Habu said that he considered this
opening experiment a failure and that a slow strategy would have been
better.

23.S3g-2h    00:56:00  01:05:00
24.S3a-3b    00:56:00  01:22:00

The more aggressive option is 24.P4e, but after 25.Px4e B5e G3h N3c
S5f B4f G4f white has nothing.

25.G6i-5h    00:59:00  01:22:00
26.S3b-4c    00:59:00  01:22:00
27.G5h-4g    01:00:00  01:22:00
28.S4c-5d    01:00:00  01:28:00
29.S6g-5f    01:02:00  01:28:00
30.K7b-8b    01:02:00  01:46:00
31.P2g-2f    01:19:00  01:46:00
32.S7a-7b    01:19:00  02:00:00
33.P8f-8e    01:30:00  02:00:00
34.P6c-6d    01:30:00  02:10:00
35.K5i-4h    02:08:00  02:10:00
36.R3d-3b    02:08:00  02:22:00
37.K4h-3h    02:14:00  02:22:00
38.G4a-5b    02:14:00  02:23:00
39.G4i-4h    02:19:00  02:23:00
40.G5b-4c    02:19:00  02:25:00
41.S2h-2g    02:24:00  02:25:00
42.P4d-4e    02:24:00  02:25:00
43.S5fx4e    02:46:00  02:25:00
44.S5dx4e    02:46:00  02:27:00
45.P4fx4e    02:46:00  02:27:00
46.R3b-6b    02:46:00  02:27:00

47.P8e-8d!   02:57:00  02:27:00

This tsugifu attack is very strong. Black gets a huge pawn on 8d and
that means a big advantage.

48.P8cx8d    02:57:00  02:27:00
49.P*8e      02:58:00  02:27:00
50.P8dx8e    02:58:00  02:27:00
51.P*8d      02:58:00  02:27:00
52.K8b-7a    02:58:00  02:28:00

No choice. If black is given the chance to play Rx8e with the king on
8b, white's position will be completely destroyed.

53.S2gx3f    03:04:00  02:28:00

There goes the pawn that Habu dropped to start the opening battle. He
has absolutely no compensation for its loss. Kubo has a great position.

54.P6d-6e    03:04:00  02:33:00

Desperately seeking counter chances.

55.S*8c!     03:14:00  02:33:00

Of course 55.Rx8e would be a blunder after 56.P*8b and black's attack is
stopped dead in its tracks.

56.G4c-5d    03:14:00  02:34:00
57.P6fx6e?!  03:20:00  02:34:00

Here Kubo could have played his attack better. After 57.P4d 58.Bx4d and
only then 59.P6e, the game move 60.P*6f can be answered strongly with
61.G4f with the strong threat S4e next. If black gets a gold or bishop
in hand, white will be mated on 8b.

58.P*6f      03:20:00  02:34:00
59.S8cx7b+   03:26:00  02:34:00
60.G6ax7b    03:26:00  02:34:00
61.S*8c      03:26:00  02:34:00
62.S*7d      03:26:00  02:49:00
63.S8cx7d+   03:28:00  02:49:00
64.P7cx7d    03:28:00  02:49:00
65.S*8c      03:28:00  02:49:00

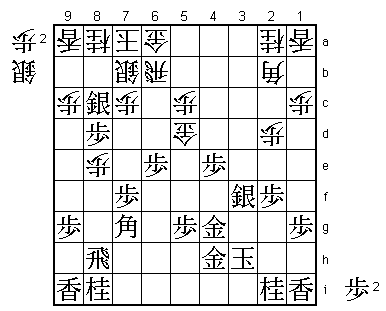
Kubo has gotten a little confused about the right way to play the attack.
Dropping the silver several times on the same square is bad style and
gives Habu a chance to fight back. "Having the silver dropped several times
was unexpected" was Habu's understatement for being very happy about this.

66.G7b-6c    03:28:00  02:49:00
67.P7f-7e    03:30:00  02:49:00
68.P7dx7e    03:30:00  02:54:00
69.R8hx8e    03:31:00  02:54:00
70.K7a-6a    03:31:00  02:59:00
71.P*7b      03:37:00  02:59:00
72.B2b-5e    03:37:00  03:22:00

Moving the gold to 6c on the 66th move has given white the room he needs
to start a counter attack. Kubo still seems to have the edge, but things
have gotten quite complicated.

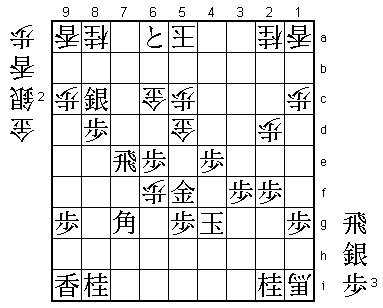
73.P*3g?!    03:39:00  03:22:00

73.P7a+ first would have been better. This forces the white king back to
the black pieces. Allowing the king to run away to 5a later is making
the attack a lot harder.

74.P*4f      03:39:00  03:27:00

An alternative was 74.N7c and after 75.P7a+ K5a +P7b Nx8e +Px6b Gx6b
P5f P*4f Px5e Px4g+ Sx4g P*4f white has good chances. However, the attack
Habu played in the game also looks good.

75.G4g-5f    03:41:00  03:27:00
76.K6a-5a    03:41:00  03:27:00
77.P7b-7a+   03:44:00  03:27:00
78.R6b-3b    03:44:00  03:28:00
79.R8ex7e    03:50:00  03:28:00
80.R3bx3f    03:50:00  03:39:00
81.P3gx3f    03:56:00  03:39:00
82.S*4g      03:56:00  03:39:00
83.G4hx4g    03:57:00  03:39:00
84.P4fx4g+   03:57:00  03:39:00
85.K3hx4g    03:57:00  03:39:00
86.B5ex1i+   03:57:00  03:39:00
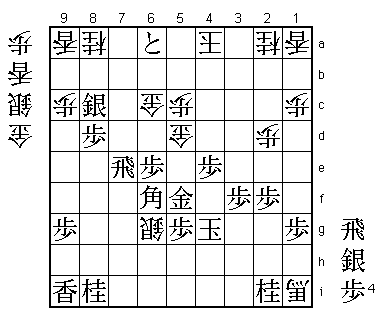
87.+P7a-6a!  03:59:00  03:39:00

Kubo doesn't give up. This is the perfect timing for this check. If he
would have played 87.Bx6f first, he would have missed his chance after
88.S*6g +P6a K4b R7b+ and now white can defend with a pawn drop on 6b.
With the pawn still on 6f, this is not possible.

88.K5a-4a    03:59:00  03:42:00
89.B7gx6f    03:59:00  03:42:00
90.S*6g?     03:59:00  03:49:00

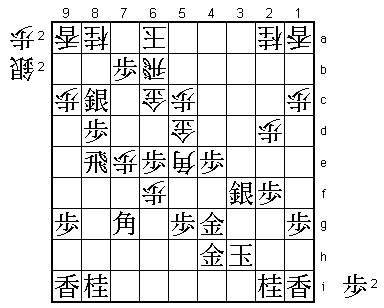
Uncharacteristically, this close endgame ends with a Habu mistake. If
he would have played 90.+Bx2i K5h L*7c the outcome of the game would
still have been unclear. For example S*4c S*4g K6g Sx5f+ Px5f N*5e Bx5e
+Bx5f Kx5f Gx5e Kx5e B*3g N*4f S*5d K5f G*5e K6g P*6f K5h Sx4c and a
position that is very hard to play in byoyomi.

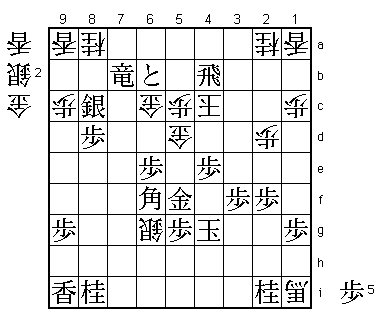
91.S*5b!     03:59:00  03:49:00

This move must have been a great relief for Kubo. It decides his first
win in a title match game and also his first win against Habu.

92.K4ax5b    03:59:00  03:54:00

It only just works: 92.K3b R*2b also wins.

93.R7e-7b+   03:59:00  03:54:00
94.P*6b      03:59:00  03:54:00
95.+P6ax6b   03:59:00  03:54:00
96.K5b-4c    03:59:00  03:54:00
97.R*4b      03:59:00  03:54:00
Resigns      03:59:00  03:54:00

And mate after 98.Kx4b +Px6c K4c (or K3d +R3b and white has no good pieces
to drop) +R5b etc. Habu now has to wait at least another game for his
next Kio title. A good thing of this loss was that Habu is now certain
to break the record for most games in a season that was held by Yonenaga,
who once played 88 official games. Habu now has played 87 games and has
only the Kio match and one game in the Ryu-O tournament to play before
the end of the season. Another Kio game makes sure that he will end the
season with at least 89 games. If Kubo wins the fourth game, Habu can
even get to the magical number of 90 games.
