26th Kio Match Game 1
Black: Kubo Toshiaki, Challenger
White: Habu Yoshiharu, Kio
26th Kio-sen, Game 1, February 14th 2001
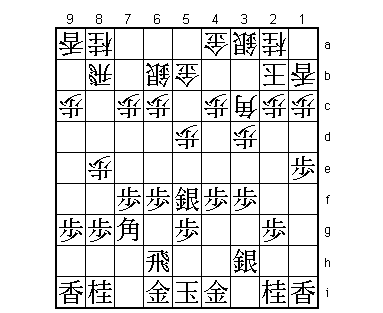
1.P7g-7f 0/0 0/0
2.P3c-3d 0/0 2/2
3.P6g-6f 1/1 0/2
4.P8c-8d 0/1 1/3
5.R2h-6h 1/2 0/3
Kubo is a specialist in both Sankenbisha and Shikenbisha, and his first
title match appearance is started with ranging the rook to the sixth
file. The young challenger (25) said he did not feel any pressure in
his first title match game and just played it like any other game.
Still, the different atmosphere (wearing formal kimono, for example)
must have been special.
6.S7a-6b 0/2 1/4
7.P1g-1f 0/2 0/4
8.K5a-4b 0/2 2/6
9.S3i-3h 1/3 0/6
10.K4b-3b 0/3 1/7
11.S7i-7h 0/3 0/7
12.P5c-5d 0/3 4/11
13.S7h-6g 3/6 0/11
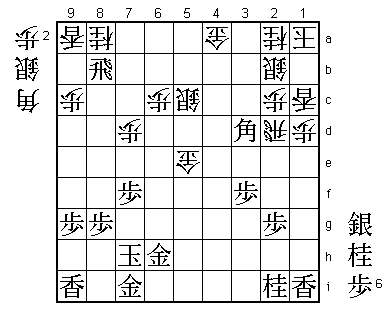
14.G6a-5b 0/6 1/12
15.P1f-1e 1/7 0/12
16.P8d-8e 0/7 6/18
17.B8h-7g 0/7 0/18
18.B2b-3c 0/7 0/18
19.P4g-4f 5/12 0/18
20.K3b-2b 0/12 3/21
21.P3g-3f 5/17 0/21
22.L1a-1b 0/17 3/24
23.S6g-5f 2/19 0/24
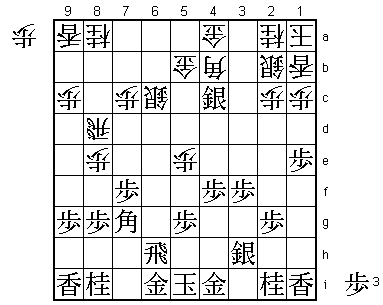
Already it is clear that Kubo is a different kind of Furibisha player
than Ryu-O Fujii. Even though Kubo plays a kind of Fujii system here,
his style is much more aggressive. Fujii plays to take away the
opportunities of the opponent with slow strangulation as the main
goal. Kubo on the other hand, aims for a quick development of his
pieces (sabaki), opening the game as quickly as possible.
24.P5d-5e?! 0/19 19/43
Habu is not afraid. He invites the silver to move up. This move says
"Come and get me if you can". Objectively, this seems a little dubious.
25.S5f-4e 6/25 0/43
26.R8b-8d 0/25 0/43
27.P6f-6e 16/41 0/43
28.K2b-1a?! 0/41 12/55
It is possible that Habu overlooked something here. In the press
room 28.K3b was analysed, which is probably better. However, moving
back the king would show a weak heart, so I doubt that Habu considered
this very long.
29.P6e-6d 18/59 0/55
30.S3a-2b 0/59 24/79
31.S4ex3d 16/75 0/79
32.B3c-4b 0/75 1/80
33.P6dx6c+ 11/86 0/80
34.S6bx6c 0/86 6/86
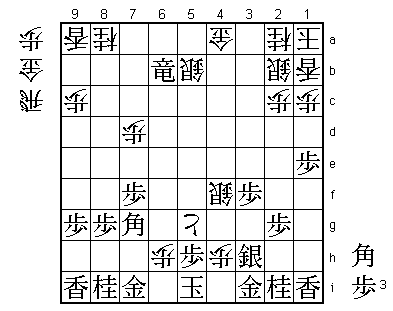
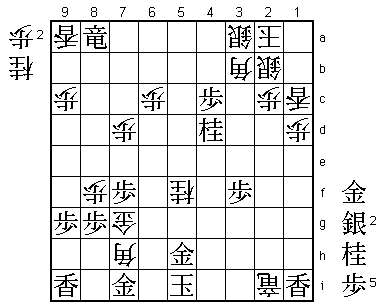
35.S3dx4c= 9/95 0/86
Here Kubo looked in amazement at his own position: "I was very surprised
at how well it was going here". White seems to be completely lost as
Gx4c Rx6c+ is too bad. In the press room it was expected that the
game would be over very soon. However...
36.B4b-6d! 0/95 29/115
Again the shogi gods smile on Habu. It can only be called amazing luck
that white's position is still playable after this move. The difference
in king defence is just enough to give Habu a counter attack.
37.S4cx5b= 12/107 0/115
38.S6cx5b 0/107 3/118
39.G*9e 11/118 0/118
Black wants to play 39.G*7e, but after 40.P*6g Rx6g Bx7e Px7e S*7e
white takes over the game.
40.R8d-7d 0/118 2/120
41.G9ex8e 1/119 0/120
42.P5e-5f 0/119 0/120
43.G8ex7d 1/120 0/120
44.B6dx4f 0/120 0/120
45.R6h-6b+ 47/167 0/120
46.P5fx5g+ 0/167 10/130
47.R*4c 39/206 0/130
In the press room, 47.R*4e was analysed extensively, but after 48.P*6h
Rx4f Px6i+ Kx6i P*6h K7i S*6i (or S*6g) white's attack seems too strong.
48.S*5e 0/206 28/158
49.R4cx4f+ 6/212 0/158
50.S5ex4f 0/212 19/177
51.P*5h 0/212 0/177
52.P*4h 0/212 17/194
53.G4i-3i 1/213 0/194
54.P*6h 0/213 6/200
55.G6i-7i 1/214 0/200
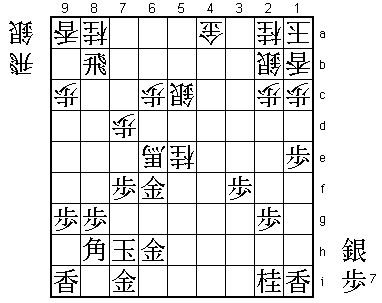
56.P7cx7d? 0/214 13/213
Here it seems that Habu could have won with 56.S4g+!. Taking this
gold gives Kubo the opportunity to regroup his defence.

57.P5hx5g    2/216     0/213
58.P*5f      0/216     1/214
59.P5gx5f    2/218     0/214
60.R*5g      0/218     0/214
61.K5ix6h    0/218     0/214
62.R5gx5f+   0/218     0/214
63.G3ix4h    13/231    0/214
64.P*6c      0/231     5/219
65.B*3d      4/235     0/219
66.G*6g      0/235     7/226
67.K6h-6i    0/235     0/226
68.G6gx7g    0/235     0/226
69.B3dx5f    0/235     0/226
70.B*8d      0/235     0/226
71.N8ix7g    0/235     0/226
72.B8dx4h+   0/235     2/228
73.K6i-7h    1/236     0/228
74.S4f-5g+   0/236     0/228
75.B5f-6e    1/237     0/228
76.+S5g-6g   0/237     0/228
77.K7hx6g    1/238     0/228
78.G*6f      0/238     0/228
79.K6g-7h    0/238     0/228
80.G6fx6e    0/238     0/228
81.N7gx6e    0/238     0/228
82.+B4hx3h   0/238     0/228
83.N6e-5c+   1/239     0/228
84.B*4d      0/239     0/228
85.G*6h      0/239     0/228
86.B4dx5c    0/239     2/230
87.+R6bx5c   0/239     0/230
88.S5bx5c    0/239     0/230
89.B*8h      0/239     0/230

Now the tables have turned in Kubo's favour. White's attack is no
longer strong enough.

90.+B3h-6e   0/239     0/230
91.R*8b      0/239     0/230
92.N*5e      0/239     2/232
93.G*6f?     0/239     0/232
In byoyomi Kubo makes the decisive mistake. Here 93.K8i would have
given him great chances to win. After 94.+B5f G*7h black's king is
completely safe.

94.+B6ex6f   0/239     1/233
95.B8hx6f    0/239     0/233
96.G*5f      0/239     0/233
97.B6fx5e    0/239     0/233
98.G5fx5e    0/239     0/233
99.P1e-1d    0/239     0/233
100.P1cx1d   0/239     0/233
101.P*1c     0/239     0/233
102.L1bx1c   0/239     0/233
103.B*3d     0/239     0/233
104.R*2d!    0/239     1/234
Habu shows some nice defending skills with major pieces here. Usually,
it is hard to defend with bishops and rooks ("Without a gold in hand,
there is no defence"), but here is an exception. This rook defends
against the mating threat P*1b, attacks the attacking bishop and also
will play a decisive role in mating the black king.

105.B3d-4c+  0/239     0/234
106.S5c-4b   0/239     1/235
107.+B4cx4b  0/239     0/235
108.G4ax4b   0/239     0/235
109.R8bx4b+  0/239     0/235
110.S*3a     0/239     1/236
111.+R4b-4a  0/239     0/236
112.G5e-6f   0/239     1/237
113.N*3c     0/239     0/237
114.B*3b     0/239     1/238

The second defensive drop of a major piece. This bishop also threatens
to help in the attack by capturing the pawn on 7f.

115.N3cx2a+  0/239     0/238
116.K1ax2a   0/239     0/238
117.+R4ax8a  0/239     0/238

Tempting is 117.N*3c, but after 118.Sx3c S*1b Kx1b +Rx3a the move
B*2a (another major piece in defence) is winning for white. Capturing
the pawn on 7f next is a mating threat.

118.N*5f     0/239     0/238
119.G6h-5h   0/239     0/238
120.P*8f     0/239     0/238
121.P*4c     0/239     0/238
122.R2dx2g+  0/239     0/238
123.N*4d     0/239     0/238
124.G6f-7g   0/239     1/239
125.K7h-6i   0/239     0/239
126.B*7h     0/239     0/239
127.K6i-5i   0/239     0/239
128.+R2gx2i  0/239     0/239
Resigns      0/239     0/239
Time:        03:59:00  03:59:00
Mate after 129.N*4i N*4g Gx4g P*5h Kx5h B6g+. A great game with both
players attacking and defending almost from the start. Kubo really
showed his great potential here and was unlucky that he could not
start his first title match with a win. This might be important,
as Kubo now desperately needs to win the next one, as 2-0 down in
a best-of-five match against Habu seems hopeless.