25th Ryu-O Match Game 5
[Black "Maruyama Tadahisa, Challenger"]
[White "Watanabe Ryu-O"]
[Event "25th Ryu-O sen, Game 5"]
[Date "November 28th and 29th 2012"]
1.P7g-7f     00:00:00  00:00:00
2.P8c-8d     00:00:00  00:00:00
3.P2g-2f     00:00:00  00:00:00
4.G4a-3b     00:00:00  00:01:00
5.G6i-7h     00:01:00  00:01:00
6.P8d-8e     00:01:00  00:05:00
7.B8h-7g     00:02:00  00:05:00
8.P3c-3d     00:02:00  00:05:00
9.S7i-8h     00:02:00  00:05:00
10.B2bx7g+   00:02:00  00:05:00
11.S8hx7g    00:02:00  00:05:00
12.S3a-4b    00:02:00  00:05:00
13.P9g-9f    00:03:00  00:05:00
14.P9c-9d    00:03:00  00:06:00
15.S3i-3h    00:04:00  00:06:00
16.S7a-7b    00:04:00  00:06:00
17.P4g-4f    00:04:00  00:06:00
18.P6c-6d    00:04:00  00:06:00
19.S3h-4g    00:05:00  00:06:00
20.S7b-6c    00:05:00  00:06:00
21.K5i-6h    00:06:00  00:06:00
22.S6c-5d    00:06:00  00:06:00
23.P1g-1f    00:07:00  00:06:00
24.P1c-1d    00:07:00  00:06:00
25.S4g-5f    00:08:00  00:06:00
26.P4c-4d    00:08:00  00:06:00
27.K6h-7i    00:12:00  00:06:00
28.G6a-5b    00:12:00  00:06:00
29.G4i-5h    00:13:00  00:06:00
30.K5a-4a    00:13:00  00:07:00
31.P3g-3f    00:14:00  00:07:00
32.K4a-3a    00:14:00  00:07:00
33.K7i-8h    00:15:00  00:07:00

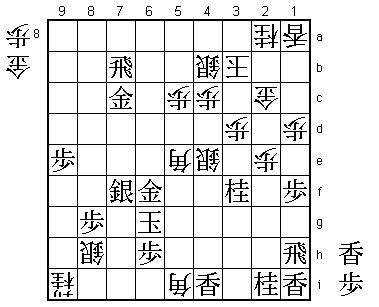
Another Kakugawari opening. Moving the king in the castle early is an unusual way
of playing this position. Normal is 33.P6f, which was also played in the first game.
Black keeps the pawn on 2f for a while, which allows white to attack first, giving
this game the flavor of a reversed Kakugawari opening.

34.P7c-7d    00:15:00  00:10:00
35.G5h-6h    00:24:00  00:10:00
36.N8a-7c    00:24:00  00:29:00
37.P6g-6f    02:02:00  00:29:00
38.K3a-2b    02:02:00  01:16:00
39.P2f-2e    02:51:00  01:16:00
40.S4b-3c    02:51:00  01:16:00
41.P4f-4e    04:37:00  01:16:00
42.B*4f      04:37:00  01:44:00
43.R2h-1h    04:47:00  01:44:00
44.P4dx4e    04:47:00  01:48:00
45.G6h-5h    04:48:00  01:48:00
46.P6d-6e    04:48:00  02:00:00
47.P6fx6e    04:48:00  02:00:00
48.N7cx6e    04:48:00  02:46:00

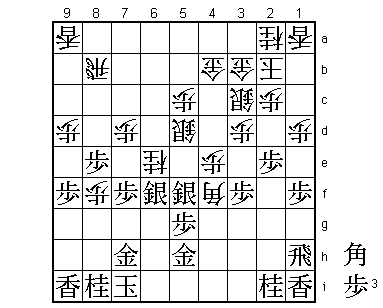
The sealed move. Because he was able to attack first in a position where white usually
has to wait, Watanabe was quite happy with his position at this point.

49.S7g-6f    04:49:00  02:46:00
50.P8e-8f    04:49:00  03:16:00
51.P8gx8f    04:50:00  03:16:00
52.P*8e      04:50:00  03:16:00
53.P8fx8e    04:51:00  03:16:00
54.P*8f      04:51:00  03:16:00
55.K8h-7i    04:58:00  03:16:00
56.G5b-4b    04:58:00  04:57:00

Strengthening the castle and returning the initiative to the opponent is in Watanabe's
style, but here it is more a sign that things are more complicated than he initially
thought. White is supposed to be in the middle of an attack and this is not the type
of move one wants to play then.

57.P3f-3e?   05:14:00  04:57:00

Maruyama seizes the opportunity to counter attack, but he should have been a little
more patient. Correct was 57.P8d Rx8d P*8h. The difference with the game is that the
knight on 6e is not defended by the rook and black still has the pawn in hand.

58.B4fx3e    05:14:00  05:00:00
59.B*7c      05:19:00  05:00:00
60.R8bx8e    05:19:00  05:06:00
61.P*8h      05:19:00  05:06:00
62.B3e-4f    05:19:00  05:07:00

Here white has the better position, was the general opinion in the press room. However,
in reality things are far from easy.

63.B7c-5a+   05:24:00  05:07:00
64.P9d-9e    05:24:00  05:15:00
65.P*4c      06:19:00  05:15:00
66.G4bx4c    06:19:00  05:21:00
67.P*4g      06:19:00  05:21:00
68.B4f-3e    06:19:00  05:31:00
69.+B5a-7c   06:19:00  05:31:00
70.B3e-4d    06:19:00  05:42:00

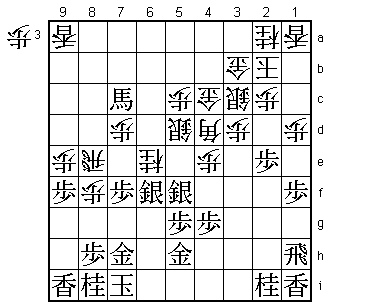
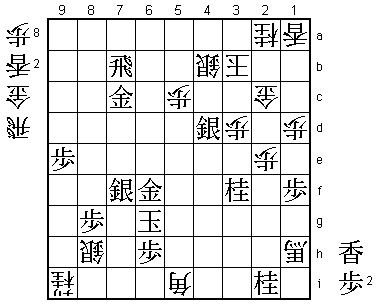
Here the white position looks perfect with a nice solid Yagura, the silver on 5d and the
bishop on 4d, attacking with rook, bishop and knight. Still, Watanabe was far from sure
that his position was good here.

71.S5f-6g    06:25:00  05:42:00
72.P7d-7e?   06:25:00  05:42:00

Giving up the lance leads to a very dangerous position. White should have defended this
lance with 72.R8a. Then 73.Px9e P*9h Lx9h P*9g Lx9g P*9h creates a promoted pawn near
the king and 73.+B7b R3a is also good for white because his king position is very solid
and the bishop and knight attacked combined with three pawns in hand looks strong enough.

73.+B7cx9a   07:00:00  05:42:00
74.P7ex7f    07:00:00  05:42:00
75.+B9a-6d   07:01:00  05:42:00
76.P7f-7g+   07:01:00  05:50:00
77.N8ix7g    07:02:00  05:50:00
78.N6ex7g+   07:02:00  05:50:00
79.S6fx7g    07:02:00  05:50:00
80.N*8g      07:02:00  05:50:00
81.K7i-6h    07:10:00  05:50:00
82.N8gx9i+   07:10:00  05:50:00
83.N*3f      07:16:00  05:50:00
84.B4d-3e    07:16:00  05:56:00
85.+B6d-7d   07:27:00  05:56:00
86.R8e-8a    07:27:00  06:01:00
87.L*2g      07:27:00  06:01:00

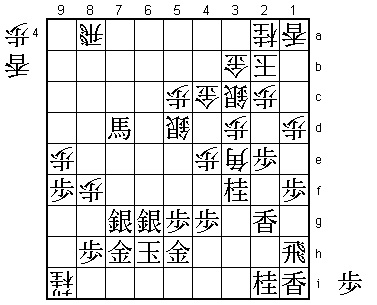
Now the black attack at the head of the king becomes quite a nuisance for white. Also,
if he tries to attack himself, giving up another lance would give black the unstoppable
R2h followed by L*2f.

88.R8a-7a    07:27:00  06:20:00
89.+B7d-8e   07:49:00  06:20:00
90.P4e-4f    07:49:00  06:31:00
91.P4gx4f    07:51:00  06:31:00
92.B3ex4f    07:51:00  06:32:00
93.P2e-2d    07:51:00  06:32:00
94.S3cx2d?   07:51:00  06:37:00

Watanabe feared the joining pawn attack, but giving up this silver only makes his
position worse. He should have played 94.Px2d here, because 95.P*2e Px2e P*2d can be
answered by L*2f and the black attack is stopped.

95.L2gx2d    07:51:00  06:37:00
96.P2cx2d    07:51:00  06:37:00
97.P*4d      07:52:00  06:37:00
98.G4c-3c    07:52:00  06:39:00
99.+B8e-5b   07:53:00  06:39:00
100.P*4b     07:53:00  07:08:00
101.P*2e     07:54:00  07:08:00
102.P2dx2e   07:54:00  07:09:00
103.P9fx9e   07:55:00  07:09:00
104.S5d-4e   07:55:00  07:13:00
105.P*2c     07:55:00  07:13:00
106.G3cx2c   07:55:00  07:22:00
107.S*4c     07:55:00  07:22:00
108.L*5d     07:55:00  07:29:00
109.S4cx3b+  07:55:00  07:29:00
110.K2bx3b   07:55:00  07:29:00
111.S7g-7f   07:55:00  07:29:00
112.L*6d     07:55:00  07:34:00
113.K6h-7g   07:55:00  07:34:00
114.L5dx5g+  07:55:00  07:37:00
115.+B5bx5c  07:55:00  07:37:00
116.R7a-7c   07:55:00  07:37:00
117.G*6c     07:58:00  07:37:00
118.L6dx6g+  07:58:00  07:42:00
119.G7hx6g   07:58:00  07:42:00
120.+L5gx6g  07:58:00  07:42:00
121.G5hx6g   07:58:00  07:42:00
122.P*5b!    07:58:00  07:49:00

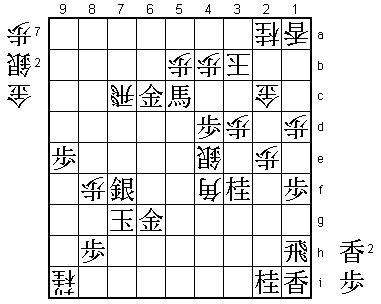
In the press room the position was considered to be a win for Maruyama and thoughts
started already drifting to the next game. However, Watanabe has not given up. With
his back against the wall, he plays some very good defense, confusing the issue. This
pawn drop is very strong.

123.P4d-4c+  07:59:00  07:49:00
124.P4bx4c   07:59:00  07:49:00
125.G6cx7c   07:59:00  07:49:00
126.P5bx5c   07:59:00  07:49:00
127.R*7b     07:59:00  07:49:00
128.S*4b     07:59:00  07:50:00
129.L*4i     07:59:00  07:50:00
130.B4f-5e   07:59:00  07:55:00
131.G6g-6f   07:59:00  07:55:00
132.P8f-8g+  07:59:00  07:56:00
133.P8hx8g   07:59:00  07:56:00
134.B*5i     07:59:00  07:56:00
135.P*6h     07:59:00  07:56:00
136.S*8h     07:59:00  07:58:00
137.K7g-6g   07:59:00  07:58:00

138.B5ex1i+! 07:59:00  07:59:00

In byoyomi, Watanabe plays a perfect endgame. If 138.G*7g K5g first and only then Bx1i+,
black wins after Lx4e +Bx1h Lx4c+ Kx4c L*4d K5d G*5e and mate.

139.L4ix4e   07:59:00  07:59:00
140.+B1ix1h  07:59:00  07:59:00
141.L4ex4c+  07:59:00  07:59:00
142.K3bx4c   07:59:00  07:59:00
143.S*4d     07:59:00  07:59:00

With the king still on 7g, 143.L*4d is not mate.

144.K4c-3b   07:59:00  07:59:00
Resigns      07:59:00  07:59:00

It is unclear if and where Maruyama missed the winning move, but here the outcome is
clear. The white king cannot be mated and black has the mating threat R*7g K5f +Bx2i
which cannot be properly defended. Maruyama resigned here, giving Watanabe his ninth
consecutive Ryu-O title. In the end, this match was decided in the first two games
that Maruyama lost convincingly. Had he played like in the last three games from the
start, Watanabe would have had his hands full.
