25th Ryu-O Match Game 4
[Black "Watanabe Akira, Ryu-O"]
[White "Maruyama Tadahisa, Challenger"]
[Event "25th Ryu-O sen, Game 4"]
[Date "November 20th and 21st 2012"]
1.P7g-7f     00:00:00  00:00:00
2.P3c-3d     00:00:00  00:00:00
3.P2g-2f     00:01:00  00:00:00
4.B2bx8h+    00:01:00  00:00:00
5.S7ix8h     00:01:00  00:00:00
6.S3a-2b     00:01:00  00:01:00
7.S3i-4h     00:04:00  00:01:00
8.S7a-6b     00:04:00  00:03:00
9.P3g-3f     00:05:00  00:03:00
10.P6c-6d    00:05:00  00:04:00
11.P2f-2e    00:06:00  00:04:00
12.S2b-3c    00:06:00  00:05:00
13.S4h-3g    00:07:00  00:05:00
14.S6b-6c    00:07:00  00:05:00
15.K5i-6h    00:08:00  00:05:00
16.S6c-5d    00:08:00  00:06:00
17.S8h-7g    00:10:00  00:06:00
18.P4c-4d    00:10:00  00:10:00
19.K6h-7h    00:11:00  00:10:00
20.G6a-5b    00:11:00  00:11:00
21.P5g-5f    00:13:00  00:11:00
22.P8c-8d    00:13:00  00:27:00
23.S3g-4f    00:16:00  00:27:00
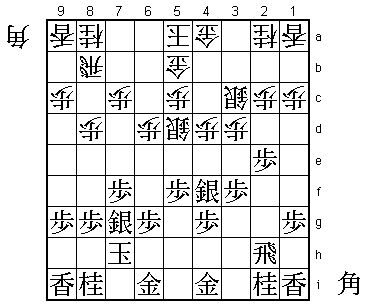
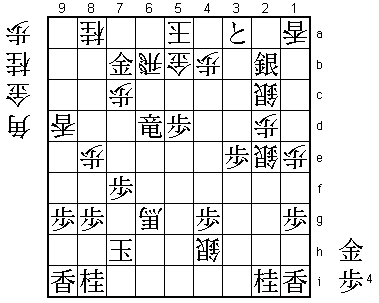
Including the last Ryu-O match, this position has now appeared four times and
black has won all of these games. "Don't push the central pawn in the Kakugawari"
is a well-known advice because without the pawn on 5g, there is always the risk of
a bishop drop on 3i. However, in this position the gold on 4i is defending against
this bishop drop. On the other hand, if black exchanges silvers on the third file
this can be followed by a pawn push on the central file that will force the white
pawn away from 5d, creating important weaknesses in the white camp. Because of this,
the black formation is considered to be a good way to attack the Kakugawari.

24.K5a-4b    00:16:00  00:28:00
25.P3f-3e    00:18:00  00:28:00
26.S5d-4c    00:18:00  00:28:00
27.P3ex3d    00:20:00  00:28:00
28.S4cx3d    00:20:00  00:28:00
29.P*3f      00:20:00  00:28:00
30.K4b-3b    00:20:00  00:29:00
31.S4f-3e    00:22:00  00:29:00
32.S3dx3e    00:22:00  00:37:00
33.P3fx3e    00:22:00  00:37:00
34.P8d-8e    00:22:00  00:44:00
35.G6i-6h    00:23:00  00:44:00
36.G4a-4b    00:23:00  00:56:00
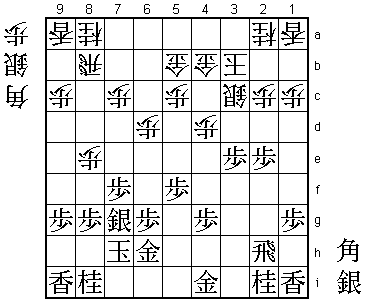
37.S*1e?!    00:52:00  00:56:00

Watanabe is the first to change play from the second game. This silver is threatening
P2d next, breaking through on the second file, but the real idea behind Watanabe's
move is to force the silver into a wall position with S2b and then simply exchange
the pawns on the second file. However, this idea doesn't work because Maruyama has
a perfect reply.

38.B*4e!     00:52:00  01:25:00

This bishop drop is very strong and either overlooked or underestimated by Watanabe.
It is kind of an awkward position to drop the bishop, but it is defending the weak
point 2c, attacking the pawn on 5f and as we will see will create all kinds of other
problems for black.

39.G4i-3h    00:59:00  01:25:00

To defend against moves like P*2g after an exchange of pawns on the second file.

40.S3c-2b    00:59:00  02:08:00

Tempting is 40.P1d, but this fails to 41.P2d Px1e P4f Bx5f G5g and now both B9b and
Bx3h+ fail to Px2c+ (which is a check).

41.P2e-2d    01:41:00  02:08:00
42.P2cx2d    01:41:00  02:08:00
43.R2hx2d    01:41:00  02:08:00
44.P*2c      01:41:00  02:46:00
45.R2dx4d    01:57:00  02:46:00
46.B4ex5f    01:57:00  02:46:00
47.R4d-4f    02:28:00  02:46:00
48.P8e-8f    02:28:00  02:50:00
49.S7gx8f    03:20:00  02:50:00
50.S*5e      03:20:00  02:56:00
51.R4f-2f    03:24:00  02:56:00
52.P1c-1d    03:24:00  02:57:00
53.B*7g      03:35:00  02:57:00
54.P5c-5d    03:35:00  02:58:00

55.G6h-5g 03:41:00 02:58:00
In the press room 55.Rx5f Sx5f B*4d was analyzed which threatens both Bx2b+ and B7b+.
For example, P5e B7a+ R8c +B7b R8d S7e R8e and black has the option to escape with
sennichite after S8f R8d S7e. Watanabe abandoned this idea because B*4d can be answered
with P*3c and after B7a+ R8c +B7b R8d S7e R8e there is no sennichite because after S8f
white can play Rx3e (the white pawn is still on 5d in this variation).
56.B5f-9b 03:41:00 03:00:00
57.P*5f 03:41:00 03:00:00
58.P*8e 03:41:00 03:01:00
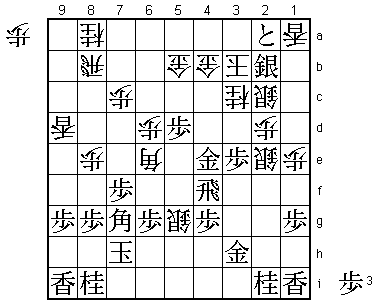
59.S8f-9e 04:24:00 03:01:00
The sealed move. It must have been a long night for Watanabe, because this silver is
going to be picked up for free. Watanabe already thought the black position was hopeless
here.
60.P1dx1e 04:24:00 03:21:00
61.P5fx5e 04:24:00 03:21:00
62.P9c-9d 04:24:00 03:24:00
63.S9ex9d 04:25:00 03:24:00
64.B9b-6e 04:25:00 03:25:00
65.P5ex5d 04:46:00 03:25:00
66.L9ax9d 04:46:00 03:38:00
67.P*2d 04:46:00 03:38:00
68.P2cx2d 04:46:00 03:44:00
69.P*2c 04:46:00 03:44:00
70.S2bx2c 04:46:00 03:45:00
71.P*2b 04:46:00 03:45:00
72.N2a-3c 04:46:00 04:46:00
73.P2b-2a+ 04:46:00 04:46:00
74.P*5f 04:46:00 05:31:00
75.G5gx5f 04:51:00 05:31:00
76.S*2e 04:51:00 05:32:00
77.R2f-4f 05:17:00 05:32:00
78.P*4e 05:17:00 05:40:00
79.G5fx4e 05:17:00 05:40:00
80.S*5g 05:17:00 05:48:00
81.S*2b      05:31:00  05:48:00

This threatens mate with S3a+ K4c G*4d, but white can easily defend. However, black
didn't have any alternative. For example, 81.G4h Sx4f+ Gx4f Kx2a and the black attack
is stopped.

82.K3b-4a!   05:31:00  06:01:00

This early escape with the king is very strong.

83.G3h-4h    05:35:00  06:01:00

Tries to bring the passive gold into play, forcing the white silver into a bad position,
but again Maruyama has the right answer.

84.N3cx4e!   05:35:00  06:27:00

Black was hoping to pick up this knight with the silver on 2b, but with the knight gone,
this silver swings at nothing but air. Of course, this knight move needed careful
calculation because it releases the black rook which was supposed to be captured,
adding some considerable punch to the black attack.

85.R4fx4e    06:19:00  06:27:00
86.S5gx4h=   06:19:00  06:45:00
87.B7g-3c+   06:22:00  06:45:00
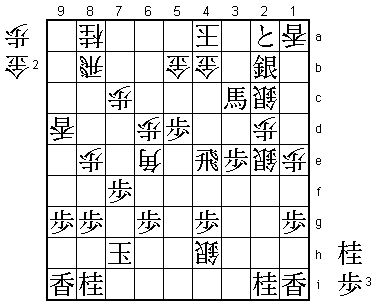
88.B6e-5f!   06:22:00  07:01:00

Maruyama is known for winning games by taking away all of the opponent's attacking
options before attacking himself, but here he shows another side of himself. He is
allowing black a number of strong looking attacking moves, but has judged that he can
survive them all and win quickly himself. In the press room 88.K5a was analyzed, but
after +Bx4b Gx4b N*6c black wins. The difference between the bishop being on 6e or
being on 5f is huge as we will see a little later.

89.N*4c      06:59:00  07:01:00

Or 89.+P3a K5a +Bx4b Gx4b N*6c and now K6a loses to Rx4b+ and hisshi while there is
no mate against the black king. However, N*6c can be answered strongly with K6b! and
after Rx4b+ Kx6c P5c+ K7d the white king escapes while white now has a mating threat
with the knight drop on 6f.

90.G5bx4c    06:59:00  07:07:00
91.+B3cx4c   06:59:00  07:07:00
92.G4bx4c    06:59:00  07:19:00
93.R4ex4c+   06:59:00  07:19:00

This looks very dangerous, but can be defended.

94.P*4b      06:59:00  07:21:00

This stops the black attack long enough to win the mating race.

95.+P2a-3a   06:59:00  07:21:00
96.K4a-5a    06:59:00  07:21:00
97.+R4c-5c   06:59:00  07:21:00
98.G*5b      06:59:00  07:28:00
99.+R5cx6d   06:59:00  07:28:00
100.R8b-6b   06:59:00  07:28:00
101.G*7b     06:59:00  07:28:00
102.B5fx6g+  06:59:00  07:28:00
Resigns      06:59:00  07:28:00
Mate after both 102.Kx6g Rx6d P*6f R*5g etc. or 102.+Rx6g Rx6g+ Kx6g R*5g K6f B*5e
etc. so Watanabe resigned here. Maruyama finally wins a game in this match and in
great style. This will give his confidence a boost and for the neutral spectator
there is some hope that this match will become interesting again. Maruyama has the
black pieces in game 5, giving him an excellent chance to further close the gap.