25th Ryu-O Match Game 2
[Black "Watanabe Akira, Ryu-O"]
[White "Maruyama Tadahisa, Challenger"]
[Event "25th Ryu-O sen, Game 2"]
[Date "October 31st and November 1st 2012"]
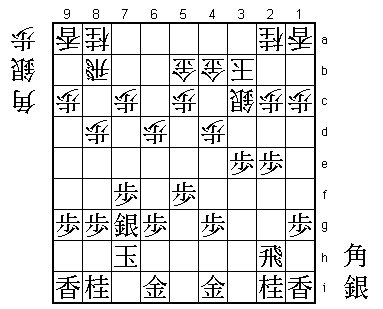
1.P7g-7f 00:00:00 00:00:00
2.P3c-3d 00:00:00 00:00:00
3.P2g-2f 00:01:00 00:00:00
4.B2bx8h+ 00:01:00 00:00:00
The Kakugawari with tempo loss is what Maruyama played in the Ryu-O match last
year as well, so this was no surprise.
5.S7ix8h 00:01:00 00:00:00
6.S3a-2b 00:01:00 00:00:00
7.S3i-4h 00:04:00 00:00:00
8.S7a-7b 00:04:00 00:00:00
9.P3g-3f 00:05:00 00:00:00
10.P6c-6d 00:05:00 00:00:00
11.P2f-2e 00:06:00 00:00:00
12.S2b-3c 00:06:00 00:01:00
13.S4h-3g 00:06:00 00:01:00
14.S7b-6c 00:06:00 00:01:00
15.K5i-6h 00:07:00 00:01:00
16.S6c-5d 00:07:00 00:02:00
17.K6h-7h 00:08:00 00:02:00
18.P4c-4d 00:08:00 00:04:00
19.S8h-7g 00:09:00 00:04:00
20.G6a-5b 00:09:00 00:05:00
21.P5g-5f 00:10:00 00:05:00
22.P8c-8d 00:10:00 00:06:00
23.S3g-4f 00:11:00 00:06:00
24.K5a-4b 00:11:00 00:07:00
25.P3f-3e 00:17:00 00:07:00
26.S5d-4c 00:17:00 00:08:00
27.P3ex3d 00:17:00 00:08:00
28.S4cx3d 00:17:00 00:09:00
29.P*3f 00:17:00 00:09:00
Here 29.P*3e can be played as well. For example, 30.S4c S3g G5b S3f and even
though the silver on 3f is in a good position, it will not be exchanged for a
defending silver any time soon. With 29.P*3f, black can play S3e next (as in
the game) and exchange the attacking silver. This is a more active way of playing
the silver. However, in the end the black silver is only exchanged for the white
right silver (not the defending silver) so this silver exchange is not necessarily
good for black.
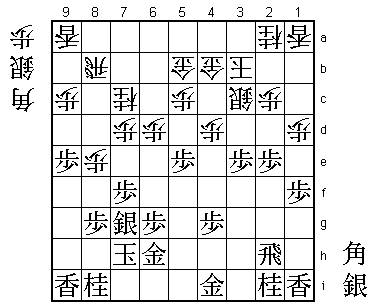
30.K4b-3b 00:17:00 00:23:00
31.S4f-3e 00:20:00 00:23:00
32.S3dx3e 00:20:00 00:27:00
33.P3fx3e 00:20:00 00:27:00
34.G4a-4b 00:20:00 00:40:00
This is the position that Maruyama was aiming for. In the past, the normal way
of playing was to put the king on 2b and the gold on 3b. However, a drawback of
this shape is that the gold on 3b is not connected to the gold on 5b. A good
plan for black is the play P5e threatening P5d Px5d P3d Sx3d B*7a. Also, at
some point S*7a R7b B*6a can become a problem. In any case, white needs to be
very careful. The king on 3b is closer to the black attack, which will use the
pawn on 3e as an attacking base. Also, the pawn on 2c is only defended by the
king. On the other hand, the golds are connected and white doesn't need to worry
about the black attacking options mentioned earlier. There is one other drawback
to the position of the king on 3b. This is hidden at the moment, but the open
diagonal to the king will become a problem later in this game.
35.G6i-6h 00:23:00 00:40:00
36.P7c-7d 00:23:00 01:40:00
37.P5f-5e 00:49:00 01:40:00
38.P1c-1d 00:49:00 02:38:00
If white plays 38.P8e here, we get the same position as in the third game of the
Ryu-O challenger match between Yamasaki and Maruyama. There Yamasaki played 39.B*5f
which threatens 40.Bx2c+! Kx2c P2d Sx2d S*3d, but Maruyama calmly replied 40.P1d!
creating space for the king so that S*3d can be answered by K1c. Probably not
expecting a bishop drop on 5f here, Maruyama subtly changes the move order.
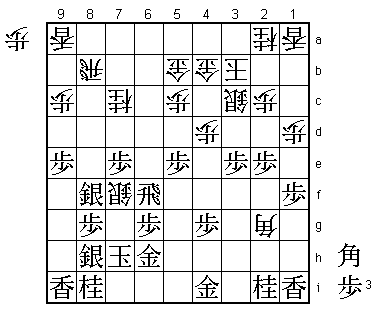
39.P1g-1f 02:36:00 02:38:00
40.P8d-8e 02:36:00 03:22:00
41.P9g-9f 02:42:00 03:22:00
42.N8a-7c 02:42:00 03:30:00
43.P9f-9e! 02:43:00 03:30:00
TWhite has been preparing an attack, but in response Watanabe only plays three
moves with edge pawns. He is inviting Maruyama to come out and get him. One must
be very confident in defense to play this way. Actually, 43.P9e is not a simple
waiting move. It creates extra space for the king to run away, making the white
attack more difficult. Commentator Tomioka (8-dan) even rated the difference
between P9f and P9e as two extra generals needed to mate the black king.

44.P7d-7e    02:43:00  04:17:00

Maruyama has no moves to improve his position, so after 47 minutes of though he
decides to attack here. The alternative is 44.N6e here, but the timing of the
knight jump to 6e is very difficult. Again, there was only a very short
post-mortem analysis after this game, so not many variations were investigated
here.

45.P7fx7e    02:47:00  04:17:00
46.P8e-8f    02:47:00  04:19:00

Again, 46.N6e may have been an alternative. For example, 47.P7d Nx7g+ Gx7g and
it is not so clear who has the better position. Again, further analysis is needed.

47.S7gx8f    03:20:00  04:19:00
48.S*7f?     03:20:00  04:44:00

TThis is a mistake, underestimating the black reply. This was Maruyama's last
chance to get the knight into play with 48.N6e. Watanabe had planned to answer
this with 49.G4i-5h, but after 50.P*8e S9g B*3i R2f S*5g the white attack is
surprisingly strong. For example, S*6f Sx6h+ Kx6h G*4h S*3g P8f Px8f Gx5h Kx5h
Bx6f+ Px6f G*5g was investigated in the press room, and the question becomes
whether the white attack is strong enough or not.

49.S*8h!     03:24:00  04:44:00

Strong defense. Now it becomes very difficult for white to continue the attack.
Watanabe: "Black is two pawns up. If white runs out of moves, the position will
automatically get better for black."

50.P6d-6e    03:24:00  05:12:00

Maruyama tries to get his attack going, because waiting is not an option as black
threatens P7d followed by Px7c+.

51.R2h-2f!   03:35:00  05:12:00

Watanabe doesn't allow the attack. Moving this rook to the other side of the
board opens up some squares for a bishop drop, but Watanabe has judged correctly
that this is no problem.

52.P6e-6f    03:35:00  05:13:00
53.R2fx6f    03:36:00  05:13:00
54.B*2g      03:36:00  05:14:00
TThe last desperate try. If the gold on 4i moves then S6e followed by B4e+ and
the white position becomes quite strong.

55.R6fx7f!   04:00:00  05:14:00

On the first day, Watanabe played flexible waiting moves, but here he goes in
strongly.

56.B2gx4i+   04:00:00  05:14:00
57.P7e-7d    04:00:00  05:14:00
58.G*6e      04:00:00  06:35:00
59.P7dx7c+   04:07:00  06:35:00
60.G6ex7f    04:07:00  06:37:00

Black has won the knight on 7c that was supposed to be joining the attack. The
gold on 7f is very close to the black king which looks dangerous, but when we
look at the position closely, we see that this gold is on the diagonal to the
king, so a bishop fork is a serious problem. Finally, the other drawback of the
king position on 3b comes into play.

61.+P7cx8b   04:07:00  06:37:00
62.R*2f      04:07:00  07:05:00
63.R*7a      04:15:00  07:05:00
64.G5b-4c    04:15:00  07:10:00
65.B*6e      04:25:00  07:10:00
66.G7fx8f    04:25:00  07:12:00
67.P8gx8f    04:29:00  07:12:00
68.P*6f      04:29:00  07:12:00
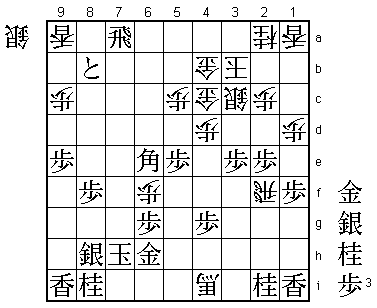
69.P3e-3d!   04:43:00  07:12:00

No hesitation. The black attack is faster.

70.P6fx6g+   04:43:00  07:12:00

Or 70.Sx3d P*3c and whichever way white takes this pawn, it is mate.

71.K7h-8g    04:43:00  07:12:00

With the pawn on 9e, the black king has a lot of space to run. White has no fast
attack here.

72.+P6gx6h   04:43:00  07:12:00
73.G*3a      04:43:00  07:12:00
Resigns      04:43:00  07:12:00
TNo mate, but after 74.K2b Gx2a K1c P3c+ white has no defense (G4cx3c S*2b leads
to mate). The black king cannot be mated, so Maruyama resigned here. Another
total victory for Watanabe, who seems to have Maruyama's number. Maruyama now
must win the third game with the black pieces to make this match interesting.