25th Kio Match Game 1
Black: Habu Yoshiharu, Kio
White: Moriuchi Toshiyuki, Challenger
25th Kio-sen, Game 1, February 12th 2000
1.P7g-7f           0/0          0/0

Moriuchi and Habu have been rivals since they were about 10 years old,
but Habu has left Moriuchi behind quite a long time ago. Both are 29 years
old, but Habu has already won more than 40 major titles, while Moriuchi
is now appearing in only his second title match ever. Four years ago he
lost badly in the Meijin match against Habu; how would he fare this time.

2.P8c-8d           0/0          1/1
3.P2g-2f           2/2          0/1
4.G4a-3b           0/2          0/1
5.G6i-7h           0/2          0/1
6.P8d-8e           0/2          0/1
7.B8h-7g           0/2          0/1
8.P3c-3d           0/2          0/1
9.S7i-8h           0/2          0/1
10.B2bx7g+         0/2          0/1
11.S8hx7g          0/2          0/1

The Kakugawari opening, just like in the final game of the Osho match against
Sato. Habu said after the game that this was his intended strategy if the
furigoma would give him black.

12.S3a-4b          0/2          0/1
13.S3i-3h          0/2          0/1
14.S7a-7b          0/2          0/1
15.P9g-9f          1/3          0/1
16.P9c-9d          0/3          0/1
17.P1g-1f          1/4          0/1
18.P1c-1d          0/4          2/3
19.P4g-4f          1/5          0/3
20.P6c-6d          0/5          0/3
21.S3h-4g          0/5          0/3
22.S7b-6c          0/5          0/3
23.K5i-6h          2/7          0/3
24.S4b-3c          0/7          0/3
25.P3g-3f          4/11         0/3
26.K5a-4b          0/11         0/3
27.G4i-5h          1/12         0/3
28.S6c-5d          0/12         1/4
29.K6h-7i          2/14         0/4
30.G6a-5b          0/14         2/6
31.S4g-5f          4/18         0/6
32.P6d-6e          0/18         1/7
33.N2i-3g          1/19         0/7
34.S3c-4d?!        0/19         5/12

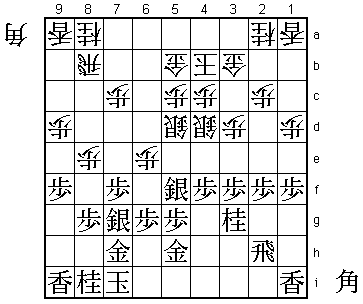
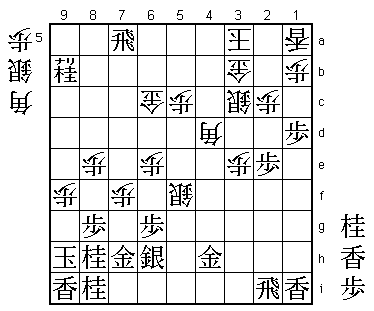
It is hard to play a new idea in this opening, since it has been analysed
so deeply about 10 years ago. Still, this is a new plan introduced by
Fukaura in his game against Abe in their B2 Junisen game this year. The
plan is to invite black to play P2e, so the knight can no longer go to 2e,
which is the natural attack in this position. If black does not play P2e,
then the silver is much better positioned on 4d than on 3c to meet the black
attack. However, after the game Moriuchi was not so happy about this move.
The loss of tempo gives black the time to complete his piece development and
attack.

35.P2f-2e          16/35        0/12
36.S4d-3c          0/35         1/13
37.G5h-4h          19/54        0/13
38.K4b-3a          0/54         26/39
39.R2h-2i          5/59         0/39
40.R8b-6b          0/59         21/60
41.K7i-8h          37/96        0/60
42.P7c-7d          0/96         3/63
43.P3f-3e          0/96         0/63
44.P3dx3e          0/96         6/69
45.N3g-4e          0/96         0/69
46.S3c-4b          0/96         4/73
47.P1f-1e          0/96         0/73
48.P4c-4d          0/96         31/104

49.P1ex1d          4/100        0/104

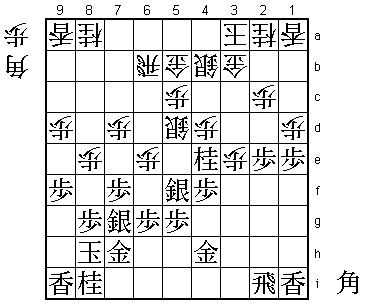
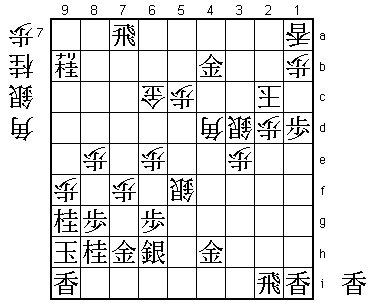
Habu judges that 49.P2d Px2d Rx2d P*2c Rx4d is not good because of the bad
position of the gold on 4h. Therefore, he invests a pawn in the exchange
of the knights.

50.P*1b            0/100        0/104
51.P*3c            36/136       0/104
52.N2ax3c          0/136        27/131
53.N4ex3c+         0/136        0/131
54.S4bx3c          0/136        0/131
55.N*8c            12/148       0/131

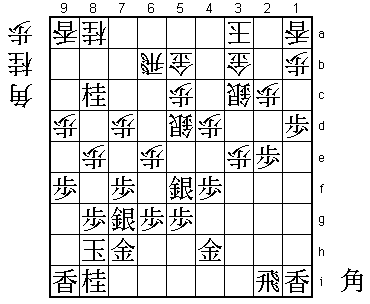
Looks a little strange, but black's attack is not easy. For example, 55.B*7a
R7b N*6d Rx7a Nx5b+ S4c is not good for black.

56.L9a-9b          0/148        30/161
57.N8c-7a+         4/152        0/161
58.P7d-7e          0/152        1/162
59.+N7ax8a         2/154        0/162
60.N*6d            0/154        1/163
61.B*7c            17/171       0/163
62.P7ex7f          0/171        5/168
63.S7g-6h          2/173        0/168
64.R6b-6c          0/173        2/170
65.B7c-8b+         0/173        0/170
66.B*9c            0/173        6/176
67.S5f-4g          7/180        0/176
68.B9cx8b          0/180        5/181
69.+N8ax8b         0/180        0/181
70.P9d-9e          0/180        9/190
71.+N8bx9b         3/183        0/190
72.B*5e            0/183        0/190

Black looks to have the edge, but Moriuchi is doing everything to stay in
the game. The middle game is very difficult to judge. "Every time the side
that played a move looks better" (Inoue, 8-dan).

73.K8h-9h          4/187        0/190
74.P9ex9f          0/187        0/190
75.N*8h!           2/189        0/190

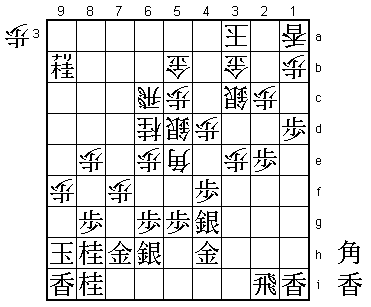
Habu magic! It is almost impossible that Habu has seen that this move is
going to be vital in the end. The normal defence would have been 75.B*8h
Bx8h+ Gx8h.

76.P4d-4e          0/189        9/199
77.P5g-5f          5/194        0/199
78.B5e-4d          0/194        0/199
79.P4fx4e          4/198        0/199
80.S5dx4e          0/198        0/199
81.B*7b            0/198        0/199
82.N6dx5f          0/198        19/218
83.S4gx5f          3/201        0/218
84.S4ex5f          0/201        0/218
85.B7bx6c+         1/202        0/218
86.G5bx6c          0/202        0/218
87.R*7a            9/211        0/218

Tough choice with 87.R*6a looking very tempting. However, 87.R*6a P*4a L*4f
P9g+ Nx9g S*4e Lx4e Sx4e S*5b G4b P*3b Kx3b Rx6c+ B*7e is bad for black.
It is more important to defend against B*7e than to attack the gold on 6c.

88.K3a-2b          0/211        1/219
89.P2e-2d!         8/219        0/219

Habu was not sure about this move, but he had seen that 89.N*2d Px2d Px2d
P*2e P1c+ Px1c L*2c Gx2c Rx1a+ K3b Px2c+ Kx2c G*4c Px9g+ Kx9g B*7e was good
for white.

90.P2cx2d          0/219        2/221
91.N*1e            0/219        0/221
92.P9f-9g+         0/219        6/227
93.N8ix9g          7/226        0/227

If 93.Kx9g then B*6d and white wins.

94.P*9f            0/226        5/232
95.P*2c            5/231        0/232
96.G3bx2c          0/231        0/232
97.P*3d            0/231        0/232

Here Habu actually intended 97.R7b+, but realised just in time that 98.P*4b
P*4c P9g+ Kx9g B*6d P*7e G*7c is good for white. He is a little lucky that
a change of plan is still possible at this stage.

98.S3cx3d          0/231        3/235
99.N1ex2c+         0/231        0/235
100.K2bx2c         0/231        0/235
101.G*4b!          0/231        0/235

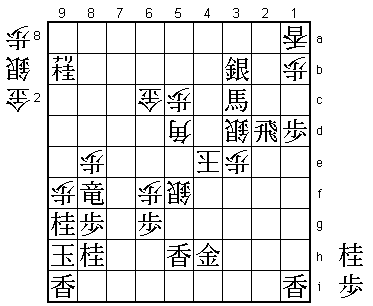
Despite threatening mate (Rx2a+ etc.), this does not look like a good move.
However, white has no good defence and his attack is not strong enough. The
strength of 75.N*8h becomes clear, as the extra defence of 9f makes it
impossible to draw out the black king into the open board.

102.B*5d           0/231        3/238
103.L*5h           1/232        0/238
104.S*7g           0/232        1/239
105.S6hx7g         0/232        0/239
106.P7fx7g+        0/232        0/239
107.G7hx7g         0/232        0/239
108.B4dx7g+        0/232        0/239
109.R7ax7g+        0/232        0/239
110.P6e-6f         0/232        0/239
111.S*3b           5/237        0/239
112.K2c-3c         0/237        0/239
113.B*5a           0/237        0/239
114.K3c-4d         0/237        0/239
115.G4b-4c         0/237        0/239
116.S3dx4c         0/237        0/239
117.R2ix2d         0/237        0/239
118.S4c-3d         0/237        0/239
119.P*4e           0/237        0/239
120.K4dx4e         0/237        0/239
121.B5a-3c+        0/237        0/239
122.N*8f           0/237        0/239
123.+R7gx8f        0/237        0/239
Resigns            0/237        0/239
Time:              03:57:00     03:59:00

Mate after 124.Px8f +Bx3d K5e +Bx5f K6d +B5e K7e P*7f K8d S*8e K8c +B8b. In
the end, the knight on 8h even helps to mate the white king. Tough loss for
Moriuchi, who did not make a single obvious mistake. Like Sato in the Osho
match, he must be wondering how well he has to play to beat Habu. Will he
find the answer in game 2?
