25th Asahi Open Match Game 3
[Black "Habu Yoshiharu, Asahi"]
[White "Akutsu Chikara, Challenger"]
[Event "25th Asahi Open, Game 3"]
[Date "April 30th 2007"]
1.P7g-7f     00:00:00  00:00:00
2.P3c-3d     00:00:00  00:00:00
3.P2g-2f     00:01:00  00:00:00
4.B2bx8h+    00:01:00  00:03:00
5.S7ix8h     00:01:00  00:03:00
6.S3a-4b     00:01:00  00:03:00
7.S3i-4h     00:01:00  00:03:00
8.S4b-3c     00:01:00  00:04:00
9.S8h-7g     00:02:00  00:04:00
10.R8b-2b    00:02:00  00:06:00
11.B*6e      00:07:00  00:06:00

12.B*7d      00:07:00  00:07:00

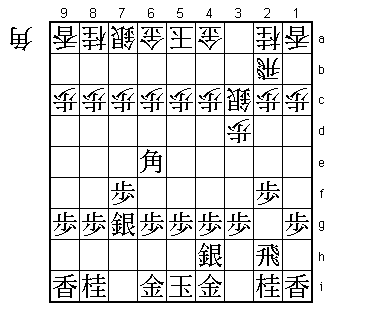
This position is similar to the 4th game of the 32nd Kio match between Moriuchi
and Sato. The black king position is a little different, but the main difference
is that the white pawn was on 9e instead of 9c and the black pawn on 2e instead of
2f. In that game Moriuchi played Bx4c+ and it followed G4a-5b +Bx5b Gx5b G*7e P6d
Gx7d Px7d P3f K6b. Black then has won a pawn, but white has a gold in hand and it
is unclear who is better (in the end black won this game). However, with the white
pawn still on 9c and the black pawn still on 2f, this variation seems to be better
for black here than in the Moriuchi-Sato game.

13.B6e-5f    00:08:00  00:07:00

Habu decides against 13.Bx4c+, but he may have regretted this decision. Letting
Akutsu dictate the pace in the opening is a psychological mistake, because it
will give the young challenger a lot of confidence to see his famous opponent
shy away from the fight.

14.B7dx5f    00:08:00  00:10:00
15.P5gx5f    00:08:00  00:10:00
16.G4a-5b    00:08:00  00:10:00
17.K5i-6h    00:09:00  00:10:00
18.K5a-6b    00:09:00  00:10:00
19.K6h-7h    00:09:00  00:10:00
20.K6b-7b    00:09:00  00:13:00
21.K7h-8h    00:10:00  00:13:00
22.K7b-8b    00:10:00  00:16:00
23.S4h-5g    00:13:00  00:16:00
24.P2c-2d    00:13:00  00:21:00
25.S5g-4f    00:16:00  00:21:00
26.S3c-4d    00:16:00  00:29:00
27.G6i-7h    00:17:00  00:29:00
28.N2a-3c    00:17:00  00:33:00
29.P5f-5e    00:20:00  00:33:00
30.P3d-3e    00:20:00  00:51:00
31.P9g-9f    00:22:00  00:51:00
32.P9c-9d    00:22:00  00:51:00
33.P5e-5d    00:46:00  00:51:00
34.P5cx5d    00:46:00  00:51:00
35.B*3a      00:46:00  00:51:00
36.R2b-2a    00:46:00  00:55:00
37.B3a-7e+   00:46:00  00:55:00
38.S7a-7b    00:46:00  00:55:00
39.P8g-8f    00:52:00  00:55:00
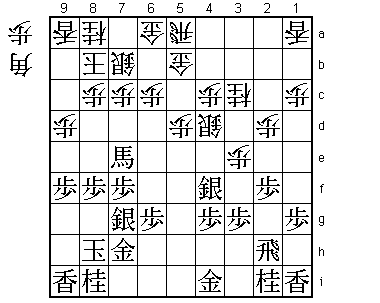
40.R2a-5a!   00:52:00  01:09:00

Black has sacrificed a pawn to make a promoted bishop, but this hidden move makes
use of the open file in the center. It is not immediately clear how white is going
to do this, but we will see what Akutsu had planned soon enough.

41.P8f-8e    01:10:00  01:09:00
42.P5d-5e    01:10:00  01:10:00
43.P8e-8d    01:10:00  01:10:00
44.P8cx8d    01:10:00  01:11:00
45.+B7ex8d   01:10:00  01:11:00
46.P6c-6d!   01:10:00  01:11:00

The point. Black didn't have much choice but to attack the head of the king, but
as soon as the promoted bishop moves away, white can move into a high Mino formation
and free the rook, followed by a strong attack on the central file. Akutsu has
outplayed Habu in the opening.

47.+B8d-6f   01:19:00  01:11:00
48.G5b-6c    01:19:00  01:14:00
49.P2f-2e    01:19:00  01:14:00
50.P2dx2e    01:19:00  01:26:00
51.P3g-3f    01:19:00  01:26:00
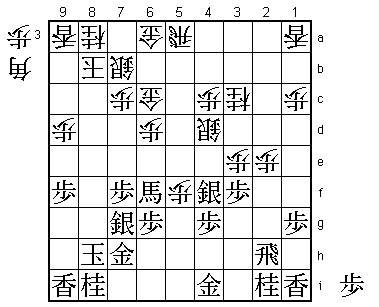
52.P5e-5f!   01:19:00  01:35:00

Another strong move. This looks like an overplay because of 53.P*5e, but after
54.P*3f +Bx5f B*7d +B5g P3g+ and after Sx3g white has the fork N4e or after Nx3g
there is the attack on the head of the knight with P*3f.

53.P3fx3e    01:20:00  01:35:00
54.P6d-6e    01:20:00  01:36:00
55.+B6fx6e   01:50:00  01:36:00
56.P*8g      01:50:00  01:44:00
57.G7hx8g    02:03:00  01:44:00
58.P5f-5g+   02:03:00  02:05:00

White's plans have been a complete success. White has a clear advantage here, but
Habu of course fights back strongly.

59.P*8c      02:04:00  02:05:00
60.S7bx8c    02:04:00  02:05:00
61.P*8d      02:04:00  02:05:00
62.S8cx8d    02:04:00  02:14:00
63.P*8c      02:06:00  02:14:00
64.K8b-7b    02:06:00  02:14:00

With the pawn on 8c, white has to be very careful with his attack or he runs the
risk of suddenly being mated.

65.P3e-3d!   02:13:00  02:14:00

This looks too far away from the white king to be of any use. In the press room,
P*5b Gx5b Sx5g and P*5b Rx5b +Bx4c were analyzed, but both Habu and Akutsu had
been looking at 65.P3d here.

66.P*8f      02:13:00  02:30:00
67.S7gx8f    02:32:00  02:30:00
68.P*8e      02:32:00  02:30:00
69.S8f-7g    02:32:00  02:30:00
70.B*6i      02:32:00  02:32:00
71.P3dx3c+   02:33:00  02:32:00
72.+P5gx6g   02:33:00  02:35:00
73.P*5b      02:37:00  02:35:00
74.R5ax5b    02:37:00  02:36:00
75.+P3cx4c   02:39:00  02:36:00
76.R5b-6b    02:39:00  02:40:00
77.+P4cx4d   02:46:00  02:40:00
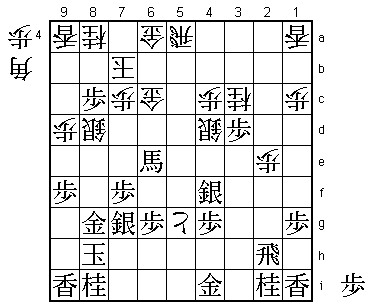
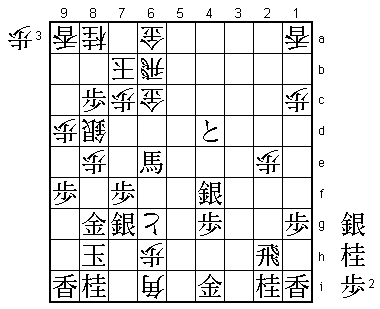
78.P*6h?     02:46:00  02:53:00

This is a natural looking move, as it kills the defensive power of the rook on
2h and seems to give the white attack decisive strength. Akutsu had completely
overlooked Habu's reply, just like all the professionals following this game...
If Akutsu had seen what was coming, he would have played 78.G7d here. Then 79.P*6c
Gx6e Px6b+ Kx8c +Px6a P*6h G*7h B*7h is winning. Note that P*6h is an important
move here, because B*7h immediately can be answered by N*7i and black can defend.
Also, 78.G7d +B5d Kx8c P*6c R8b N*7e Sx7e Px7e B7h+ K9h +Px7g and the white king
cannot be easily mated, so white will win.

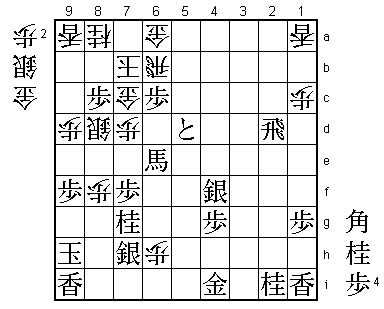
79.R2hx2e!!  02:47:00  02:53:00

Habu magic. The rook that was supposed to be out of the game, suddenly comes back
to haunt Akutsu from the other side. 80.G7d is now too late because of +Bx7d Px7d
G*8b K7c R2c+ which leads to mate. By the way, Habu was not at all convinced that
79.Rx2e was good enough. Moves like 79.N*7e are much more likely candidates in this
position, but after 80.Sx7e Px7e G6d P8b+ (or P*6c Gx6e Px6b+ Kx8c and no mate while
white threatens mate against which there is no defense) Kx8b S8c K9c the white king
cannot be mated. For example, S*8b K8d Sx7c= Kx7c there is no mate (only this, because
after both Nx7c and K9c the white king will be mated).

80.P*2d?     02:47:00  02:58:00

Akutsu was so upset with himself for overlooking Rx2e that he makes matters worse by
adding another mistake. Here he might have saved the game if he had played 80.G6d!
here. Then after 81.+Bx6d Rx6d G*8b K6c the white king escapes and white wins. After
81.+B4c P*4b +B3d B7h+ K9h +Px7g Gx7g "this game is not over yet" (Habu). Akutsu was
begging for someone to find a variation that was winning for black after 80.G6d, but
no win was found during the post-mortem analysis.

81.R2ex2d    02:48:00  02:58:00

Now G6d is no longer possible and black wins.

82.B6i-7h+   02:48:00  02:58:00
83.K8h-9h    02:48:00  02:58:00
84.+P6gx7g   02:48:00  02:58:00
85.G8gx7g    02:48:00  02:58:00
86.+B7hx7g   02:48:00  02:58:00
87.N8ix7g    02:48:00  02:58:00
88.P8e-8f    02:48:00  02:58:00
89.S*7h      02:50:00  02:58:00
90.P7c-7d    02:50:00  02:58:00
91.+P4d-5d   02:51:00  02:58:00
92.G6c-7c    02:51:00  02:59:00
93.P*6c      02:51:00  02:59:00
Resigns      02:51:00  02:59:00

There is no mating threat against the black king and if the white rook moves black wins
easily after +P6d or R2a+. Therefore, Akutsu resigned here and was added to the long list
of players suffering from Habu's magical endgame skills. Instead of being 2-1 up, Akutsu
is now 2-1 down and needs to win the two remaining games to take the Asahi Open title
from Habu. Considering the difference in experience and the shocking defeat suffered in
this game, it is unlikely that Akutsu will be able to do this.
