24th Ryu-O Match Game 4
[Black "Maruyama Tadahisa, Challenger"]
[White "Watanabe Akira, Ryu-O"]
[Event "24th Ryu-O sen, Game 4"]
[Date "November 24th and 25th 2011"]
1.P7g-7f     00:01:00  00:00:00
2.P8c-8d     00:01:00  00:01:00
3.P2g-2f     00:01:00  00:01:00
4.G4a-3b     00:01:00  00:01:00
5.G6i-7h     00:01:00  00:01:00
6.P8d-8e     00:01:00  00:02:00
7.B8h-7g     00:01:00  00:02:00
8.P3c-3d     00:01:00  00:02:00
9.S7i-8h     00:01:00  00:02:00
10.B2bx7g+   00:01:00  00:02:00
11.S8hx7g    00:01:00  00:02:00
12.S3a-4b    00:01:00  00:02:00
13.P9g-9f    00:01:00  00:02:00
14.P9c-9d    00:01:00  00:02:00
15.S3i-3h    00:01:00  00:02:00
16.S7a-7b    00:01:00  00:02:00
17.P4g-4f    00:01:00  00:02:00
18.P6c-6d    00:01:00  00:02:00
19.S3h-4g    00:02:00  00:02:00
20.S7b-6c    00:02:00  00:02:00
21.K5i-6h    00:03:00  00:02:00
22.S4b-3c    00:03:00  00:03:00
23.P1g-1f    00:07:00  00:03:00
24.P1c-1d    00:07:00  00:03:00
25.G4i-5h    00:10:00  00:03:00
26.S6c-5d    00:10:00  00:04:00
27.P3g-3f    00:12:00  00:04:00
28.K5a-4b    00:12:00  00:06:00
29.S4g-5f    00:13:00  00:06:00
30.P6d-6e    00:13:00  00:07:00
31.K6h-7i    00:14:00  00:07:00
32.G6a-5b    00:14:00  00:07:00
33.N2i-3g    00:15:00  00:07:00
34.K4b-3a    00:15:00  00:07:00

Maruyama is considered to be the leading expert in the Kakugawari opening and in
general the black has a good winning rate in this opening. However, for the second
time in this match, Watanabe meets Maruyama's favorite opening head on. Still,
Watanabe has not prepared this especially for this match. He seems to like this
position, because after winning the sixth game of the Ryu-O match against Habu last
year (thereby closing out the match) he has played this position 6 times and lost
only once, on June 12th against Murayama in the Daiwa Cup. Watanabe keeps changing
the perception that this opening is hard to play with white.

35.G5h-4g    00:19:00  00:07:00
36.P4c-4d    00:19:00  00:07:00
37.P2f-2e    00:20:00  00:07:00
38.G5b-4c    00:20:00  00:07:00
39.K7i-8h    00:21:00  00:07:00
40.K3a-2b    00:21:00  00:08:00
41.G4g-4h    00:22:00  00:08:00
42.G4c-4b    00:22:00  00:11:00
43.R2h-2i    00:23:00  00:11:00
44.G4b-4c    00:23:00  00:13:00
45.R2i-6i    00:45:00  00:13:00
46.R8b-6b    00:45:00  00:14:00

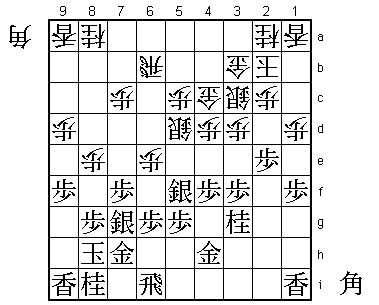
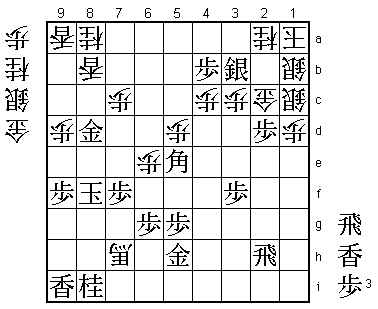
One of the reasons that this opening is considered good for black is that there
is a risk that white runs out of moves. This position is an example. White's pieces
are positioned perfectly so if it was white's turn here, it would be difficult to
find a good move. However, it is black to move. Maruyama finds a cunning plan...

47.R6i-5i    00:46:00  00:14:00
48.R6b-9b    00:46:00  00:46:00
49.S5f-4g    01:35:00  00:46:00
50.R9b-8b    01:35:00  01:00:00
51.R5i-6i    01:35:00  01:00:00
52.R8b-6b    01:35:00  01:25:00
53.S4g-5f    01:40:00  01:25:00

Now we are in the same position as earlier, but this time it is white to move. After
the game Watanabe admitted that his opening plan of waiting for the black attack
with the perfect position to defend had failed.

54.L1a-1b    01:40:00  01:26:00

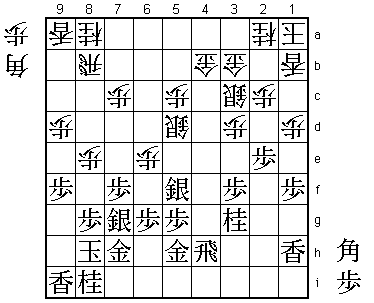
This move invites the black attack because the lance on 1b is a weakness if black
doesn't allow white to move into the anaguma. Interestingly, despite not being the
move of choice, it turns out that moving into the anaguma works quite well here,
forcing black into an attack that is not strong enough.

55.R6i-2i    03:21:00  01:26:00
56.R6b-8b    03:21:00  01:26:00
57.L1i-1h    03:21:00  01:26:00
58.G4c-4b    03:21:00  02:05:00
59.P4f-4e    03:22:00  02:05:00
60.G4b-4c    03:22:00  02:05:00
61.P4ex4d    03:23:00  02:05:00
62.G4cx4d    03:23:00  02:05:00
63.R2i-2h    03:29:00  02:05:00
64.G4d-4c    03:29:00  02:11:00
65.G4h-5h    03:39:00  02:11:00
66.G4c-4b    03:39:00  02:26:00
67.R2h-4h    03:44:00  02:26:00
68.K2b-1a    03:44:00  02:50:00

69.N3g-4e    04:40:00  02:50:00

The sealed move. After the game Maruyama said that he felt he was already in trouble
here.

70.S3c-4d    04:40:00  02:52:00
71.P1f-1e    05:13:00  02:52:00
72.P1dx1e    05:13:00  03:04:00
73.B*2f      05:30:00  03:04:00
74.P*4c      05:30:00  03:12:00
75.P*1d      05:30:00  03:12:00
76.L1bx1d    05:30:00  04:13:00
77.L1hx1e    05:30:00  04:13:00
78.P*1c      05:30:00  04:13:00
79.L1ex1d    05:30:00  04:13:00
80.P1cx1d    05:30:00  04:13:00
81.L*5e      05:30:00  04:13:00
82.S4dx4e    05:30:00  04:55:00
83.S5fx4e    05:30:00  04:55:00
84.S5dx5e    05:30:00  04:55:00
85.S4ex3d    05:42:00  04:55:00
86.P*3c      05:42:00  05:15:00
87.S3dx2c=   06:08:00  05:15:00
88.G3bx2c    06:08:00  05:16:00
89.B2f-3g    06:08:00  05:16:00
90.P5c-5d    06:08:00  05:58:00
91.R4h-2h    06:26:00  05:58:00
92.S*1c      06:26:00  06:00:00
93.S*2d      06:31:00  06:00:00
94.G4b-3b    06:31:00  06:01:00
95.S2dx2c+   06:42:00  06:01:00
96.G3bx2c    06:42:00  06:01:00
97.P*4b      06:42:00  06:01:00

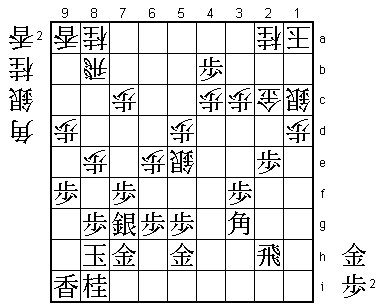
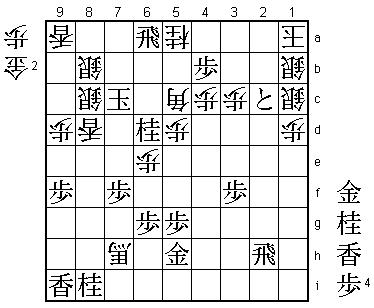
Black has given up material and it seems that the attack is not strong enough. Despite
this, Watanabe said that he never was sure about who was better. The pawn drop on 4b
is a move that tests the character. It is not immediately threatening, so white has
the option to defend against the pawn promotion or counter attack.

98.P8e-8f    06:42:00  06:44:00

Watanabe chooses to attack.

99.P8gx8f    06:46:00  06:44:00
100.L*8c     06:46:00  06:47:00
101.B3gx5e   07:17:00  06:47:00
102.L*8d!    07:17:00  07:01:00

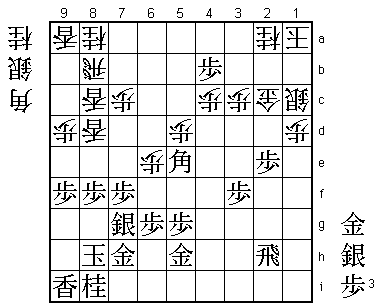
Watanabe not only opts for attack, he ignores a full bishop to set up his attack
as quickly as possible. This triple rocket on the 8th file is very dangerous.

103.S*3b?    07:34:00  07:01:00

Now we are suddenly in a straight up endgame race. Watanabe was surprised how
sudden the game had picked up pace. It turns out that this is hard to win for
black, so Maruyama should have played 103.S*7e instead. For example, 104.Px5e
Sx8d Lx8d L*2d S*1b Lx2c+ Sx2c G*2d S*1b Gx2c Sx2c S*2d and it seems like the
game will end in sennichite. Maruyama said that a sennichite ending of a game
he felt he was losing would have been a great result, but he was afraid that
white had ways to avoid this sennichite variation. Watanabe responded that he
wasn't sure how he could avoid sennichite here.

104.S*1b     07:34:00  07:10:00
105.P2e-2d   07:40:00  07:10:00
106.L8dx8f   07:40:00  07:15:00
107.S7gx8f   07:45:00  07:15:00
108.L8cx8f   07:45:00  07:15:00
109.P*8g     07:45:00  07:15:00
110.L8fx8g+  07:45:00  07:23:00
111.G7hx8g   07:45:00  07:23:00
112.R8bx8g+  07:45:00  07:23:00
113.K8hx8g   07:45:00  07:23:00
114.B*6i     07:45:00  07:23:00
115.L*7h     07:46:00  07:23:00
116.P*8f     07:46:00  07:23:00
117.K8gx8f   07:46:00  07:23:00
118.B6ix7h+  07:46:00  07:27:00

This threatens mate (P*8e Kx8e S*7d) and Watanabe had played the last few moves very
quickly. In the press room it was expected that the game would soon be over. However,
Maruyama's shows that this game is not over yet.

119.G*8d     07:48:00  07:27:00
120.L*8b     07:48:00  07:38:00

121.B5ex7c+! 07:50:00  07:38:00

A strong bishop sacrifice that opens up an escape route up the board for the black
king. Watanabe had underestimated this move. He is fortunate (and Maruyama is unfortunate)
that white still seems to have the advantage. Actually, in the press room it was believed
that black could win here with 121.K7e, but the post-mortem analysis showed that after
122.Px5e Sx2a+ Sx2a P*1b Sx1b R*6a N*5a white wins (Px2c+ leads to mate after B*8f Kx6e
S*5d Kx5d G*4d etc.).

122.N8ax7c   07:50:00  07:42:00

If only this would not have been a mating threat. Too bad for black, it is a mating
threat after B*6d next.

123.S3bx2a+  07:50:00  07:42:00
124.S1bx2a   07:50:00  07:48:00
125.P*1b     07:50:00  07:48:00
126.S2ax1b   07:50:00  07:48:00
127.R*6a     07:50:00  07:48:00

This defends against the mating threat B*6d.

128.N*5a!    07:50:00  07:49:00

If black takes this knight, the mating threat of B*6d is again possible.

129.P2dx2c+? 07:50:00  07:49:00

The final mistake. The best chance for black was 129.Rx5a+ P*2a K7e Sx2d and there
is still a long fight ahead. However, as Watanabe pointed out, white is up on material
so despite being a long battle, it still seems that white has the upper hand.

130.B*5c     07:50:00  07:50:00

Watanabe has found a perfectly fitting mate.

131.N*6d     07:59:00  07:50:00
132.L8bx8d   07:59:00  07:50:00
133.K8f-7e   07:59:00  07:50:00
134.P*7d     07:59:00  07:50:00
135.K7ex7d   07:59:00  07:50:00
136.S*8c     07:59:00  07:51:00
137.K7dx7c   07:59:00  07:51:00
138.S*8b     07:59:00  07:51:00
Resigns      07:59:00  07:51:00

After 138.Kx8b G*9b and both K8a and K7c are answered with G*8b. Because of the bishop
on 5c (defending 6b and 7a) and the knight on 5c (defending 6c) white has just enough
pieces to mate the black king. Maruyama loses for the second time in his favorite
opening and one cannot help but feel that it will only be a matter of time before
Watanabe clinches his 9th consecutive Ryu-O title. Considering the dominance of
Watanabe in the first four games, it seems unlikely that Maruyama can stage a famous
comeback.
