24th Ryu-O Match Game 3
[Black "Watanabe Akira, Ryu-O"]
[White "Maruyama Tadahisa, Challenger"]
[Event "24th Ryu-O sen, Game 3"]
[Date "November 8th and 9th 2011"]
1.P7g-7f     00:00:00  00:00:00
2.P3c-3d     00:00:00  00:00:00
3.P2g-2f     00:01:00  00:00:00
4.B2bx8h+    00:01:00  00:00:00
5.S7ix8h     00:01:00  00:00:00
6.S3a-2b     00:01:00  00:00:00
7.S3i-3h     00:12:00  00:00:00
8.S7a-7b     00:12:00  00:05:00
9.P3g-3f     00:22:00  00:05:00
10.P6c-6d    00:22:00  00:07:00
11.P2f-2e    00:22:00  00:07:00
12.S2b-3c    00:22:00  00:15:00
13.S3h-3g    00:26:00  00:15:00
14.P4c-4d    00:26:00  01:39:00

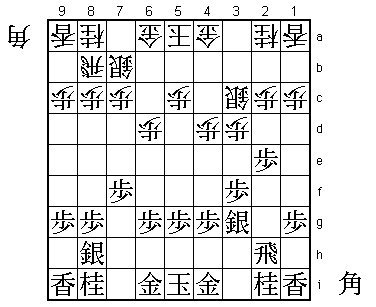
Like in the first game, Maruyama plays the Kakugawari with tempo loss. In that game
he played P8d and G3b early, which is the more safe way to play. That type of position
can also be reached from the Yokofudori and doesn't make much use of the ideas behind
the Kakuwari with tempo loss. In this game, Maruyama tries the more risky strategy of
postponing P8d and G3b. White must be very careful in this opening, because a small
mistake in the move order can spell disaster. For example, if white plays 14.S6c here,
then 15.P3e Px3e B*4e is very good for black. White is a move behind, which means that
his position may not be ready to withstand a quick attack. Black has it easier and on
this morning of the first day of play, Maruyama used more than two hours more than
Watanabe. The move 14.P4d was played after one hour and 24 minutes.

15.K5i-6h    00:32:00  01:39:00
16.S7b-6c    00:32:00  01:42:00
17.K6h-7h    00:32:00  01:42:00
18.S6c-5d    00:32:00  02:15:00
19.S8h-7g    00:37:00  02:15:00
20.G4a-3b    00:37:00  02:22:00

Finally, white moves up this gold. Because white has managed to play P4d and S5d
early, there is no risk anymore to be overrun by the S4f attack, because S4f can
be answered by P4e. Also, sacrificing the pawn first with P3e is less effective
because white can pull back the silver with S4c. This Silver Yagura formation is
quite strong. White can be happy with the position reached in the opening, but
there are still dangers lurking.

21.P5g-5f    00:41:00  02:22:00
22.G6a-5b    00:41:00  02:42:00
23.S3g-4f    00:44:00  02:42:00
24.K5a-4b    00:44:00  02:53:00
25.P3f-3e    00:52:00  02:53:00
26.S5d-4c    00:52:00  02:56:00
27.P3ex3d    00:59:00  02:56:00
28.S4cx3d    00:59:00  02:57:00
29.P*3f      00:59:00  02:57:00
30.P7c-7d    00:59:00  02:58:00
31.G6i-6h    01:16:00  02:58:00
32.N8a-7c    01:16:00  02:58:00
33.S4f-3e    01:26:00  02:58:00
34.S3dx3e    01:26:00  02:59:00
35.P3fx3e    01:26:00  02:59:00
36.P8c-8d    01:26:00  03:01:00
37.P9g-9f    01:46:00  03:01:00
38.P8d-8e    01:46:00  03:47:00
39.P5f-5e    02:36:00  03:47:00
40.K4b-3a?!  02:36:00  04:03:00

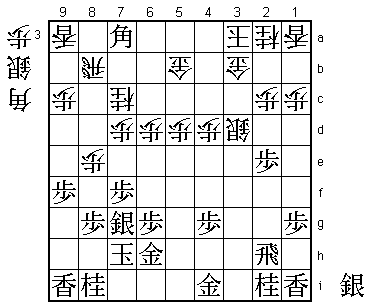
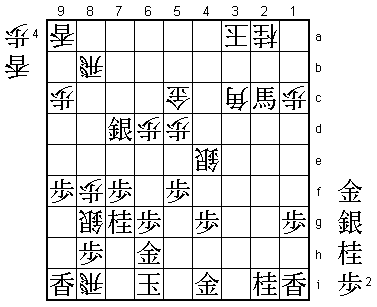
Putting the king into a safer spot is tempting, but not the right move here. White
should have played 40.P9d instead. If then 41.P5d Px5d P3d Sx3d B*7a R8a Bx4d+ G5b-4c
and now black cannot take the lance with +Bx1a because after N3c the sideways working
of the rook makes sure that black loses the promoted bishop. Also, the king on 4b is
much further away from the promoted bishop.

41.P5e-5d    02:57:00  04:03:00
42.P5cx5d    02:57:00  04:03:00
43.P3e-3d    02:58:00  04:03:00
44.S3cx3d    02:58:00  04:16:00
45.B*7a      02:58:00  04:16:00

Black gets a promoted bishop and a lance to boot. It is a testament to Maruyama's
judgment that he thought that this would make things the hardest for black.

46.R8b-8a    02:58:00  04:21:00
47.B7ax4d+   03:00:00  04:21:00
48.G5b-4c!   03:00:00  04:21:00

The only way to keep up the fight. White can prevent the loss of the lance with
48.P*3c, but then 49.+Bx5d attacks the white rook. If white prevents this by moving
the rook to 8c instead of 8a then 46.R8c B4d+ P*3c +Bx5d is not attacking the rook,
but white has little counter play because N6e fails to +Bx6d which is a fork on king
and knight. However, white has no time to waste, because black threatens +B7b next.

49.+B4dx1a   03:12:00  04:21:00
50.P8e-8f    03:12:00  04:21:00
51.P8gx8f    03:13:00  04:21:00
52.P*8e      03:13:00  04:21:00
53.P*5c      03:50:00  04:21:00
54.P8ex8f    03:50:00  04:29:00
55.P*8h      03:51:00  04:29:00
56.S*2b      03:51:00  04:34:00
57.+B1a-1b   03:51:00  04:34:00
58.R8a-8b    03:51:00  04:34:00
59.S*6c!     04:20:00  04:34:00

This threatens to make a tokin, but also controls the white counter attack as will
become clear later. In the post-mortem analysis Watanabe said that he felt very good
about his position here.

60.G4cx5c    04:20:00  05:57:00
61.S6cx7d=   04:23:00  05:57:00

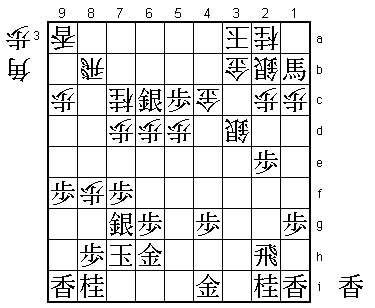
This silver is defending the vital squares 8e and 6e, which should have given black
a big advantage. However, Watanabe suddenly loses his way a little.

62.N7c-6e    04:23:00  05:57:00
63.P2e-2d?   04:31:00  05:57:00

Correct was 63.Sx6e Px6e and only then P2d. For example, B*5e N*4f P*4e Nx3d Bx2h+
P*3c Nx3c S*2a is good for black. The reason Watanabe wanted to keep the silver on
7d is to attack the rook on 8b. This is not a bad plan, and Watanabe is still in the
driver's seat.

64.B*5e      04:31:00  06:02:00
65.L*4f      04:51:00  06:02:00
66.N6ex7g+   04:51:00  06:08:00
67.N8ix7g    04:51:00  06:08:00
68.P*4e      04:51:00  06:10:00
69.P*5f      04:55:00  06:10:00
70.B5e-3c    04:55:00  06:13:00

71.L4fx4e?   05:26:00  06:13:00

This was the time to put pressure on the white rook with 71.S7c+. Watanabe didn't
like this because he thought that 72.R4b would just put the rook in a better position,
but then 73.N*2f! is a very strong knight drop. For example, 74.S2e is answered by
75.N3g and 74.S*2e Nx3d Sx3d Lx4e Rx4e S*4f followed by P*3e is also good for black.

72.S*8g      05:26:00  07:07:00
73.K7h-6i    05:32:00  07:07:00
74.S3dx4e    05:32:00  07:09:00
75.P2dx2c+   05:32:00  07:09:00
76.S2bx2c    05:32:00  07:10:00
77.R2hx2c+   05:33:00  07:10:00
78.G3bx2c    05:33:00  07:18:00
79.+B1bx2c   05:33:00  07:18:00

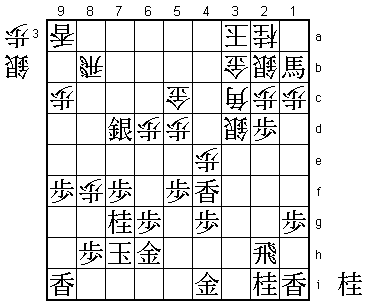
Black has destroyed the white castle and gained material while doing it, so it is not
hard to see why Watanabe liked this variation. However, the rook on 8b is strong in
defense and Watanabe never gets another chance to attack it with S7c+. In the end,
the silver on 7d is still there, while white managed to exchange the knight for the
important silver on 7g. "If I keep the silver on 7d, I must attack the rook with S7c+",
said Watanabe after the game, admitting that he failed to execute either plan he had
with the silver on 7d.

80.R*8i!     05:33:00  07:19:00

Well timed check.

81.K6i-5h    06:44:00  07:19:00

Dangerous but black has no choice. If 81.G*7i then the mating threat G*4a is gone,
so white can simply play Rx9i+.

82.L*4a!     06:44:00  07:19:00

So far in this match, Maruyama wasn't given much chance to show why he was a Meijin
title holder a few years back, but this endgame he plays flawlessly. This lance
works great in both attack and defense. There is also another reason why this lance
drop is good, which we will see next.

83.+B2cx3c   07:18:00  07:19:00
84.N2ax3c    07:18:00  07:19:00
85.B*3e      07:18:00  07:19:00
86.L4a-4d!   07:18:00  07:26:00

Defending against Bx5c+ while keeping the attacking options along the fourth file
alive. After the game Maruyama said that here he felt confident that he was winning.

87.B3ex1c+   07:33:00  07:26:00
88.P*2b      07:33:00  07:30:00
89.P*3b      07:34:00  07:30:00
90.K3a-4b    07:34:00  07:36:00
91.S*3a      07:35:00  07:36:00
92.K4b-5b    07:35:00  07:40:00
93.+B1c-2d   07:36:00  07:40:00
94.P*4f      07:36:00  07:42:00
95.N*5i      07:36:00  07:42:00
96.R8ix8h+   07:36:00  07:43:00
97.G*6i      07:43:00  07:43:00
98.P4fx4g+   07:43:00  07:44:00
99.K5hx4g    07:44:00  07:44:00
100.B*3f     07:44:00  07:45:00
101.K4g-5g   07:44:00  07:45:00
102.S4e-4f   07:44:00  07:54:00
103.+B2dx4f  07:49:00  07:54:00
104.L4dx4f   07:49:00  07:54:00
105.K5gx4f   07:49:00  07:54:00
106.B3fx6i+  07:49:00  07:54:00
107.G6hx6i   07:49:00  07:54:00
108.P*4e     07:49:00  07:54:00
109.K4f-3g   07:54:00  07:54:00
110.B*4f     07:54:00  07:54:00
111.K3g-4g   07:55:00  07:54:00
112.B4fx1i+  07:55:00  07:54:00
Resigns      07:56:00  07:54:00

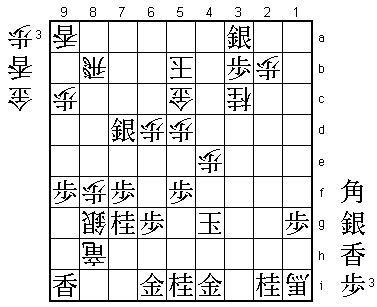
The simple threat is G*4f mate and there is not much else to defend against this
than 113.L*6h. However, then 114.+Bx2i is winning after 115.S*3h G*4f or 115.K5g
G*4f or 115.K5h +Bx5f. Black has no defense and cannot mate the white king, so
Watanabe resigned here. Watanabe will not be happy about losing this game, giving
hope to an opponent he almost had on his knees. Maruyama showed that he can be a
very dangerous opponent when given the chance. The fourth game will be big, because
a win for Watanabe will almost certainly mean that the match is over, but a win
for Maruyama could completely turn this match around.
