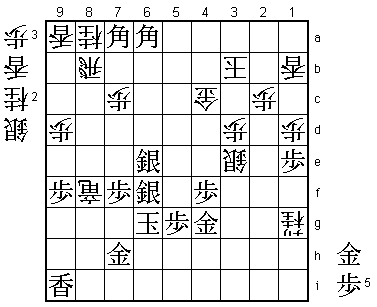
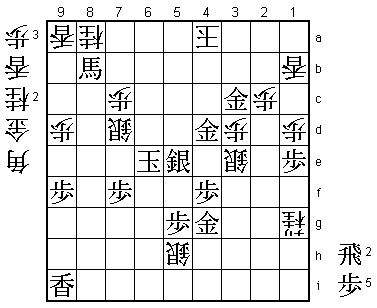
24th Ryu-O Match Game 2
[Black "Maruyama Tadahisa, Challenger"]
[White "Watanabe Akira, Ryu-O"]
[Event "24th Ryu-O sen, Game 2"]
[Date "October 25th and 26th 2011"]
1.P2g-2f     00:00:00  00:00:00
2.P8c-8d     00:00:00  00:00:00
3.P7g-7f     00:00:00  00:00:00
4.G4a-3b     00:00:00  00:00:00
5.G6i-7h     00:00:00  00:00:00
6.P8d-8e     00:00:00  00:00:00
7.B8h-7g     00:00:00  00:00:00
8.P3c-3d     00:00:00  00:00:00
9.S7i-8h     00:00:00  00:00:00
10.B2bx7g+   00:00:00  00:01:00

This may be inspired by the total victory in the first game, or prepared before
the match, but Watanabe wastes no time to attack Maruyama's favorite opening: the
classic Kakugawari. Winning in Maruyama's comfort zone after annihilating him in
game 1 would be such a psychological blow that it will be hard to imagine Maruyama
recovering from that.

11.S8hx7g    00:00:00  00:01:00
12.S3a-4b    00:00:00  00:01:00
13.P9g-9f    00:01:00  00:01:00
14.P9c-9d    00:01:00  00:02:00
15.S3i-3h    00:01:00  00:02:00
16.S7a-7b    00:01:00  00:02:00
17.P4g-4f    00:01:00  00:02:00
18.P6c-6d    00:01:00  00:02:00
19.S3h-4g    00:01:00  00:02:00
20.S7b-6c    00:01:00  00:02:00
21.K5i-6h    00:01:00  00:02:00
22.S4b-3c    00:01:00  00:03:00
23.G4i-5h    00:04:00  00:03:00
24.S6c-5d    00:04:00  00:05:00
25.S4g-5f    00:05:00  00:05:00
26.P6d-6e    00:05:00  00:09:00
27.P1g-1f    00:07:00  00:09:00
28.P1c-1d    00:07:00  00:09:00
29.P3g-3f    00:08:00  00:09:00
30.K5a-4b    00:08:00  00:09:00
31.K6h-7i    00:09:00  00:09:00
32.G6a-5b    00:09:00  00:10:00
33.N2i-3g    00:11:00  00:10:00
34.K4b-3a    00:11:00  00:11:00

It is not that Watanabe only plays the Kakugawari against Maruyama. Up until here,
 the position is identical to the sixth game of last year's Ryu-O match. Watanabe
won that game to end the match. Actually, even though most professional players do
not like the white position because it often leads to a passive waiting game, Watanabe
plays it quite often in big games and with a lot of success.

35.R2h-4h    00:16:00  00:11:00
36.G5b-4b    00:16:00  01:16:00
37.K7i-8h    00:41:00  01:16:00
38.K3a-2b    00:41:00  01:16:00
39.G5h-4g    00:48:00  01:16:00
40.P4c-4d    00:48:00  01:19:00
41.P2f-2e    00:52:00  01:19:00

42.L1a-1b    00:52:00  02:12:00

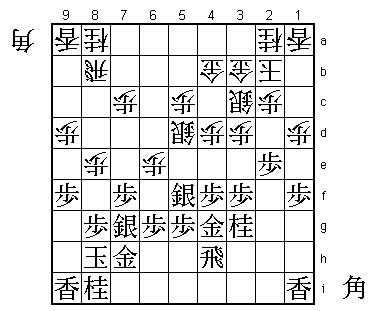
Going for the Anaguma looks like a typical Watanabe plan, but the position is
actually quite complex. White is running out of useful moves here. For example,
42.G4b-4c is answered by 43.R2h and even though both players now have an optimal
position, it is white to play, which means that white has no choice but to weaken
his position here. Zugzwang doesn't often happen in shogi, but this position is
an example.

43.P4f-4e    01:29:00  02:12:00

Black has to start the fight now before white gets the chance to play K1a followed
by S2b.

44.P4dx4e    01:29:00  02:26:00
45.N3gx4e    01:55:00  02:26:00
46.S3c-4d    01:55:00  02:26:00

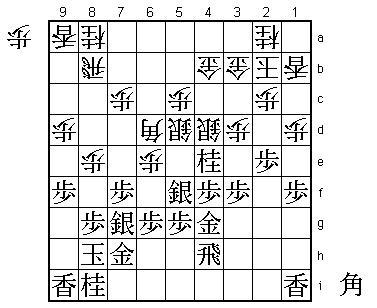
Black has forced the silver away from the Anaguma, so this castle formation is
now hard to play for white.

47.P*4f      01:56:00  02:26:00
48.B*6d      01:56:00  02:32:00

Watanabe is the first to drop the bishop. He felt that he had no choice, because
black threatens R2h followed by exchanging the pawn on the 2nd file. After 48.B*6d,
the same plan of course fails: 49.R2h S4dx4e Sx4e Sx4e.

49.L1i-1g    01:58:00  02:32:00

Threatens to move the rook behind the lance, making the drop on 6d ineffective.

50.N2a-3c    01:58:00  03:03:00

Not played from a position of strength. Watanabe thought he was in trouble here
because he had to play this knight. Still, it is not easy for black to get the
advantage here.

51.P1f-1e    03:11:00  03:03:00
52.N3cx2e    03:11:00  03:09:00
53.P3f-3e    03:24:00  03:09:00
54.S4dx3e    03:24:00  04:03:00

Not good is 54.Nx1g+ because after 55.Px3d the pawn on 3d is a huge attacking base
and black also threatens the fork B*2f next.

55.P6g-6f    04:12:00  04:03:00
56.P8e-8f    04:12:00  04:06:00
57.P8gx8f    04:14:00  04:06:00

After the game, Watanabe said that he was worried about 58.Px6e here. Maruyama
dismissed it as too dangerous, but analysis showed that it is a vital alternative.
For example, 59.Px8g+ Gx8g P*8f G9g Sx4e Px6d Sx5f Gx5f S*8g K7i N*8e P*8c Rx8c
P*8d Nx7g+ Nx7g and it seems that white has nothing else but to escape with sennichite:
N3g+ R1h +N2g R4h etc.

58.P6ex6f    04:14:00  04:06:00
59.R4h-6h    04:14:00  04:06:00
60.N2ex1g+   04:14:00  04:13:00

White is a lance up, which means that black has to act quickly to avoid getting the
inferior position.

61.R6hx6f    04:51:00  04:13:00

It seems like 61.P*6e is an alternative here, but after 62.Bx8f Sx8f Rx8f black has
no pawns in hand. Also, 61.P*3c can be answered with 62.G3b-4c which defends 5c and
63.Rx6f is then simply answered with 64.P*6c and it is hard to continue the attack
for black.

62.P*6e      04:51:00  04:50:00
63.S5fx6e    04:56:00  04:50:00
64.B6d-5e    04:56:00  04:50:00
65.P*3c      05:11:00  04:50:00
66.G3b-3a    05:11:00  04:58:00

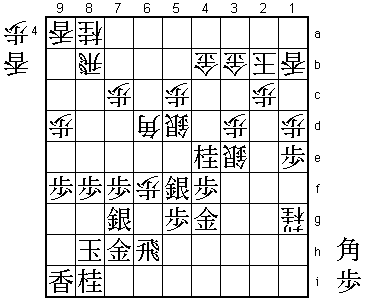
Now 66.G3b-4c can be answered by 67.Sx5d Bx6f Sx4c= which is good for black.

67.S6ex5d    05:23:00  04:58:00
68.P*8g      05:23:00  05:00:00

Perfectly timed. If white takes the rook first, this doesn't work: 68.Bx6f Sx6f
P*8g is answered by K7g and the black king is much harder to get to as we will
see a little later.

69.K8hx8g    05:24:00  05:00:00
70.B5ex6f    05:24:00  05:00:00
71.S7gx6f    05:25:00  05:00:00
72.R*6i      05:25:00  05:00:00

The point. Forcing the king to 8g makes this fork possible.

73.N4ex5c+   05:50:00  05:00:00

This is not a mating threat, so Watanabe said that this was winning for white,
but he also said that he still considered the position to be quite complicated.

74.R6ix8i+   05:50:00  06:01:00
75.K8g-7g    05:50:00  06:01:00
76.+R8ix8f   05:50:00  06:01:00

77.K7g-6g    06:02:00  06:01:00

Tough decision to make. It seems like 77.K6h is a viable alternative, but trying
to escape back down the board is often bad, so a hard move to play.

78.P*6e      06:02:00  06:01:00

A painful drop, but not as painful as Maruyama makes it for himself.

79.S5dx6e    06:38:00  06:01:00

It is very hard to predict what you're opponent is thinking, but Maruyama's best
chance would probably have been 79.S5e because Watanabe thought that he had nothing
else but 80.+R8g. However, then 81.Gx8g Rx8g+ S*7g leads to an unclear position
because the obvious L*6f can be answered by K5f and N*8e by +Nx4b. However, Maruyama
saw that instead of 80.+Rx8g, white can play 80.N*6d! and after 81.Sx6d +R8g N*7g
P6f Kx6f +Rx7h white has the superior position.

80.G4bx5c    06:38:00  06:02:00
81.S*3b      06:39:00  06:02:00
82.G3ax3b    06:39:00  06:19:00
83.P3cx3b+   06:39:00  06:19:00
84.K2bx3b    06:39:00  06:19:00
85.B*7a      06:40:00  06:19:00
86.G5c-4c    06:40:00  06:28:00
87.B*6a      07:23:00  06:28:00

88.+R8f-8i!  07:23:00  06:51:00

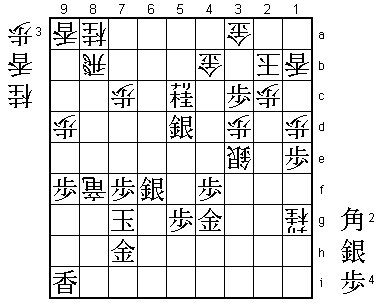
This is the type of difficult to find but strong move that set Watanabe apart from
most other professional players. Black is threatening Bx4c+ and it seems normal to
defend with 88.P*4b or P*5b here. However, after 88.P*5b P*8c R9b G*8g the black
position is harder to break down than it seems. White is still better, but black at
least have some fighting chances. If defense is not sufficient, then attacking moves
like 88.P*6d seem much more effective than 88.+R8i. After all, this rook move looks
like it will be just a waste of time after Bx8b+ +Rx8b. Furthermore, after 88.+R8i
the white king seems to be in a lot of danger. Watanabe has judged correctly that
he can keep the rook on 8i long enough to attack the black king and that the white
king is still safe enough. As a result, a game that was judged in the press room as
being a long endgame struggle, suddenly is decided in Watanabe's favor.

89.S6f-5e    07:43:00  06:51:00
90.S*5h      07:43:00  07:12:00

The decisive move.

91.K6g-6f    07:45:00  07:12:00
92.+R8ix7h   07:45:00  07:12:00
93.B6ax4c+   07:59:00  07:12:00
94.K3bx4c    07:59:00  07:12:00
95.G*4d      07:59:00  07:12:00
96.K4c-3b    07:59:00  07:13:00
97.G*3c      07:59:00  07:13:00
98.K3b-4a    07:59:00  07:13:00
99.B7ax8b+   07:59:00  07:13:00
100.+R7h-6g  07:59:00  07:13:00
101.K6f-7e   07:59:00  07:13:00
102.+R6gx6e  07:59:00  07:13:00
103.K7ex6e   07:59:00  07:13:00
104.S*7d     07:59:00  07:13:00
Resigns      07:59:00  07:13:00

Mate after 105.K5d B*6e K4e Sx4d Sx4d G*5d Kx3d G*2d K4c N*5a or 105.K6f B*8h etc.,
so Maruyama resigned here. Watanabe got what he wanted by beating Maruyama in the
Kakugawari. However, the psychological damage might not be so big, because Maruyama
made no obvious mistakes in this game. Still, he is 2-0 down, his opening preparation
with black and white is shattered and he needs to win the third game with the white
pieces against a Ryu-O title holder who is brimming with confidence. Quite a mountain
to climb.
