24th Kio Match Game 3
Black: Habu, Kio
White: Sato Yasumitsu, Challenger
24th Kio-sen, Game 3, March 8th 1999
1.P2g-2f           0/0          0/0
2.P8c-8d           0/0          0/0
3.P7g-7f           1/1          0/0
4.P8d-8e           0/1          3/3
5.B8h-7g           1/2          0/3
6.P3c-3d           0/2          0/3
7.S7i-8h           1/3          0/3
8.G4a-3b           0/3          1/4
9.G6i-7h           1/4          0/4
10.B2bx7g+         0/4          1/5
11.S8hx7g          0/4          0/5
12.S3a-4b          0/4          0/5
13.S3i-3h          3/7          0/5
14.S7a-7b          0/7          0/5
15.P9g-9f          3/10         0/5
16.P9c-9d          0/10         4/9
17.P1g-1f          3/13         0/9
18.P1c-1d          0/13         4/13
19.P4g-4f          4/17         0/13
20.P6c-6d          0/17         7/20
21.S3h-4g          15/32        0/20
22.S7b-6c          0/32         4/24
23.G4i-5h          5/37         0/24
24.S6c-5d          0/37         2/26
25.K5i-6h          6/43         0/26
26.S4b-3c          0/43         19/45
27.P3g-3f          6/49         0/45
28.K5a-4b          0/49         0/45
29.N2i-3g          4/53         0/45
30.G6a-5b          0/53         2/47
31.K6h-7i          1/54         0/47
32.K4b-3a          0/54         2/49
33.S4g-5f          3/57         0/49
34.P6d-6e          0/57         1/50
35.K7i-8h          20/77        0/50
36.P7c-7d          0/77         6/56
37.G5h-4g          6/83         0/56
38.P4c-4d          0/83         7/63
39.L1i-1g          18/101       0/63
40.B*6d            0/101        8/71
41.R2h-1h          1/102        0/71
42.S3c-2d          0/102        1/72
43.P2f-2e          28/130       0/72
44.S2d-3c          0/130        2/74
45.P4f-4e          0/130        0/74
46.N8a-7c          0/130        34/108

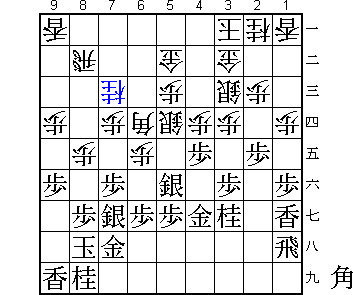
Very unusual move in this type of position. In almost all Bishop Exchange
games the pawn on 4e is taken before the counterattack is started. Sato felt
that he had to be quicker than that, since he did not like 46.Px4e Nx4e S4d
P*4f. Habu agreed that he also felt that black would have an advantage then.
Sato's N7c leads to an all-out fighting game.

47.P4ex4d          24/154       0/108
48.S3cx4d          0/154        1/109
49.P1f-1e          0/154        0/109
50.P1dx1e          0/154        4/113
51.P2e-2d          0/154        0/113
52.P2cx2d          0/154        3/116
53.P*2e            0/154        0/116
54.P*4f            0/154        31/147
55.G4g-4h          0/154        0/147
56.S4d-3c          0/154        0/147
57.P3f-3e          8/162        0/147
58.P8e-8f          0/162        17/164
59.S7gx8f          8/170        0/164
60.P3dx3e          0/170        1/165
61.N3g-4e          16/186       0/165
62.S5dx4e          0/186        8/173
63.S5fx4e          0/186        0/173
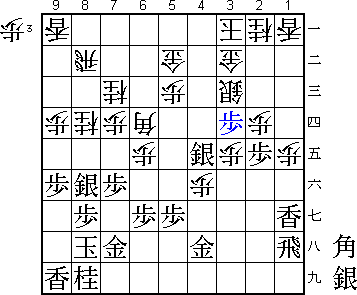
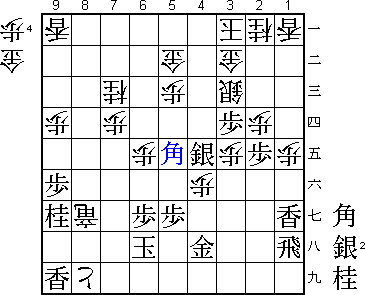
64.N*8d!           0/186        2/175

It looked like Habu had a very good attack, but this knight drop is a nasty
counter.

65.P*3d            3/189        0/175

Normally the silver on 3c now has to move...

66.N8dx7f!         0/189        19/194

...but not in this game. This position is an example where taking a silver
with a pawn is actually bad. If white moves the silver to 4b, a future knight
drop on 4d will be devastating. Furthermore, if black takes the silver on 3c,
then after Nx3c the knight attacks the silver on 4e, so there is no gain for
black there. The silver on 3c and the pawn on 3d will stay like this for
25 moves!

67.K8h-7i          2/191        0/194
68.P*8h            0/191        1/195
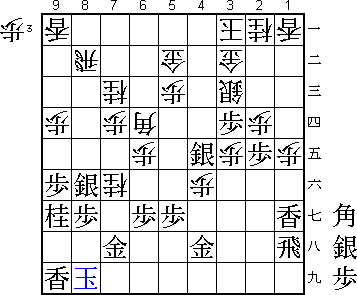
69.N8i-9g!         3/194        0/195

Great move by Habu. Moving the knight to 7g looks like a much better move,
but now black threatens S7g followed by Sx7f, so white has to rush his
attack. There is actual a second reason why N9g is better than N7g, as
will become clear later.

70.P8h-8i+         0/194        38/233
71.K7ix8i          0/194        0/233

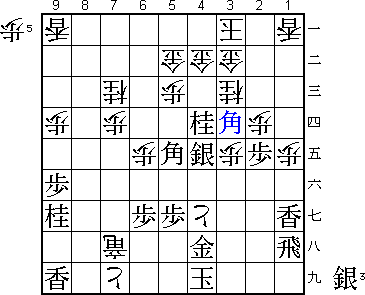
72.B6dx8f?         0/194        0/233

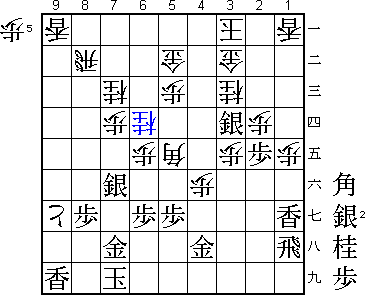
Sato feels that he needs to hurry, but this is forcing the position too much.
The correct move was 72.P9e. Then, for example, 73.S7g Px9f Sx7f P9g+ Px3c+
Nx3c S3d B5e K7i N*6d (diagram). In this position S*2c is a mating threat,
but with G5b-4b white also brings the rook on 8b into play as a defender
and black can not continue his attack. On the other hand, Nx7f is very
quick, since it would threaten mate with S*6h Gx6h +P8h K6i Nx6h+ Kx6h
B7g+ etc.

73.P8gx8f          7/201        0/233
74.R8bx8f          0/201        0/233
75.P*8g            7/208        0/233
76.P*8h            0/208        0/233
77.K8i-7i          3/211        0/233
78.S*6h            0/211        0/233
79.G7hx6h          0/211        0/233
80.P8h-8i+         0/211        0/233
81.K7i-6i          0/211        0/233
82.N7fx6h+         0/211        0/233

Here white of course wants to play 82.Rx8g+. However, if white plays that
here, then 83.G7h is alright. This is the second reason why the black
knight needs to be on 9g, since with the knight on 7g 83.G7h +Rx7h would
lead to mate.

83.K6ix6h          0/211        0/233
84.R8fx8g+         0/211        0/233
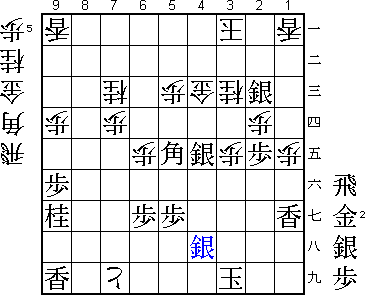
85.B*5e!           2/213        0/233

A very nice point to drop the bishop. This strong bishop works in attack
and defence and will stay at the central square until the end of the game.

86.+P8i-7i         0/213        0/233
87.K6h-5i          5/218        0/233
88.+R8g-7h         0/218        0/233
89.K5i-4i          1/219        0/233
90.P4f-4g+         0/219        3/236
91.P3dx3c+         3/222        0/236

Finally the deadlock of silver and pawn is broken. Habu goes in for the kill.

92.N2ax3c          0/222        0/236
93.N*4d            2/224        0/236
94.G*4b            0/224        3/239
95.B*3d!           8/232        0/239

Habu magic. It still seems very close, but this bishop drop decides the
game. This is not a mating threat, but a hisshi threat, since there is no
defence after Bx5b+ (Gx5b Nx3b+ Kx3b S*2c leads to mate). If white would
be able to make a strong mating threat, he would still win, but there is
nothing that white can do. 96.P*4f looks strong, but is not a mating threat.
Furthermore, 96.Nx4e Gx4g! +Rx1h Nx3b+ Gx3b G*2a K4a Bx5b+ Kx5b S*6c Kx6c
S*6d K5b S*6c K4b P*4c is mate. The difference in strength between Habu
and Sato is well illustrated by this variation, where the outcome of the
game depends on a single pawn in hand.

96.G5b-4c          0/232        0/239

A desperate last attempt. If white can get a bishop in hand, then B*2g K3i
+Rx4h is mate.

97.N4dx3b+         8/240        0/239
98.G4bx3b          0/240        0/239
99.B3dx4c+!        0/240        0/239

The final blow. White can not take this bishop, since 99.Gx4c S*2b Kx2b G*2c
Kx2c S*3d Gx3d Sx3d Kx3d G*4d Kx2e S*3d K2f G*3g is again magically mate.

100.+R7h-6i        0/240        0/239
101.G*5i           0/240        0/239

This drop means that black no longer has mate, but unfortunately the same is
true for white.

102.G3bx4c         0/240        0/239
103.S*2c           1/241        0/239
104.+P4gx4h        0/241        0/239
105.R1hx4h         1/242        0/239
106.G*3i           0/242        0/239
107.K4ix3i         0/242        0/239
108.+R6ix5i        0/242        0/239
109.S*4i           0/242        0/239
110.+R5ix4h        0/242        0/239
111.S4ix4h         0/242        0/239
Resigns            0/242        0/239
Time:              03:58:00     03:59:00

White has no mate and no defence. This game took a lot out of both players.
Usually the players are very talkative during the post mortem analysis, but
in this case there were long lapses of silence and contemplation. Sato felt
that he gave it all he had in every game and still ended up with a 3-0 title
match loss. For Habu this meant his ninth consecutive Kio title. Still some
work to do to break the record for consecutive title victories, which is
held by Oyama who won thirteen consecutive Meijin titles.
