24th Kio Match Game 2
Black: Sato Yasumitsu, Challenger
White: Habu, Kio
24th Kio-sen, Game 2, February 27th 1999
1.P2g-2f 1/1 0/0
2.P8c-8d 0/1 1/1
3.P2f-2e 5/6 0/1
4.P8d-8e 0/6 0/1
5.G6i-7h 0/6 0/1
6.G4a-3b 0/6 0/1
7.P2e-2d 0/6 0/1
8.P2cx2d 0/6 1/2
9.R2hx2d 0/6 0/2
10.P*2c 0/6 1/3
11.R2d-2h 0/6 0/3
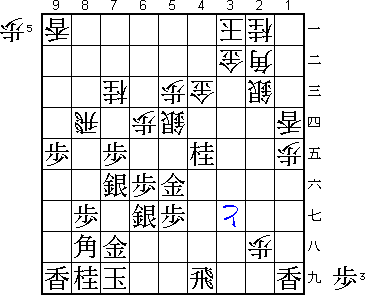
12.P3c-3d 0/6 24/27
13.S3i-3h 0/6 0/27
14.P8e-8f 0/6 0/27
15.P8gx8f 0/6 0/27
16.R8bx8f 0/6 0/27
17.P*8g 0/6 0/27
18.R8f-8d 0/6 0/27
19.P7g-7f 9/15 0/27
20.P9c-9d 0/15 2/29
21.P9g-9f 1/16 0/29
22.S7a-7b 0/16 7/36
23.P4g-4f 2/18 0/36
24.K5a-4b 0/18 1/37
25.S3h-4g 0/18 0/37
26.P6c-6d 0/18 0/37
27.S4g-5f 14/32 0/37
28.S7b-6c 0/32 0/37
29.G4i-5h 7/39 0/37
30.G6a-5b 0/39 2/39
31.P6g-6f 11/50 0/39
32.S6c-5d 0/50 11/50
33.S7i-6h 0/50 0/50
34.B2b-3c 0/50 3/53
35.P1g-1f 1/51 0/53
36.P1c-1d 0/51 3/56
37.P3g-3f 5/56 0/56
38.S3a-2b 0/56 9/65
39.P3f-3e 7/63 0/65
40.P3dx3e 0/63 32/97
41.S6h-6g 3/66 0/97
42.K4b-3a 0/66 2/99
43.K5i-6h 2/68 0/99
44.P4c-4d 0/68 21/120
45.R2h-3h 55/123 0/120
46.G5b-4c 0/123 1/121
47.R3hx3e 0/123 0/121
48.P*3d 0/123 0/121
49.R3e-3f 1/124 0/121
50.P2c-2d 0/124 0/121
51.N2i-3g 2/126 0/121
52.S2b-2c 0/126 0/121
53.K6h-7i 4/130 0/121
54.B3c-2b 0/130 14/135
The Aigakari is an opening that can easily lead to wild variations, but not
in this game. Even though Sato is a specialist in the Aigakari, his results
against Habu have not been that good. Also, if he loses this game he will have
to win all of the three remaining games. This might be the reason Sato is
playing very cautiously in this game.
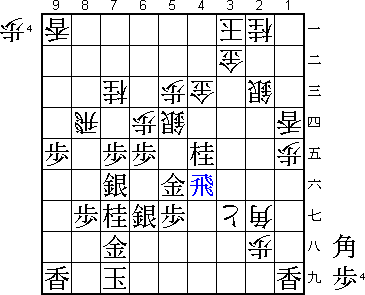
55.R3f-2f 5/135 0/135
56.R8d-8b 0/135 6/141
57.P7f-7e 9/144 0/141
58.P3d-3e 0/144 14/155
59.G5h-4g 27/171 0/155
60.P7c-7d 0/171 24/179
61.P7ex7d 0/171 0/179
62.R8b-8d 0/171 0/179
63.S6g-7f 1/172 0/179
64.R8dx7d 0/172 0/179
65.P*7e 0/172 0/179
66.R7d-8d 0/172 0/179
67.S5f-6g 2/174 0/179
68.P9d-9e?! 0/174 6/185

Finally, the middle game starts. Habu wanted to play the knight to 7c, but
if he does so immediately, then after 68.N7c P7d Rx7d B9g black threatens
to win the rook and the pressure on the head of the knight becomes a big
problem.

69.P9fx9e          0/174        0/185
70.N8a-7c          0/174        0/185

Now 71.P7d Rx7d B9g does not work because of Lx9e. However, it seems a bit
much to sacrifice a pawn for a simple knight development. Sato can use this
extra pawn for his own attack, which looks very strong now.

71.G4g-5f          3/177        0/185
72.S2c-3d          0/177        6/191
73.P1f-1e          8/185        0/191
74.P1dx1e          0/185        4/195
75.P*1c            0/185        0/195
76.L1ax1c          0/185        0/195
77.P4f-4e          2/187        0/195
78.P4dx4e          0/187        2/197
79.P*1d            0/187        0/197
80.L1cx1d          0/187        1/198
81.R2fx2d          0/187        0/198
82.S3d-2c          0/187        7/205
83.R2d-2i          11/198       0/205
84.P*2h            0/198        1/206
85.R2i-4i          0/198        0/206
86.P3e-3f          0/198        0/206
87.N3gx4e          1/199        0/206
88.P3f-3g+!        0/199        0/206
Sato's attack looks very strong and it seems that white has not time for this
pawn promotion. Habu has judged very accurately that Sato can not break
through. This difference in judgement decides the game.
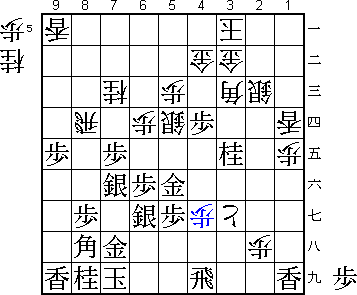
89.P*3c? 8/207 0/206
Sato was still convinced that he could make his attack work. If he would have
recognised that this is not the case, he would probably have chosen 89.P6e,
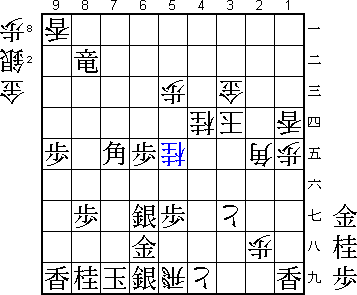
the move Habu feared most. Then after 90.P*7g Bx7g Bx7g+ Nx7g B*2g R4f
(diagram) and the bishop in hand is the extra power that Sato's attack needs.
Habu felt that he had no choice but to settle for sennichite here with +P3f
R4h +P3g. Sato probably saw this variation as well, but did not want to give
up the advantage of being black in a position in which he still thought he
had good chances.
90.N2ax3c          0/207        0/206
91.P*4d            1/208        0/206
92.G4c-4b          0/208        4/210
93.N4ex3c+         0/208        0/210
94.B2bx3c          0/208        0/210
95.N*3e            3/211        0/210
96.P*4g            0/211        1/211
97.N3ex2c+         5/216        0/211
98.G3bx2c          0/216        0/211
99.P7e-7d          2/218        0/211

This was the move that Sato counted on. After 100.P4h+ Px7c+ +Px4i B7g! it
is very hard for white to get to the black king and N*3e next is devastating.
Waki (7-dan): "Surely, Rx7d can not be played here". Immediately after he
said that the following move appeared on the monitor:

100.R8dx7d!        0/218        6/217

This gives up the rook for a silver in a risky position. Normally this is a
move that is considered last. However, in this case it is winning.

101.S*7e           1/219        0/217
102.R7dx7e         0/219        0/217
103.S7fx7e         0/219        0/217

This silver is suddenly completely useless in defence, so that white has gained
much more than a silver for a rook. For example, B7g as in the variation above
is now simple met with N*8e.

104.P4g-4h+        0/219        0/217
105.R*7a           5/224        0/217
106.K3a-2b         0/224        0/217
107.P*3d           11/235       0/217
108.G2cx3d         0/235        7/224
109.R7ax7c+        0/235        0/224

Black is desperately trying to keep his position together and get some kind of
attack, but Habu is deadly in these positions.

110.+P4hx4i        0/235        2/226
111.N*4f           0/235        0/226
112.G3dx4d         0/235        0/226
113.N4fx5d         0/235        0/226
114.G4dx5d         0/235        2/228
115.+R7c-8b        0/235        0/228
116.K2b-2c         0/235        0/228
117.P6f-6e         1/236        0/228
118.R*5i           0/236        2/230
119.S*6i           0/236        0/230
120.K2c-3d         0/236        3/233

This is the safe way to play. There was a quicker win with 120.Bx8h+ Kx8h
B*3c and after B*7g Rx6i+ Bx3c+ Gx3c white has nothing to fear. Habu chooses
the simpler but longer win.

121.B8hx3c+        0/236        0/233
122.G4bx3c         0/236        0/233
123.B*7g           2/238        0/233
124.B*2e           0/238        0/233
125.G7h-6h         0/238        0/233
126.N*4d           0/238        0/233
127.G5f-5e         1/239        0/233
128.G5dx5e         0/239        2/235
129.B7gx5e         0/239        0/235
130.N*6c           0/239        0/235
131.B5ex6d         0/239        0/235
132.N6cx7e         0/239        0/235
133.B6dx7e         0/239        0/235
134.N*5e           0/239        0/235
Resigns            0/239        0/235
Time:              03:59:00     03:55:00
A game where the difference in judgement decided the outcome. Habu is playing
great shogi again recently and proves that his shogi sense is superior to
that of the Meijin. He is now one game away from his ninth consecutive Kio
title.