24th Asahi Open Match Game 3
[Black "Habu Yoshiharu, Asahi"]
[White "Fujii Takeshi, Challenger"]
[Event "24th Asashi Open, Game 3"]
[Date "May 4th 2006"]
1.P7g-7f     00:01:00  00:00:00
2.P3c-3d     00:01:00  00:01:00
3.P2g-2f     00:02:00  00:01:00
4.P4c-4d     00:02:00  00:04:00
5.S3i-4h     00:03:00  00:04:00
6.R8b-4b     00:03:00  00:05:00
7.K5i-6h     00:06:00  00:05:00
8.P9c-9d     00:06:00  00:05:00
9.K6h-7h     00:10:00  00:05:00
10.S3a-3b    00:10:00  00:09:00
11.P5g-5f    00:20:00  00:09:00
12.S3b-4c    00:20:00  00:12:00
13.G4i-5h    00:22:00  00:12:00
14.S7a-7b    00:22:00  00:13:00
15.P9g-9f    00:35:00  00:13:00
16.K5a-6b    00:35:00  00:16:00
17.P2f-2e    00:36:00  00:16:00
18.B2b-3c    00:36:00  00:16:00
19.P3g-3f    00:37:00  00:16:00
20.K6b-7a    00:37:00  00:16:00
21.S7i-6h    00:37:00  00:16:00
22.K7a-8b    00:37:00  00:17:00
23.S6h-5g    00:37:00  00:17:00
24.L1a-1b    00:37:00  00:22:00
25.G6i-6h    00:39:00  00:22:00
26.G4a-5b    00:39:00  00:24:00
27.P4g-4f    00:43:00  00:24:00
28.S4c-5d    00:43:00  00:26:00
29.N2i-3g    00:47:00  00:26:00
30.S5d-6e    00:47:00  00:43:00

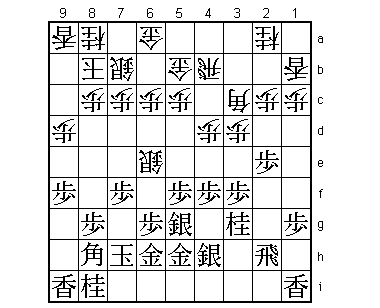
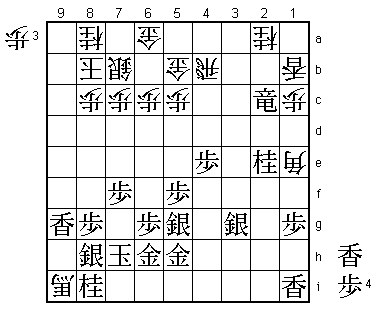
This attack is rarely seen in professional games, but many amateur players
like it. By putting pressure on the head of the king early, this silver
is creating possibilities for attacking with the usually passive ranging
rook strategy. The reason why professionals don't play is the quick attack,
which is played by Habu in this game. Of course, Fujii has prepared something.

31.P4f-4e    00:49:00  00:43:00
32.S6ex7f    00:49:00  00:55:00
33.P2e-2d    00:52:00  00:55:00
34.P2cx2d    00:52:00  00:56:00
35.P4ex4d    00:52:00  00:56:00
36.P9d-9e    00:52:00  01:11:00
37.P9fx9e    00:56:00  01:11:00

38.B3cx4d?   00:56:00  01:42:00

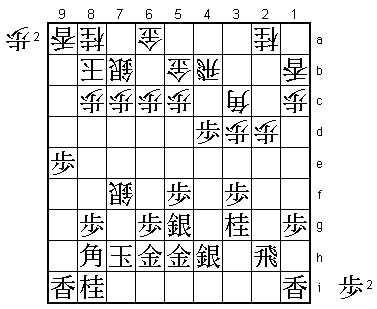
Fujii original plan was 38.P*9h Lx9h P*9g Lx9g Bx4d Bx4d Rx4d and because
of the lance on 1b, black only has an empty promotion with the bishop after
for example B*5e. On the other hand, white hasn't pushed the pawns on the
5th and 6th file, so the rook on 4d can switch to the king side and put more
pressure on the black king. It all seems like a good idea, but here Fujii
thought that he could play this without first sacrificing two pawns on the
edge. For example, 39.Bx4d Rx4d P*7g S8e Rx2d P*9h Lx9h P*9g Nx9g S9f and
now black can't play Rx2a+ because of B*5d. Keeping the pawns for later keeps
the white options open a little longer and is a very professional way of
thinking. Unfortunately, Fujii underestimated the next move.

39.P*7g!     01:31:00  01:42:00

This is usually a bad move, voluntarily blocking the bishop diagonal.
However, in this case it is the right move. The reason for this will
become clear a little later.

40.P3d-3e    01:31:00  01:59:00
41.P*4e      01:56:00  01:59:00
42.B4d-2b?   01:56:00  02:05:00

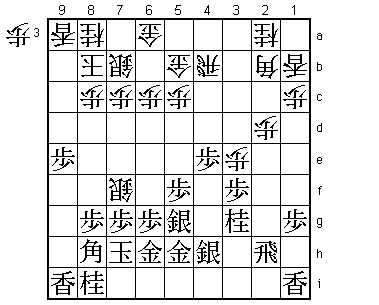
The losing move, but it was hard to see that 42.B3c was correct. After this
43.G4g or S4g is unclear, but Fujii feared that the attack on the head of
the bishop after 44.S8e P3e would be a problem. Furthermore, he still hadn't
seen what Habu was up to.

43.R2hx2d    02:01:00  02:05:00
44.P*9h      02:01:00  02:12:00
45.L9ix9h    02:05:00  02:12:00
46.P*9g      02:05:00  02:13:00
47.B8hx9g!   02:07:00  02:13:00

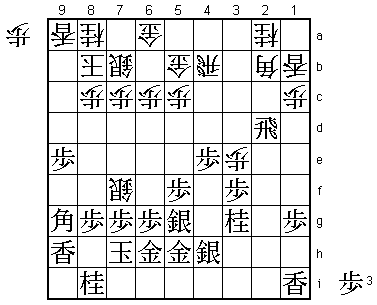
The point of Habu's play. Fujii thought this move was impossible because of
47.Lx9e and only know he realized that he had been outplayed.

48.P3ex3f?   02:07:00  02:40:00

Now there is nothing that can be done anymore. The only fighting chance white
has is 48.Lx9e Px7f Lx9g+ Lx9g P*9f Lx9f B*3c R2c+ B8h+ K6i +Bx8g, picking up
the strong lance on 9f. Black still has the upper hand, but it will still take
a long time to win, so not all hope is lost.

49.N3g-2e    02:14:00  02:40:00

The point. With the knight on 2e, the bishop drop on 3c in the previous
variation is no longer possible.

50.L9ax9e    02:14:00  02:41:00
51.P7gx7f    02:20:00  02:41:00
52.P3f-3g+   02:20:00  02:45:00
53.S4hx3g    02:22:00  02:45:00
54.L9ex9g+   02:22:00  02:45:00
55.L9hx9g    02:23:00  02:45:00

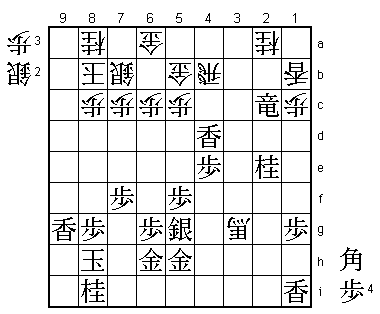
The black lance is pointing straight into the mino castle.

56.B*1e      02:23:00  02:45:00
57.R2d-2c+   02:28:00  02:45:00
58.B2b-9i+   02:28:00  02:57:00
59.S*8h!     02:32:00  02:57:00

Habu makes no mistake. If he would have saved the silver on 3g with 59.S3g-4f,
white can try and build some defense.

60.+B9ix8h   02:32:00  02:58:00
61.K7hx8h    02:32:00  02:58:00
62.B1ex3g+   02:32:00  02:58:00
63.L*4d      02:33:00  02:58:00
Resigns      02:33:00  02:59:00

Fujii took a minute to contemplate, but he realized that after 64.P*4c Rx2a+
his rook would never come into play again, while the knight is perfect for
attacking the mino castle. A perfect win for Habu, but Fujii again showed a
very positive attitude in this game. Next game he will have black and a
chance to tie the match again.
