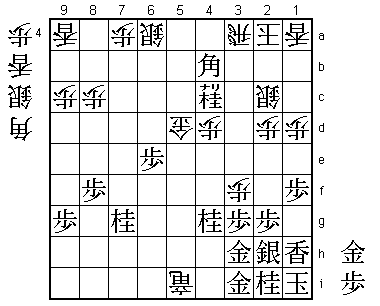
24th Asahi Open Match Game 2
[Black "Fujii Takeshi, Challenger"]
[White "Habu Yoshiharu, Asahi"]
[Event "24th Asahi Open, Game 2"]
[Date "April 19th 2006"]
1.P7g-7f     00:00:00  00:00:00
2.P8c-8d     00:00:00  00:00:00
3.P1g-1f?!   00:03:00  00:00:00

After the game, Fujii regretted playing this move so early.
Habu's opening strategy took him by surprise.

4.S7a-6b     00:03:00  00:01:00
5.P6g-6f     00:06:00  00:01:00
6.P5c-5d     00:06:00  00:02:00
7.S7i-7h     00:07:00  00:02:00
8.S3a-3b     00:07:00  00:03:00
9.S7h-6g     00:08:00  00:03:00
10.B2b-3a    00:08:00  00:04:00

This is the Iijima-style bishop pull-back. Not a very popular
opening, but Habu said after the game that he wanted to give it a
try. It is especially effective against Furibisha players that push
the edge pawn early, as can be seen from this game.

11.B8h-7g    00:08:00  00:04:00
12.P8d-8e    00:08:00  00:04:00
13.R2h-8h    00:08:00  00:04:00
14.B3a-5c    00:08:00  00:04:00
15.G6i-5h    00:10:00  00:04:00
16.K5a-4b    00:10:00  00:05:00
17.S6g-5f    00:11:00  00:05:00
18.K4b-3a    00:11:00  00:10:00
19.S5f-4e    00:23:00  00:10:00
20.R8b-8d    00:23:00  00:16:00

21.K5i-4h    00:29:00  00:16:00

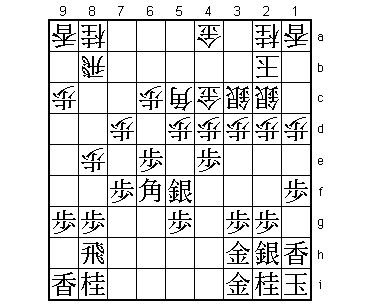
This is the point of Habu's opening strategy. Black seems to have 21.P6e
here, after which white cannot play P4d which seems to constrain his
options considerably. However, then white can play 22.P7d Sx5d B4d and
start the fight early, making use of the bad position of the black king.
This is why Fujii regretted 3.P1f. In the same opening development without
P1f, the black king would already have been on 4h here, and black could
have played 21.P6e without giving white a strong attack. Instead, black
now has to pull back his silver and loses two moves.

22.P4c-4d    00:29:00  00:20:00
23.S4e-5f    00:29:00  00:20:00
24.G6a-5b    00:29:00  00:20:00
25.K4h-3h    00:29:00  00:20:00
26.K3a-2b    00:29:00  00:21:00
27.K3h-2h    00:29:00  00:21:00
28.G5b-4c    00:29:00  00:21:00
29.L1i-1h    00:29:00  00:21:00
30.S6b-5a    00:29:00  00:25:00
31.K2h-1i    00:29:00  00:25:00
32.S5a-4b    00:29:00  00:25:00
33.S3i-2h    00:29:00  00:25:00
34.P3c-3d    00:29:00  00:25:00
35.G4i-3i    00:33:00  00:25:00
36.S4b-3c    00:33:00  00:25:00
37.G5h-4h    00:35:00  00:25:00
38.P1c-1d    00:35:00  00:28:00
39.G4h-3h    00:36:00  00:28:00
40.P2c-2d    00:36:00  00:28:00
41.P6f-6e    00:48:00  00:28:00
42.S3b-2c    00:48:00  00:29:00
43.B7g-6f    00:51:00  00:29:00
44.R8d-8b    00:51:00  00:30:00
45.P4g-4f    00:51:00  00:30:00
46.P7c-7d    00:51:00  00:33:00
47.P4f-4e    00:54:00  00:33:00

48.P4dx4e?   00:54:00  00:43:00

So far, white has done well and Habu said after the game that the Iijima-style
seems to give white even chances. However, taking the pawn on 4e is a mistake.
Fujii's reply was difficult to foresee, but here 48.G3b was required. Then after
48.Px4d Gx4d the position is unclear. After seeing this, Fujii said that maybe
47.P4e was an overplay and that playing S4g followed by S3f was better.

49.S5fx4e    00:59:00  00:43:00
50.P*4d      00:59:00  00:43:00
51.S4e-3f!   01:01:00  00:43:00

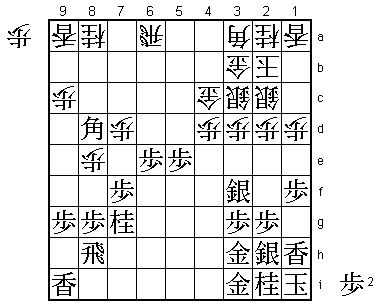
Habu underestimated the power of the silver here, combined with the next bishop
maneuver, which is very good for black. Having exchanged the pawn on the 4th file
only favors black. This pawn can be used in defense on 4h and 4i or in attack on
4b and 4c. Habu only looked at 51.S5f, after which white can go for an attack on
the head of the bishop on the 6th file.

52.G4a-3b    01:01:00  00:44:00
53.P5g-5f!   01:29:00  00:44:00

The second part of Fujii's plan. He wants to put the bishop on 4f. Habu has to avoid
this.

54.B5c-6b    01:29:00  00:56:00
55.B6f-5g    01:37:00  00:56:00
56.P5d-5e?   01:37:00  00:57:00

The second mistake and already the decisive one. Correct was immediately 56.B*7c
and even though 57.P7e P8f Px7d B8d B4f P8g+ is still good for black, white still
has fighting chances.

57.P5fx5e    01:40:00  00:57:00
58.B6b-7c    01:40:00  01:09:00
59.B5g-6f!   01:44:00  01:09:00

Flexibility by Fujii. Instead of sticking to his plan to move the bishop to 4f,
he sees that 59.P4f P3e would mean trouble. Instead, he moves the bishop back to
6f and starts to attack from there.

60.P6c-6d    01:44:00  01:11:00
61.P6ex6d    01:45:00  01:11:00
62.R8b-6b    01:45:00  01:11:00
63.N8i-7g    01:51:00  01:11:00
64.B7cx6d    01:51:00  01:17:00
65.P*6e      01:52:00  01:17:00
66.B6d-3a    01:52:00  01:18:00
67.B6f-8d    01:54:00  01:18:00
68.R6b-6a    01:54:00  01:34:00

69.R8h-5h!   02:01:00  01:34:00

Now the rook that was sleeping on 8h, comes into play with great force. There
were many other moves to consider like P*4e or R6h, but this is clearly the
strongest move.

70.P8e-8f    02:01:00  01:43:00
71.P8gx8f    02:01:00  01:43:00
72.P7d-7e    02:01:00  01:44:00
73.R5h-5f    02:02:00  01:44:00
74.P*8c      02:02:00  02:06:00
75.B8dx7e    02:02:00  02:06:00
76.B3ax7e    02:02:00  02:06:00
77.P7fx7e    02:02:00  02:06:00
78.B*6g      02:02:00  02:06:00
79.R5f-5g    02:02:00  02:06:00
80.B6g-7f+   02:02:00  02:08:00
81.P5e-5d    02:02:00  02:08:00
82.+B7fx7e   02:02:00  02:08:00
83.R5g-5f    02:03:00  02:08:00
84.N8a-7c    02:03:00  02:08:00
85.B*7b      02:14:00  02:08:00
86.R6a-5a    02:14:00  02:18:00
87.B7b-6c+   02:14:00  02:18:00
88.P*7f      02:14:00  02:18:00
89.+B6cx7c   02:20:00  02:18:00
90.R5ax5d    02:20:00  02:18:00
91.R5fx5d    02:20:00  02:18:00
92.G4cx5d    02:20:00  02:18:00
93.+B7c-6c!  02:22:00  02:18:00

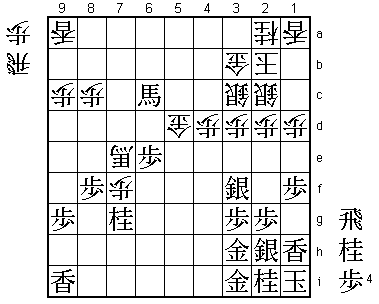
Black seems to be in a little bit of trouble, because giving up a knight can be
a problem in this position. The anaguma castle looks very solid, but after N*4f
it will become weak very quickly. However, Fujii has calculated this very deeply
and knows he will be able to save the knight.

94.G5d-5c    02:22:00  02:19:00
95.+B6c-8e   02:25:00  02:19:00
96.+B7e-6f   02:25:00  02:20:00

No choice. 97.+Bx8e Nx8e is worse.

97.R*7c      02:26:00  02:20:00
98.R*5i      02:26:00  02:21:00
99.+B8ex7f   02:26:00  02:21:00
100.+B6fx7f  02:26:00  02:21:00
101.R7cx7f+  02:26:00  02:21:00

And black has saved the knight on 7g.

102.R5ix9i+  02:26:00  02:21:00
103.P*5d     02:29:00  02:21:00
104.G5cx5d   02:29:00  02:21:00
105.+R7f-7b  02:29:00  02:21:00
106.+R9i-5i  02:29:00  02:24:00
107.P*4b     02:32:00  02:24:00
108.S3cx4b   02:32:00  02:26:00
109.P*4c     02:32:00  02:26:00
110.S4bx4c   02:32:00  02:26:00
111.P*4b     02:32:00  02:26:00
112.P*7a     02:32:00  02:26:00
113.+R7b-6a  02:33:00  02:26:00
114.P3d-3e   02:33:00  02:26:00

115.P4b-4a+! 02:35:00  02:26:00

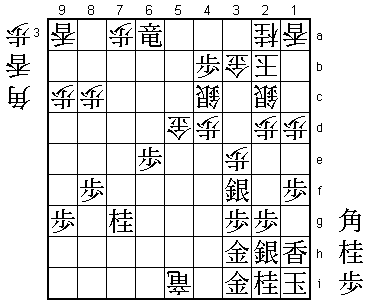
The final blow. Giving up the silver is not a big deal in this position, as
there is no way to check the black king with it while the king is still safely
in the anaguma. On the other hand, capturing the silver on 3f leaves a gaping
hole for a knight drop on 3e. The white king cannot be defended.

116.P3ex3f   02:35:00  02:30:00
117.N*3e     02:37:00  02:30:00
118.S*5b     02:37:00  02:31:00
119.N3ex4c+  02:42:00  02:31:00
120.S5bx6a   02:42:00  02:31:00
121.S*3a     02:42:00  02:31:00
122.G3bx3a   02:42:00  02:50:00
123.+P4ax3a  02:42:00  02:50:00
124.R*3e     02:42:00  02:51:00
125.+P3ax2a  02:44:00  02:51:00
126.K2bx2a   02:44:00  02:51:00
127.N*4g     02:44:00  02:51:00
128.R3e-3a   02:44:00  02:53:00
129.B*4b     02:44:00  02:53:00
Resigns      02:44:00  02:53:00

The difference between the positions is clear. White has no defense, while the
anaguma is still completely intact. A one-sided victory for Fujii, who really
needed to win this game. Not only would losing have meant a 2-0 hole with three
to play, he also had lost 9 straight games against Habu. Therefore, this victory
will have restored his confidence and the Asahi Open match is now down to a
best-of-three series.
