23rd Ryu-O Match Game 5
[Black "Watanabe Akira, Ryu-O"]
[White "Habu Yoshiharu, Challenger"]
[Event "23rd Ryu-O sen, Game 5"]
[Date "December 1st and 2nd 2010"]
1.P7g-7f 00:00:00 00:00:00
2.P3c-3d 00:00:00 00:02:00
3.P2g-2f 00:00:00 00:02:00
4.P8c-8d 00:00:00 00:03:00
5.P2f-2e 00:01:00 00:03:00
6.P8d-8e 00:01:00 00:05:00
7.G6i-7h 00:02:00 00:05:00
8.G4a-3b 00:02:00 00:07:00
9.P2e-2d 00:03:00 00:07:00
10.P2cx2d 00:03:00 00:08:00
11.R2hx2d 00:04:00 00:08:00
12.P8e-8f 00:04:00 00:10:00
13.P8gx8f 00:05:00 00:10:00
14.R8bx8f 00:05:00 00:10:00
15.R2dx3d 00:07:00 00:10:00
16.B2b-3c 00:07:00 00:16:00
17.R3d-3f 00:08:00 00:16:00
18.S3a-2b 00:08:00 00:17:00
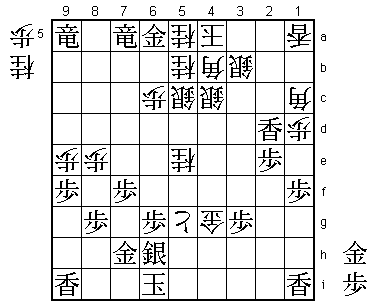
19.K5i-5h 00:21:00 00:17:00
20.K5a-4a 00:21:00 00:23:00
21.G4i-3h 00:24:00 00:23:00
22.R8f-8d 00:24:00 00:36:00
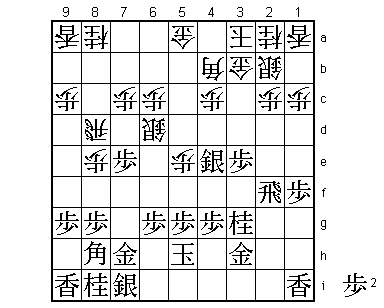
This is the third game in this match where the Yokofudori opening is played. In this
game, Watanabe delays dropping the pawn back on 8g and Habu responds by pulling back
the rook to 8d instead of 8e, like he played in the previous two games. As a result,
we get an opening that is quite different from the first and the third game.
23.P*8g 00:31:00 00:36:00
24.R8d-2d 00:31:00 00:42:00
25.S3i-2h 00:32:00 00:42:00
26.G6a-5a 00:32:00 00:43:00
27.P7f-7e 00:42:00 00:43:00
28.R2d-8d 00:42:00 00:46:00
29.R3f-8f 00:46:00 00:46:00
30.P*8e 00:46:00 00:49:00
31.R8f-5f 00:49:00 00:49:00
32.S7a-6b 00:49:00 01:17:00
33.P3g-3f 01:01:00 01:17:00
34.P5c-5d 01:01:00 01:48:00
35.P3f-3e 01:26:00 01:48:00
36.B3c-4b 01:26:00 02:01:00
37.S2h-3g 02:14:00 02:01:00
38.S6b-5c 02:14:00 02:12:00
39.S3g-4f 02:46:00 02:12:00
40.S5c-6d 02:46:00 02:28:00
41.S4f-4e 02:48:00 02:28:00
42.P5d-5e 02:48:00 03:01:00
43.R5f-2f 02:58:00 03:01:00
44.P*2c 02:58:00 03:14:00
45.N2i-3g 03:15:00 03:14:00
46.K4a-3a 03:15:00 03:32:00
47.P1g-1f 04:04:00 03:32:00
The sealed move and predicted by Akutsu (7-dan), who acted as one of the referees
for this game. It is a high class move that not many professionals would have played,
because of the following sequence.
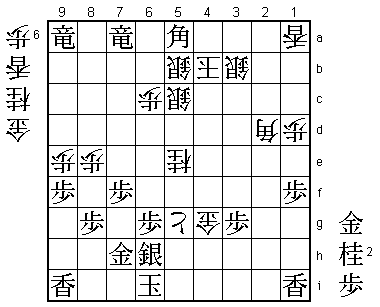
48.P7c-7d 04:04:00 03:41:00
49.P7ex7d 04:11:00 03:41:00
50.R8dx7d 04:11:00 03:41:00
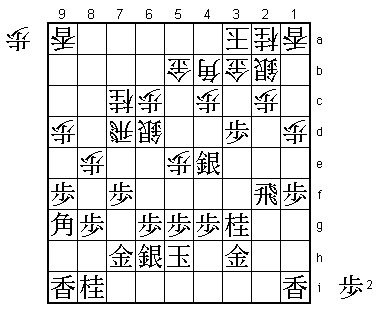
As explained in the third game, the Yokofudori is considered a strategic victory for
white if he manages to exchange the pawns on the 7th file. White has a pawn in hand,
can aim for the simple but strong attack N7c-N6e-P*7g and black cannot defend against
this with S6h because the gold on 7h can then be taken by the rook. Despite this,
Watanabe not only allowed the pawn exchange, but welcomed it. We will soon see why.
51.P9g-9f 04:15:00 03:41:00
52.P9c-9d 04:15:00 03:51:00
53.P*7f 04:35:00 03:51:00
54.P1c-1d 04:35:00 04:12:00
55.S7i-6h 04:40:00 04:12:00
56.N8a-7c 04:40:00 04:20:00
57.P3e-3d 05:02:00 04:20:00
58.G5a-5b 05:02:00 04:33:00
59.B8h-9g! 05:27:00 04:33:00
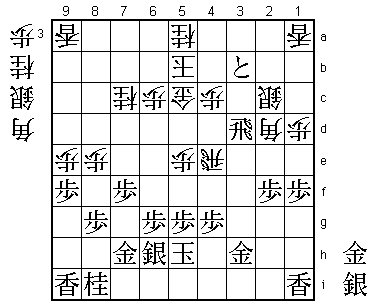
This exclamation mark is actually for all the moves leading up to 59.B9g. Watanabe
has thought of an excellent counter strategy to the attack on the 7th file. His
previous moves have set up 59.B9g, which now threatens Bx6d and whichever way white
takes the bishop, S*7e will win the rook and the white position is too vulnerable
against a rook drop.
60.G5b-5c 05:27:00 05:39:00
If taking the silver on 6d with the bishop was the only idea behind Watanabe's
strategy, 60.G5c would have taken care of the problem and white would have gotten
the better position. However, Watanabe has combined this with another attack.
61.R2f-4f 06:14:00 05:39:00
Necessary move to prevent losing the silver against P4d next, but this is also a
preparation for the following attack.
62.R7d-8d 06:14:00 06:29:00
A natural move to improve the freedom of the rook.
63.N3g-2e! 06:29:00 06:29:00
This looks like a straightforward attacking move, but only to amateur players.
For professionals, it is a move that is very hard to play, because the exchange
on 3c will give white a free pass to get rid of the wall silver on 2b. No professional
player wants to do that, so it shows that Watanabe has the ability to go beyond common
sense and be flexible, which has always been a trademark of his opponent.
64.P9d-9e 06:29:00 06:35:00
65.P3d-3c+ 06:49:00 06:35:00
66.N2ax3c 06:49:00 06:59:00
67.N2ex3c+ 06:49:00 06:59:00
68.S2bx3c 06:49:00 06:59:00
69.N*2e 06:50:00 06:59:00
70.S3c-2d 06:50:00 07:01:00
71.P*3c 06:51:00 07:01:00
72.G3b-2b 06:51:00 07:01:00
73.S4e-3d 06:51:00 07:01:00
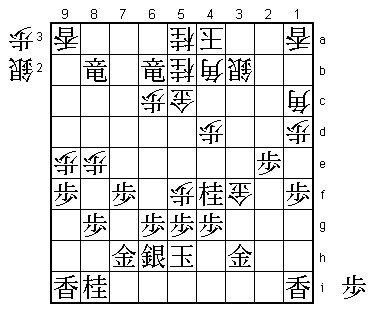
Now it becomes clear why 61.R4f was such a good move. Because the pawn on 4c must
be defended, this silver enters the attack with tempo.
74.N*5a 06:51:00 07:01:00
75.B9gx6d 07:04:00 07:01:00
76.R8dx6d 07:04:00 07:03:00
77.S*3b 07:04:00 07:03:00
78.G2bx3b 07:04:00 07:04:00
79.P3cx3b+ 07:04:00 07:04:00
80.K3ax3b 07:04:00 07:04:00
81.P*3c 07:04:00 07:04:00
82.K3b-4a 07:04:00 07:04:00
83.S3dx2c+ 07:07:00 07:04:00
84.P*3a 07:07:00 07:04:00
85.R4f-3f 07:09:00 07:04:00
86.K4a-5b 07:09:00 07:04:00
87.P3c-3b+ 07:17:00 07:04:00
88.P3ax3b 07:17:00 07:04:00
89.+S2cx2d 07:17:00 07:04:00
90.R6dx2d 07:17:00 07:07:00
91.P*3c 07:17:00 07:07:00
92.R2dx2e 07:17:00 07:11:00
93.P3cx3b+ 07:17:00 07:11:00
94.B4b-2d 07:17:00 07:11:00
95.P*2f 07:17:00 07:11:00
96.R2e-4e 07:17:00 07:11:00
97.R3f-3d 07:18:00 07:11:00
98.S*2c 07:18:00 07:14:00
99.R3d-8d?   07:29:00  07:14:00

Watanabe has played this game brilliantly so far and Habu has been forced to just
try and hang in there, hoping for a chance to turn the tables. Here Habu had more or
less given up hope, as he thought that black could play 99.Rx2d here. In the post-mortem
analysis Watanabe said that this would not be clear after 100.R3e, but Habu immediately
countered with the variation 101.S*3f! Rx3f B*2g which defends the gold on 3h with tempo
and black wins. After 99.R8d, things become a little murky.

100.S2cx3b   07:29:00  07:18:00
101.R8d-8b+  07:29:00  07:18:00
102.K5b-4a   07:29:00  07:18:00
103.G*3d     07:33:00  07:18:00
104.B*4b     07:33:00  07:25:00

Here Watanabe suddenly lost confidence in his position.

105.S*3f     07:40:00  07:25:00
106.R4e-4d   07:40:00  07:38:00
107.G3dx4d   07:40:00  07:38:00
108.P4cx4d   07:40:00  07:38:00
109.P2f-2e   07:40:00  07:38:00
110.B2d-1c   07:40:00  07:38:00
111.R*7b     07:40:00  07:38:00
112.N*5b     07:40:00  07:38:00
113.R7bx7c+  07:42:00  07:38:00
114.P5e-5f   07:42:00  07:39:00
115.G3h-4h   07:48:00  07:39:00
116.P*3g     07:48:00  07:42:00
117.N*4f     07:51:00  07:42:00
118.G*2f     07:51:00  07:52:00
119.+R7c-6b  07:52:00  07:52:00
120.P3g-3h+  07:52:00  07:52:00
121.G4hx3h   07:52:00  07:52:00
122.G2fx3f   07:52:00  07:52:00
123.+R8b-7a  07:53:00  07:52:00

Watanabe shows great mental strength by playing a difficult endgame almost flawlessly
after failing to bring his earlier advantage home. Here 123.+Rx9a is tempting to pick
up an extra lance, but Gx4f Px4f Bx4f forks king and rook.

124.S*4c     07:53:00  07:54:00
125.P*3g     07:53:00  07:54:00
126.G3f-3e   07:53:00  07:54:00
127.N8i-7g   07:55:00  07:54:00
128.P4d-4e   07:55:00  07:54:00
129.+R7ax9a  07:57:00  07:54:00

Only now Watanabe picks up the lance, after forcing white to go and get the knight
on 4f with the pawn.

130.P4ex4f   07:57:00  07:54:00
131.N7g-6e   07:57:00  07:54:00
132.S*6d     07:57:00  07:54:00
133.N6ex5c=  07:57:00  07:54:00
134.S6dx5c   07:57:00  07:54:00
135.+R6b-7a  07:57:00  07:54:00
136.P4fx4g+  07:57:00  07:55:00
137.G3hx4g   07:57:00  07:55:00
138.G3e-4f   07:57:00  07:55:00
139.L*2d     07:57:00  07:55:00
140.G4fx4g   07:57:00  07:55:00
141.K5hx4g   07:57:00  07:55:00
142.N*5e     07:57:00  07:55:00
143.K4g-5h   07:57:00  07:55:00
144.G*4g     07:57:00  07:56:00
145.K5h-6i   07:57:00  07:56:00
146.P5fx5g+  07:57:00  07:56:00
147.G*6a     07:57:00  07:56:00
A crude looking gold move, but white seems to have no good defense and the black
king cannot be mated.

148.B4bx2d?  07:57:00  07:56:00

This is the losing move. Habu could have kept the endgame very close if he would
have played 148.G5h K7i +Px6h Gx6h Gx6h Kx6h S*6b. This just seems to be giving up
a silver after Gx6b Sx6b +Rx6b, but then G*5f is a mating threat and even though Habu
was not convinced that this was winning for white, Watanabe admitted in the post-mortem
analysis that he felt that his chances of losing this position would have been quite high.

149.P2ex2d   07:57:00  07:56:00
150.B1cx2d   07:57:00  07:56:00
151.G6ax5a   07:57:00  07:56:00
152.K4a-4b   07:57:00  07:56:00
153.G5ax5b   07:57:00  07:56:00
154.S4cx5b   07:57:00  07:57:00

Or 154.K3c N*2f K4d P*4e Kx4e G*3f K4d Sx5g which threatens mate after P*4e next and
black wins.

155.B*5a     07:58:00  07:57:00
Resigns      07:58:00  07:59:00
After 156.K4c Bx2d+ defends against the white mating threat while making a hisshi, so
Habu resigned here. A great win for Watanabe, who kept playing hard after losing two
games in a row and losing a big advantage in this game as well. If we didn't already
know after his amazing comeback from 3-0 down two years ago, it now seems clear that
Watanabe's mental toughness is probably the best in the game. He gets two chances to
get his seventh consecutive Ryu-O title, but Habu has a chance to take this match the
full distance by winning with the black pieces in the next game.