23rd Ryu-O Match Game 3
[Black "Watanabe Akira, Ryu-O"]
[White "Habu Yoshiharu, Challenger"]
[Event "23rd Ryu-O sen, Game 3"]
[Date "November 10th and 11th 2010"]
1.P7g-7f     00:00:00  00:00:00
2.P3c-3d     00:00:00  00:01:00
3.P2g-2f     00:02:00  00:01:00
4.P8c-8d     00:02:00  00:04:00
5.P2f-2e     00:03:00  00:04:00
6.P8d-8e     00:03:00  00:06:00
7.G6i-7h     00:04:00  00:06:00
8.G4a-3b     00:04:00  00:10:00
9.P2e-2d     00:06:00  00:10:00
10.P2cx2d    00:06:00  00:12:00
11.R2hx2d    00:06:00  00:12:00
12.P8e-8f    00:06:00  00:14:00
13.P8gx8f    00:07:00  00:14:00
14.R8bx8f    00:07:00  00:15:00
15.R2dx3d    00:08:00  00:15:00
16.B2b-3c    00:08:00  00:20:00
17.R3d-3f    00:09:00  00:20:00
18.S3a-2b    00:09:00  00:22:00
19.P*8g      00:14:00  00:22:00
20.R8f-8e    00:14:00  00:28:00

Habu often tries a lot of different things during a title match, but here he plays
the same opening as in the first game, the R8e-Yokofudori. One of the reasons may
be a psychological one: by playing this opening again he wants to show that Watanabe
didn't shoot an important hole in his match preparation by winning the first game.
It is of course risky, because winning the first game will have given Watanabe extra
confidence in this opening and going 3-0 down in this match is something Habu cannot
afford.

21.R3f-2f    00:15:00  00:28:00
22.K5a-4a    00:15:00  00:47:00

Habu plays it a little differently than in game 1, where he played the king to 5b
instead which is a more defensive strategy.

23.K5i-5h    00:30:00  00:47:00
24.S7a-6b    00:30:00  00:55:00
25.G4i-3h    00:38:00  00:55:00
26.G6a-5a    00:38:00  01:10:00
27.P3g-3f    00:43:00  01:10:00
28.P7c-7d    00:43:00  01:14:00
29.N2i-3g    00:45:00  01:14:00
30.N8a-7c    00:45:00  01:16:00
31.S3i-4h    00:46:00  01:16:00
32.P*2e      00:46:00  01:20:00
33.R2f-2i    00:51:00  01:20:00
34.P7d-7e    00:51:00  01:21:00

35.P6g-6f    01:15:00  01:21:00

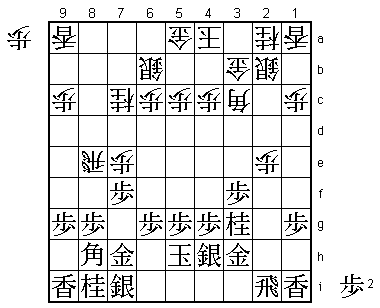
This is the first important point of the game. Black cannot take the pawn on 7e here,
because after 35.Px7e Rx7e white gets everything he wants in this position. Without
the pawn on the 7th file, in the future white will have the strong attack N6e followed
by P*7g or even P*7g immediately. This gives white a wide range of attacking options,
so black cannot afford to take the pawn on 7e. Watanabe played 35.P6f instead, which
is indirectly stopping Px7f because black can then play P*7d. 35.P6f is the correct
move, but Watanabe was not happy with it, because he felt that playing such a defensive
move with black was an indication of a strategic defeat. Objectively this is probably
not the case and Watanabe also said that he thought that it would be very difficult
for white to find a good attack against the black position, but the cautious way
Watanabe has played the opening is probably not so well-suited to his playing style.

36.R8e-8d    01:15:00  02:01:00
37.P7fx7e    01:21:00  02:01:00
38.P6c-6d    01:21:00  02:03:00
39.S7i-6h    01:46:00  02:03:00
40.P6d-6e    01:46:00  02:27:00
41.S6h-6g    01:49:00  02:27:00
42.K4a-3a    01:49:00  02:45:00

Habu played this move to remove a later bishop drop with check on 9f (for example,
after the rook promotes on 8g, which is a natural outcome of the white attack), but
it is very hard to say whether the attack on the 6th file combined with moving the
king to 3a is good for white or not.

43.P4g-4f    02:16:00  02:45:00
44.P2e-2f    02:16:00  03:12:00
45.S4h-4g    02:46:00  03:12:00
46.P*8f      02:46:00  03:28:00
47.P8gx8f    03:21:00  03:28:00
48.R8dx8f    03:21:00  03:30:00
49.B8h-7g    03:43:00  03:30:00
50.R8f-8d    03:43:00  03:35:00
51.P*8h      03:59:00  03:35:00

The sealed move.

52.P6ex6f    03:59:00  04:01:00
53.B7gx6f    04:16:00  04:01:00
54.B3cx6f    04:16:00  04:02:00
55.S6gx6f    04:16:00  04:02:00
56.B*3c      04:16:00  04:03:00
57.P*6g      05:00:00  04:03:00
58.P*6e      05:00:00  04:14:00
59.S6f-7g    05:00:00  04:14:00
60.B3cx7g+   05:00:00  04:14:00
61.N8ix7g    05:00:00  04:14:00
62.P*7f      05:00:00  04:14:00

63.B*9e!     05:57:00  04:14:00

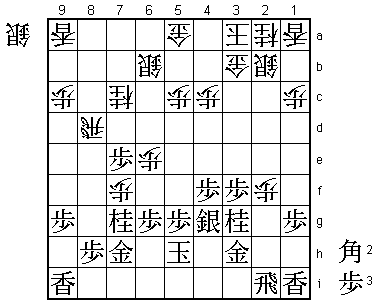
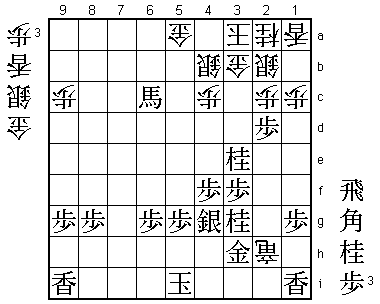
Watanabe originally intended to play 63.P*8g here, but realized that after 64.P6f
Px6f Px7g+ Gx7g S*7f G8f (Gx7g Rx8g+ is good for white) S7g= B*5i Sx6f+ P*6g +S6e
white has the better position: the silver on 6e is very strong, the gold on 8f is
in a bad position and black has been forced to drop the bishop on 5i. In the move
63.B*9e, despite being a change of plan, Watanabe has found a great replacement
as we will see.

64.R8d-9d    05:57:00  04:18:00
65.B9ex7c+   05:58:00  04:18:00
66.S6bx7c    05:58:00  05:01:00
67.N7gx6e    05:58:00  05:01:00

The knight that was under attack now comes into play strongly.

68.P7f-7g+   05:58:00  05:05:00
69.G7hx7g    05:58:00  05:05:00
70.S7c-6d    05:58:00  05:05:00
71.N6ex5c+!  05:59:00  05:05:00

Again a very strong sacrifice.

72.S6dx5c    05:59:00  05:37:00

Habu took more than half an hour for this obvious move as he suddenly realized he
was in trouble. After the game he even asked what had gone wrong, but there was
no clear answer. It may be that the attack along the 6th file is not sound, but
further study is necessary.

73.B*7c      05:59:00  05:37:00
74.S5c-4b    05:59:00  05:38:00
75.B7cx9a+   05:59:00  05:38:00

Now it becomes clear why Watanabe played 63.B*9e. White has no pawns in hand,
which means that he cannot block an attack on the 2nd and 3rd files. An attack
with a lance here is therefore very effective. The white king is surrounded by
four generals, but without pawns this defense is quite weak and white runs the
risk of being blown away instantly.

76.S*2g      05:59:00  05:45:00
77.G3hx2g    06:17:00  05:45:00
78.P2fx2g+   06:17:00  05:50:00
79.R2ix2g    06:17:00  05:50:00
80.N*6e      06:17:00  06:10:00
81.G7g-7h    06:41:00  06:10:00
82.G*7g      06:41:00  06:33:00
83.+B9a-5e   06:51:00  06:33:00
84.G7gx7h    06:51:00  06:36:00
85.+B5ex6e   06:52:00  06:36:00
86.G7h-7g    06:52:00  06:49:00
87.L*2i      07:17:00  06:49:00
88.R9d-8d    07:17:00  06:59:00
89.P8h-8g    07:17:00  06:59:00
90.B*7f      07:17:00  07:27:00
91.+B6ex7f   07:22:00  07:27:00
92.G7gx7f    07:22:00  07:27:00
93.S*7h?     07:28:00  07:27:00

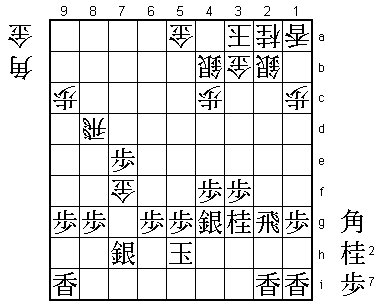
Habu has been attacking, but more out of desperation than anything else. Watanabe
is controlling this position, waiting for a chance to get to the white king with
easy attacks like N*3e followed by P*2c. Still, the game is very close and 93.S*7h
is a mistake that lets Habu back in. Correct would have been N*7i or B*4e and the
endgame is still close although it seems that black has the upper hand.

94.G7fx7e!   07:28:00  07:48:00

A pawn is worth a thousand golds. White has been suffering the lack of pawns for
a long time, but finally gets a chance to take one. This pawn is huge and Watanabe
immediately realized its significance. After taking the pawn, Habu got up and left
the playing room and Watanabe could not help himself and let out a big sigh that
could be heard all over the press room.

95.N*3e      07:55:00  07:48:00

Watanabe thought that 95.N*2d would be good enough here, but now realized that
white can play 96.G2c because black has dropped the silver on 7h. It would be alright
if black could play 97.B*7c (threatening Bx5a+ followed by G*3b), but then 98.Rx2d
is good for white. For example, 99.Rx2d Gx2d Lx2d R*2h followed by Rx2d+. Watanabe
took 27 minutes of the remaining 32 minutes to play 95.N*3e, but it is not the
solution he was seeking.

96.P*2c      07:55:00  07:50:00
97.B*4e      07:58:00  07:50:00
98.R8d-2d    07:58:00  07:51:00
99.P*2e      07:58:00  07:51:00
100.R2d-7d   07:58:00  07:51:00
101.B4e-6c+  07:58:00  07:51:00
102.B*7i     07:58:00  07:53:00
103.P*7f     07:59:00  07:53:00
104.B7i-8h+  07:59:00  07:55:00
105.P7fx7e   07:59:00  07:55:00
106.R7dx7e   07:59:00  07:55:00
107.P*7f     07:59:00  07:55:00
108.R7ex7f   07:59:00  07:55:00
109.P*7g     07:59:00  07:55:00
110.+B8hx7g  07:59:00  07:55:00
111.P2e-2d?  07:59:00  07:55:00

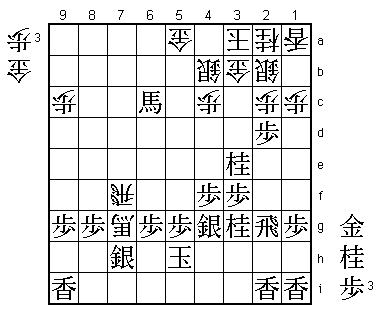
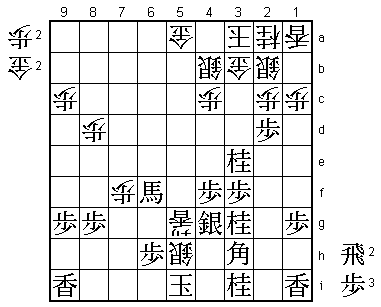
The obvious move, because after 112.Px2d black has the strong attack 113.P*2c, but
this underestimates Habu's reply. Here 111.N*6h was Watanabe's last chance. For example,
112.R7e P*7f +Bx7h Px7e P*6f and the endgame still seems complicated.

112.+B7g-5i! 07:59:00  07:55:00

This is very strong here, although this is not obvious.

113.K5hx5i   07:59:00  07:55:00
114.R7fx7h+  07:59:00  07:55:00
115.R2g-2h   07:59:00  07:55:00

It seems like black can defend against the promoted rook in multiple ways because he
has a gold in hand, but things are not so easy. For example, 115.G*6h fails to 116.G*6i
(Gx6i S*4h is mate) and 115.G*5h to 116.+R7i N*6i P*6h and the white attack is too
strong. Watanabe had counted on 115.R2h as the correct defense, but he has overlooked
something.

116.+R7hx2h  07:59:00  07:56:00
117.L2ix2h   07:59:00  07:56:00
118.R*2i     07:59:00  07:56:00
119.G*4i     07:59:00  07:56:00
120.R2ix2h+  07:59:00  07:56:00
121.G4i-3h   07:59:00  07:56:00

122.+R2h-2i! 07:59:00  07:56:00

Watanabe expected white to take the lance on 1i, but this is much stronger.

123.N*3i     07:59:00  07:56:00
124.L*6a     07:59:00  07:56:00

This lance chases the promoted bishop away and adds an attack on the other side of
the king. Black can no longer stop the white attack and his own attack doesn't work
as long as the promoted rook is defending the second file.

125.+B6c-8e  07:59:00  07:56:00
126.P*8d     07:59:00  07:56:00
127.+B8e-8f  07:59:00  07:56:00
128.L6ax6g+  07:59:00  07:56:00
129.B*1f     07:59:00  07:56:00
130.P*7g     07:59:00  07:57:00
131.P*6h     07:59:00  07:57:00
132.+L6gx5g  07:59:00  07:57:00
133.+B8fx7g  07:59:00  07:57:00
134.P*7f     07:59:00  07:57:00
135.+B7g-6f  07:59:00  07:57:00
136.+R2ix3h  07:59:00  07:57:00
137.B1fx3h   07:59:00  07:57:00
138.S*5h     07:59:00  07:57:00
Resigns      07:59:00  07:57:00

Quite a simple mate after 139.Sx5h G*4h K6i Gx5h K7h Gx6h K8h G*7h K9h S*8i, so
Watanabe resigned here. Watanabe drops a good game where he was in control and Habu
dodges a bullet with the white pieces and now has a chance to level the match with
the black pieces. A match that looked to be all but over at some point during this
game has suddenly come to live. The comments in the press room changed from "maybe
Habu will lose in four games as well" to "this match will again go the full distance".
Habu is still 2-1 down, but that looks much better than being 3-0 down.
