23rd Kio Match Game 3
Black: Goda, Challenger
White: Habu, Kio
23rd Kio-sen, Game 3, March 14th 1998
1.P7g-7f           0/0          0/0
2.P3c-3d           0/0          2/2
3.P2g-2f           1/1          0/2
4.P4c-4d           0/1          1/3
5.P2f-2e           2/3          0/3
6.B2b-3c           0/3          0/3
7.S3i-4h           0/3          0/3
8.S3a-3b           0/3          1/4
9.P5g-5f           0/3          0/4
10.S3b-4c          0/3          1/5
11.K5i-6h          0/3          0/5
12.R8b-2b          0/3          1/6
13.K6h-7h          0/3          0/6
14.K5a-6b          0/3          0/6
15.G4i-5h          4/7          0/6
16.S7a-7b          0/7          0/6
17.P9g-9f          2/9          0/6
18.P9c-9d          0/9          4/10
19.S7i-6h          3/12         0/10
20.K6b-7a          0/12         4/14
21.P3g-3f          1/13         0/14
22.K7a-8b          0/13         9/23
23.S6h-5g          7/20         0/23
24.P5c-5d          0/20         23/46
25.P4g-4f          13/33        0/46
26.G4a-5b          0/33         12/58
27.S4h-3g          11/44        0/58

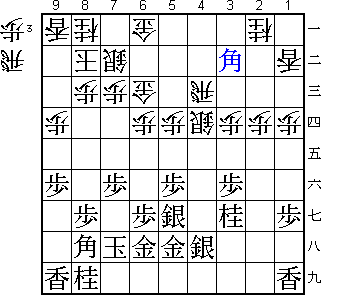
That Habu chooses the Shikenbisha can no longer be called a surprise. Goda's
bogin attack is also not strange. A couple of years ago it seemed that there
was nothing left to discover in this opening, but there has been a small
revival recently.

28.L1a-1b?!        0/44         19/77
29.G6i-6h          22/66        0/77
30.P1c-1d?!        0/66         2/79

Habu plays the Shikenbisha so well, that one easily forgets that it is not
his natural style of play. In this game, however, Habu does not fully
appreciate the subtleties of the position and plays two standard Shikenbisha
moves that weaken his position.

31.P4f-4e!         56/122       0/79

Great strategy switch by Goda. L1b and P1d now become a waste of time and the
hole on 1a invites a bishop drop.

32.R2b-4b          0/122        9/88
33.S3g-4h          0/122        0/88
34.P6c-6d          0/122        1/89
35.N2i-3g          0/122        0/89
36.G5b-6c          0/122        32/121
37.P2e-2d          3/125        0/121
38.B3cx2d          0/125        0/121
39.P4ex4d          2/127        0/121
40.S4cx4d          0/127        0/121
41.P*4c            0/127        0/121
42.R4bx4c          0/127        35/156
43.R2hx2d          0/127        0/156
44.P2cx2d          0/127        0/156
45.B*3b            0/127        0/156

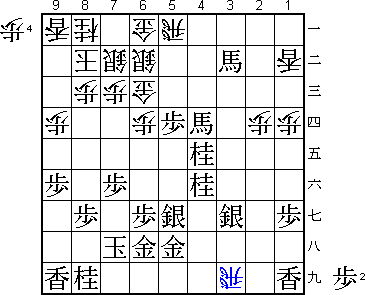
Painful drop.

46.R4c-4b          0/127        4/160
47.B3bx2a+         0/127        0/160
48.P*4c            0/127        2/162

It looks like white can weather the storm after 48.R*4a, but after 49.Bx4d
white can not take either bishop: 50.Rx4d +Bx1b followed by L*4e or 50.Rx2a
B3c+. In both cases black wins easily.

49.N*4f!           35/162       0/162

Looks a bit strange, but white has no good defense.

50.P5d-5e          0/162        10/172
51.P5fx5e          2/164        0/172
52.P3d-3e          0/164        0/172
53.P*4e            0/164        0/172
54.S4d-5c          0/164        0/172
55.P5e-5d          13/177       0/172
56.S5c-6b          0/177        0/172
57.B8h-3c+         7/184        0/172

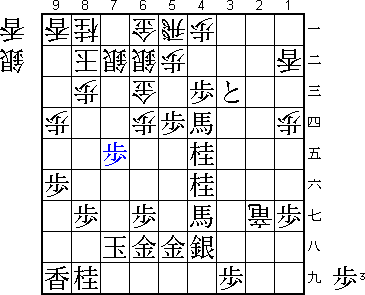
With two promoted bishops Goda has a big, perhaps even winning, advantage.

58.R4b-4a          0/184        0/172
59.+B2a-3b         0/184        0/172
60.R4a-5a          0/184        0/172
61.P4e-4d          0/184        0/172
62.P4cx4d          0/184        2/174
63.+B3cx4d         0/184        0/174
64.P3ex3f          0/184        25/199

A move one hates to play, since it forces the black knight into a good
attacking position. Still, this the only way to try something.

65.N3g-4e          1/185        0/199
66.P3f-3g+         0/185        0/199
67.S4hx3g          0/185        0/199
68.R*3i            0/185        0/199

69.+B3b-3c?        14/199       0/199

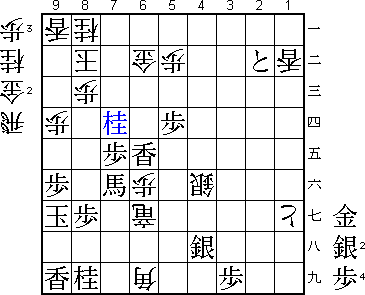
Natural move, but wrong. Goda had an easy win here after 69.P*4b Rx3g+
P4a+ +Rx3b +Px5a Gx5a P5c+ and white's position crumbles. Also, the defense
P*5i is good against all white counters.

70.P*4b            0/199        5/204
71.+B3cx4b         4/203        0/204
72.P*5b            0/203        0/204
73.S3g-4h          0/203        0/204
74.R3ix1i+         0/203        0/204
75.P*4c            1/204        0/204
76.P*4a            0/204        3/207
77.+B4bx2d         2/206        0/207
78.+R1i-2i         0/206        0/207
79.+B2d-3e         6/212        0/207
80.P*3h            0/212        1/208
81.+B3e-3f?        4/216        0/208

This second mistake gives Habu a glimmer of hope. After 81.P*3d P3i+ P3c+
+P4i S4g +P5i G4h white has no continuation.

82.P3h-3i+         0/216        1/209
83.+B3f-4g         0/216        0/209
84.+P3i-3h         0/216        1/210
85.P*3d            1/217        0/210
86.+R2i-2g         0/217        4/214
87.P3d-3c+         0/217        0/214
88.P7c-7d          0/217        1/215
89.P*3i            7/224        0/215
90.+P3hx4h         0/224        0/215
91.S5gx4h          0/224        0/215
92.P7d-7e          0/224        11/226
93.P7fx7e          0/224        0/226

94.P1d-1e!         0/224        0/226

If a computer would play a move like this, it would be hard not to laugh. This
is one of the strangest moves I have seen in a professional game. Attacking
the edge far away from both kings in this stage of the game is remarkable.
Habu shows himself a master of patience here. He can not force the position
or he will lose immediately. On the other hand, if Goda attacks and gives
him pieces, he will have a good counterattack.

95.P*2c            1/225        0/226
96.P1e-1f          0/225        0/226
97.P2c-2b+         0/225        0/226
98.L*7f            0/225        0/226
99.K7h-6i          0/225        0/226
100.P1fx1g+        0/225        1/227

Suddenly this pawn does not look that far away from the black king.

101.+B4d-6f        2/227        0/227
102.S*3f           0/227        5/232
103.+B4g-5f        1/228        0/232
104.+R2g-2e        0/228        0/232
105.+B6fx7f        1/229        0/232
106.S3fx4e         0/229        0/232
107.+B5f-6f        3/232        0/232
108.S4ex4f         0/232        0/232
109.P4c-4b+        0/232        0/232
110.P4ax4b         0/232        0/232
111.+P3cx4b        0/232        0/232
112.P*4g           0/232        5/237
113.S4h-5i         0/232        0/237
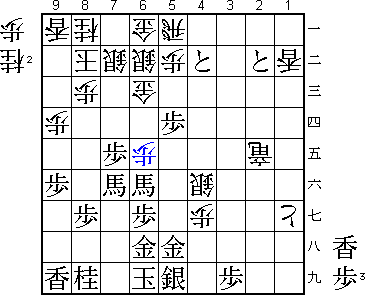
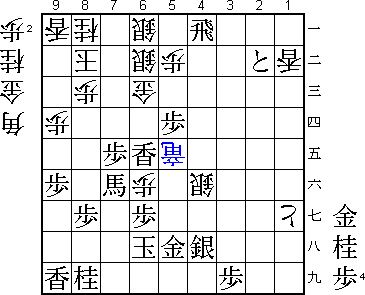
114.P6d-6e!        0/232        0/237

With both players close to byoyomi, Habu goes all out to win.

115.+P4bx5a?       1/233        0/237

After 115.+B7fx6e Goda still would have had the better chances.

116.P6ex6f!        0/233        0/237

Overlooked by Goda. He thought that +Px5a was a forcing move.

117.+P5ax6a        0/233        0/237
118.S7bx6a         0/233        0/237
119.R*4a           0/233        0/237
120.P4g-4h+        0/233        0/237
121.S5ix4h         0/233        0/237
122.N*5f           0/233        0/237
123.L*6e           5/238        0/237
124.N5fx6h+        0/238        1/238
125.K6ix6h         0/238        0/238
126.+R2e-5e?       0/238        0/238

Throws the game away after fighting hard to get back in it. After 126.N*8d
+Bx6f P*6d Rx6a+ G*7a +R5b Px6e there remains a very tight endgame which is
very hard to judge.

127.R4ax6a+        1/239        0/238
128.G*7h           0/239        1/239
129.K6hx7h         0/239        0/239
130.+R5ex5h        0/239        0/239
131.G*6h           0/239        0/239
132.B*6i           0/239        0/239
133.K7h-8h         0/239        0/239
134.+R5hx6h        0/239        0/239
135.K8h-9g         0/239        0/239
136.+R6hx6g        0/239        0/239
137.+R6ax6b        0/239        0/239
138.G6cx6b         0/239        0/239
139.N*7d           0/239        0/239
Resigns            0/239        0/239
Time:              03:59:00     03:59:00

And mate after 140.K9b S*9c Kx9c S*8b K9b Sx9a+ K9c +Bx9d Kx9d G*9e K9c
L*9d. This ends Habu's winning streak in the Kio-sen. After sixteen games in
more than 5 years Goda breaks the spell. Can he continue this in game 4?
