23rd Asahi Open Match Game 3
[Black "Habu Yoshiharu, Asahi"]
[White "Yamasaki Takayuki, Challenger"]
[Event "23rd Asahi Open, Game 3"]
[Date "May 4th 2005"]
1.P7g-7f     00:00:00  00:00:00
2.P3c-3d     00:00:00  00:00:00
3.P2g-2f     00:01:00  00:00:00
4.G4a-3b     00:01:00  00:02:00
5.P2f-2e     00:02:00  00:02:00
6.B2bx8h+    00:02:00  00:03:00
7.S7ix8h     00:02:00  00:03:00

After the disaster in the second game, the question was how
Yamasaki would recover. One advantage is that the third game
was played in Osaka, where he is based. Plenty of mental support,
but he is not playing anybody. The opening is no surprise: the
Kakugawari with tempo loss is one of Yamasaki's specialties.

8.S3a-2b     00:02:00  00:03:00
9.S3i-3h     00:02:00  00:03:00
10.S2b-3c    00:02:00  00:04:00
11.P1g-1f    00:03:00  00:04:00
12.P1c-1d    00:03:00  00:12:00
13.S8h-7g    00:03:00  00:12:00
14.P7c-7d    00:03:00  00:14:00
15.K5i-6h    00:04:00  00:14:00
16.S7a-6b    00:04:00  00:19:00
17.G6i-7h    00:05:00  00:19:00
18.P6c-6d    00:05:00  00:21:00
19.S3h-2g    00:13:00  00:21:00
20.S6b-6c    00:13:00  00:22:00
21.S2g-2f    00:13:00  00:22:00
22.S3c-4d    00:13:00  00:23:00
23.K6h-7i    00:13:00  00:23:00
24.N8a-7c    00:13:00  00:32:00
25.P3g-3f    00:26:00  00:32:00
26.R8b-4b    00:26:00  00:41:00

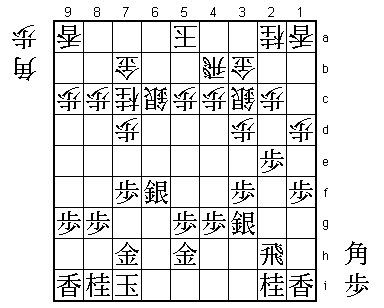
Yamasaki is trying to drag Habu into an open fight by changing
tactics. This fourth file rook strategy has some similarities with
the second game of the Meijin match, but the position is different
enough for this to be of little help for Habu. However, Yamasaki
might have overdone his attempts to try and confuse Habu a little.

27.G4i-5h    00:33:00  00:41:00
28.P6d-6e    00:33:00  00:44:00
29.S2f-3g    00:41:00  00:44:00
30.S4d-3c    00:41:00  00:45:00
31.P6g-6f    00:41:00  00:45:00
32.P6ex6f    00:41:00  00:45:00
33.S7gx6f    00:41:00  00:45:00
34.G6a-7b?   00:41:00  00:47:00

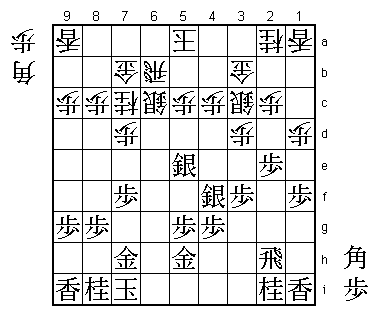
Here Yamasaki realized that his opening strategy had been a failure.
White wants to play 34.K6b here, but this fails to 35.B*8b. 34.G7b
is played to defend against this, but turns out to be bad in combination
with the next move. Better would have been directly 34.R6b. If then the
same line as in the game 35.S4f K4b S6f-5e, the white gold is still on
6a and can move to the right to support the king.

35.S3g-4f    00:54:00  00:47:00
36.R4b-6b    00:54:00  00:50:00
37.S6f-5e!   01:00:00  00:50:00

Typical positive play by Habu. He is not happy with just getting a
slightly better position after 37.G5h-6g, but seizes the moment to
try and inflict more damage upon the white position now that the pieces
are in disarray. This is not something that can be done lightly. Deep
calculation is needed to make sure that this is not an overplay.

38.S3c-4d    01:00:00  01:43:00
39.P2e-2d    01:31:00  01:43:00
40.P2cx2d    01:31:00  01:43:00
41.R2hx2d    01:31:00  01:43:00
42.P*2c      01:31:00  01:43:00
43.R2d-2h    01:31:00  01:43:00
44.K5a-4b    01:31:00  01:49:00
45.S5ex4d    01:43:00  01:49:00
46.P4cx4d    01:43:00  01:49:00
47.S4f-5e    01:43:00  01:49:00
48.S*5d      01:43:00  01:55:00
49.S5ex4d    02:13:00  01:55:00
50.B*2b?     02:13:00  01:58:00

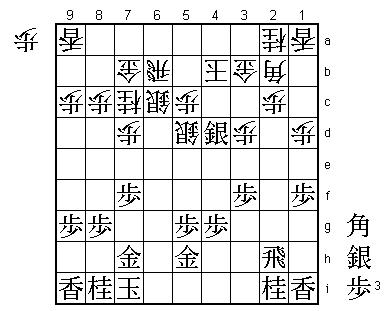
Here is where Habu's deep calculations made the difference. Yamasaki
thought in this position that Habu had made a mistake. The silver on
4d seems hard to defend. For example, the obvious 51.B*8h fails to
52.S5b and then P*6f is impossible. If Yamasaki would have calculated
as deeply, he would have played 50.B*6d ad after 51.B*3g P*4c S*5e Px4d
Sx6d Sx6d P*2d Px2d B*4f G6c Bx2d K5b white has two silvers for the
bishop and good fighting chances.

51.P*2d!     02:21:00  01:58:00

Habu has seen deeper than Yamasaki. By taking the side pawn on 3d, he
not only defends the silver, black also strengthens the attack. Realizing
that he is being outplayed here must have been the final blow to
Yamasaki's confidence. The quick collapse of the white position shows
a lack of fighting spirit.

52.P2cx2d    02:21:00  02:09:00
53.R2hx2d    02:21:00  02:09:00
54.P*2c      02:21:00  02:21:00
55.R2dx3d    02:21:00  02:21:00
56.S5d-4c    02:21:00  02:26:00
57.S4dx4c+   02:22:00  02:26:00
58.G3bx4c    02:22:00  02:27:00
59.S*3a      02:29:00  02:27:00
60.K4b-5a    02:29:00  02:27:00
61.S*4b      02:29:00  02:27:00
62.G4cx4b    02:29:00  02:29:00
63.S3ax2b=   02:29:00  02:29:00
64.S*3c      02:29:00  02:34:00
65.S2bx3c+   02:32:00  02:34:00
66.G4bx3c    02:32:00  02:34:00
67.R3d-3e    02:32:00  02:34:00
68.S*3d      02:32:00  02:34:00
69.R3e-5e    02:36:00  02:34:00
70.S6c-6d    02:36:00  02:34:00
71.R5e-5f    02:36:00  02:34:00
72.S*5e      02:36:00  02:34:00
73.P*6c!     02:37:00  02:34:00

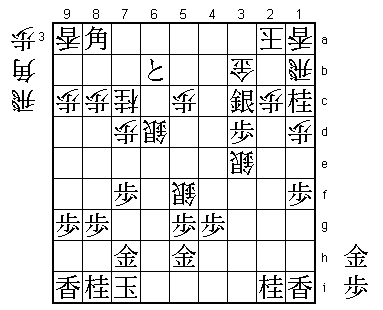
Winning. 74.Rx6c fails to 75.B*8a and after 74.Gx6c B*8a there is no
defense against S*7b next.

74.R6b-1b    02:37:00  02:34:00
75.P3f-3e    02:42:00  02:34:00
76.S3dx3e    02:42:00  02:34:00
77.P*3d      02:42:00  02:34:00
78.G3c-3b    02:42:00  02:35:00

Blocking the sideways working of the rook is very painful, but white
had no choice. 78.Gx3d Rx5e Sx5e B*4c or 78.G4c P*2d Px2d (Sx2d R2f)
S*2c wins.

79.B*8a      02:45:00  02:35:00
80.G7b-7a    02:45:00  02:36:00
81.B*6b      02:48:00  02:36:00
82.G7ax6b    02:48:00  02:37:00
83.P6cx6b+   02:48:00  02:37:00
84.K5a-4b    02:48:00  02:37:00
85.P*2b!     02:48:00  02:37:00

The decisive move.

86.K4b-3a    02:48:00  02:40:00
87.P2bx2a+   02:48:00  02:40:00
88.K3ax2a    02:48:00  02:40:00
89.S*3c      02:48:00  02:40:00
90.S5ex5f    02:48:00  02:40:00
91.N*1c      02:48:00  02:40:00
Resigns      02:48:00  02:40:00

Mate after 92.Rx1c Sx3b+ Kx3b G*3c or 92.K3a G*2a K4a B6c+. Not much in
this game for Yamasaki, who apologized to his fans after the game. Habu
defends his Asahi Open title for the first time, but rather than winning
the match, the general feeling was that Yamasaki had lost it. If he could
have taken his chances in the second game, the story might have been
very different.
