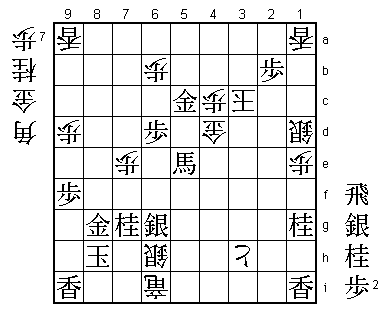
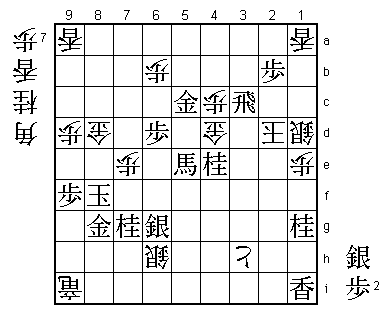
23rd Asahi Open Match Game 2
[Black "Yamasaki Takayuki, Challenger"]
[White "Habu Yoshiharu, Asahi"]
[Event "23rd Asahi Open, Game 2"]
[Date "April 19th 2005"]
1.P2g-2f     00:01:00  00:00:00
2.P8c-8d     00:01:00  00:02:00
3.P2f-2e     00:01:00  00:02:00
4.P8d-8e     00:01:00  00:03:00
5.G6i-7h     00:02:00  00:03:00
6.G4a-3b     00:02:00  00:03:00
7.P2e-2d     00:02:00  00:03:00
8.P2cx2d     00:02:00  00:03:00
9.R2hx2d     00:02:00  00:03:00
10.P*2c      00:02:00  00:03:00
11.R2d-2h    00:02:00  00:03:00

Yamasaki likes this opening, pulling back the rook to 2h and
then following up with a climbing silver attack. Therefore,
this was no surprise and the question was how Habu would
counter it.

12.P3c-3d    00:02:00  00:03:00
13.S3i-3h    00:02:00  00:03:00
14.P8e-8f    00:02:00  00:03:00
15.P8gx8f    00:02:00  00:03:00
16.R8bx8f    00:02:00  00:03:00
17.P*8g      00:02:00  00:03:00
18.R8f-8d    00:02:00  00:03:00
19.S3h-2g    00:04:00  00:03:00
20.P9c-9d    00:04:00  00:03:00
21.P9g-9f    00:04:00  00:03:00
22.K5a-4a    00:04:00  00:03:00
23.S2g-3f    00:07:00  00:03:00
24.B2b-3c    00:07:00  00:04:00
25.P1g-1f    00:10:00  00:04:00
26.P1c-1d    00:10:00  00:04:00
27.K5i-6i    00:10:00  00:04:00
28.S7a-6b    00:10:00  00:04:00
29.P7g-7f    00:11:00  00:04:00
30.S3a-2b    00:11:00  00:04:00
31.P6g-6f    00:12:00  00:04:00
32.G6a-5b    00:12:00  00:06:00
33.S7i-6h    00:12:00  00:06:00
34.P5c-5d    00:12:00  00:06:00
35.G4i-5h    00:37:00  00:06:00
36.B3c-4b    00:37:00  00:13:00

Habu is not doing anything special in this game, just defending
quietly and defending his pieces. Just like in the first game, he
gives his young opponent the chance to throw his best punch.

37.P4g-4f    00:41:00  00:13:00
38.P7c-7d    00:41:00  00:17:00
39.G5h-6g    00:53:00  00:17:00
40.N2a-3c    00:53:00  00:19:00
41.P4f-4e    01:00:00  00:19:00
42.P7d-7e    01:00:00  00:20:00
43.P7fx7e    01:02:00  00:20:00
44.B4bx7e    01:02:00  00:20:00
45.S6h-7g    01:07:00  00:20:00
46.B7e-5c    01:07:00  00:21:00
47.P5g-5f?!  01:12:00  00:21:00

Yamasaki was not happy with this choice, which loses a pawn. If this
was a simple mistake, it would have been tolerable, but a similar
thing had happened in an earlier game that Yamasaki knew about.

48.P3d-3e    01:12:00  00:27:00
49.S3f-2g    01:13:00  00:27:00

This loses the pawn on 4e, but the problem is that the natural
49.S4g fails to 50.P5e!, threatening R2d or P1e Px1e P*1g (Lx1g
P*1h Rx1h R2d) next. Black cannot exchange rooks with the king
on 6i.

50.R8d-8e    01:13:00  00:34:00
51.B8h-7i    01:15:00  00:34:00
52.R8ex4e    01:15:00  00:52:00

Habu was happy with his position here and Yamasaki was not, but
in the next couple of moves things inexplicably change...

53.P*4f      01:15:00  00:52:00
54.R4e-4d    01:15:00  00:52:00
55.B7i-6h    01:16:00  00:52:00
56.P2c-2d    01:16:00  01:08:00
57.K6i-7i    01:23:00  01:08:00
58.S2b-2c    01:23:00  01:13:00
59.P6f-6e    01:28:00  01:13:00
60.P6c-6d    01:28:00  01:21:00
61.P6ex6d    01:33:00  01:21:00
62.B5cx6d    01:33:00  01:21:00
63.R2h-4h    01:33:00  01:21:00
64.P2d-2e    01:33:00  01:22:00
65.P4f-4e    01:34:00  01:22:00
66.R4d-3d    01:34:00  01:22:00
67.P5f-5e    01:40:00  01:22:00
68.P5dx5e    01:40:00  01:35:00
69.P4e-4d    01:40:00  01:35:00
70.S6b-5c    01:40:00  01:36:00
71.P3g-3f    01:59:00  01:36:00
72.S5cx4d    01:59:00  01:37:00
73.R4h-3h    02:02:00  01:37:00
74.B6d-5c    02:02:00  02:03:00
75.K7i-8h    02:05:00  02:03:00

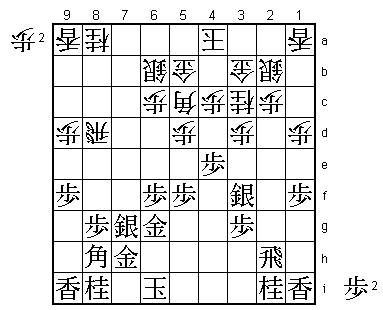
Despite winning an early pawn, white has been unable to make any
progress. On the other hand, the black position has improved
massively. The black king is much safer than the white king and
black has potential attacks everywhere. Even the silver on 2g is
no longer a passive piece. Seeing this position through the eyes
of a professional, the game is over. The only question remaining
is where and how black will strike the decisive blow.

76.S2c-2d    02:05:00  02:13:00

Moving the silver out of the defense is not a move of preference,
but Habu has no choice.

77.P*5d      02:13:00  02:13:00

This attacking base should have decided the game.

78.B5c-6b    02:13:00  02:13:00
79.P1f-1e    02:24:00  02:13:00
80.P1dx1e    02:24:00  02:13:00
81.P*2f      02:24:00  02:13:00
82.P5e-5f    02:24:00  02:25:00
83.P2fx2e    02:25:00  02:25:00
84.S2dx2e    02:25:00  02:25:00
85.P3fx3e    02:25:00  02:25:00
86.S4dx3e    02:25:00  02:25:00
87.N2i-1g    02:26:00  02:25:00
88.S2e-1d    02:26:00  02:27:00
89.S2g-2f    02:27:00  02:27:00
90.P*3g      02:27:00  02:27:00
91.S2fx3e    02:31:00  02:27:00
92.B6bx3e    02:31:00  02:27:00
93.B6hx3e    02:31:00  02:27:00
94.P3gx3h+   02:31:00  02:27:00

95.B3e-7a+?  02:36:00  02:27:00

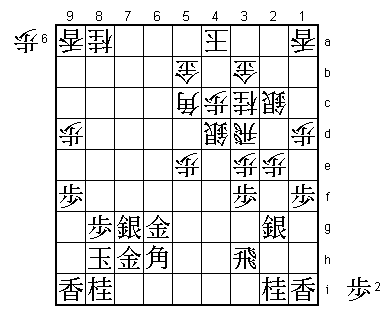
Aims at taking the knight, followed by N*4f, but this is playing
it too safe. As Morishita pointed out, the quickest way to win
was 95.B5c+ Gx5c Px5c+ K3a and then P*3e Rx3e P*4d Px4d B*5d
(or S*4c) and white has no defense. After 95.B7a+ black is still
winning quite comfortably, but it shows that Yamasaki's mind set
is wrong here. Trying to play it safe is a dangerous thing in a
shogi endgame.

96.P5f-5g+   02:36:00  02:32:00
97.G6gx5g    02:37:00  02:32:00
98.P*7f      02:37:00  02:32:00
99.S7gx7f    02:38:00  02:32:00
100.P*7g     02:38:00  02:34:00
101.N8ix7g   02:41:00  02:34:00
102.P*7e     02:41:00  02:34:00
103.S7f-6g   02:43:00  02:34:00
104.P*6b     02:43:00  02:35:00
105.P*6c     02:43:00  02:35:00
106.G5bx6c   02:43:00  02:36:00
107.P*6d     02:43:00  02:36:00
108.G6cx5d   02:43:00  02:37:00
109.+B7ax8a  02:43:00  02:37:00
110.P*8f     02:43:00  02:37:00
111.N*4f     02:45:00  02:37:00
112.R3d-3g+  02:45:00  02:38:00
113.+B8ax5d  02:52:00  02:38:00
114.+R3gx5g  02:52:00  02:38:00
115.S*5c     02:57:00  02:38:00
116.P8fx8g+  02:57:00  02:51:00
117.G7hx8g   02:57:00  02:51:00
118.+R5gx4f  02:57:00  02:52:00

119.P*2b?    02:57:00  02:52:00

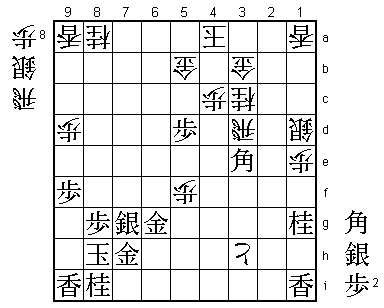
Habu has created some threats of his own against the king, but
here Yamasaki could have delivered the coupe de grace with
119.B*2b, which is hisshi. If white doesn't defend G*5b is
mate, 120.Gx2b G*4b, 120.G4b G*3a, 120.G*4b Sx4b+ Gx4b G*3a
are all mate. Of course, Yamasaki had seen B*5b, but he overlooked
that after 120.S*5a or G*5b he could drop a pawn on 4b which leads
to mate. Because of this oversight, he didn't think that B*2b was
a mate and chose 119.P*2b instead, which also threatens mate
(after B*5b next). Yamasaki regretted missing B*2b most, but he
gets another chance to win the game.

120.G3b-4b   02:57:00  02:54:00
121.S5cx4b+  02:59:00  02:54:00
122.K4ax4b   02:59:00  02:54:00
123.G*5c     02:59:00  02:54:00
124.K4b-3b   02:59:00  02:57:00
125.P*3d     02:59:00  02:57:00
126.S*7i     02:59:00  02:58:00
127.K8hx7i   02:59:00  02:58:00
128.R*5i     02:59:00  02:58:00
129.G*6i     02:59:00  02:58:00
130.S*6h     02:59:00  02:59:00
131.K7i-8h   02:59:00  02:59:00
132.R5ix6i+  02:59:00  02:59:00
133.P3dx3c+  02:59:00  02:59:00
134.K3bx3c   02:59:00  02:59:00
135.B*5e     02:59:00  02:59:00
136.+R4fx5e  02:59:00  02:59:00
137.+B5dx5e  02:59:00  02:59:00
138.G*4d     02:59:00  02:59:00

139.N*4e?    02:59:00  02:59:00

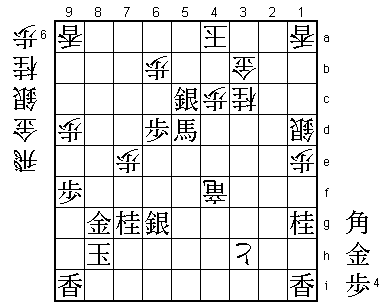
Only here the game finally turns in Habu's favor. Black has a
mate here after 139.N*2e Sx2e Nx2e K2c S*2d Kx2d +B4f S*3e S*3c
K2e R*2c P*2d Sx2d+ K2f +S2e K2g +S3e. This is not so easy in
byoyomi, and Yamasaki said after the game that he had overlooked
+B4f in this line. Yamasaki actually thought that 139.N*4e was
winning.

140.K3c-2c   02:59:00  02:59:00

Yamasaki somehow thought that this move was impossible. He has read
140.K2d +B4f P*3e S*3c K1c +Bx6h +Rx6h K9g and no mate against the
black king, while the white king is almost impossible to defend.

141.R*3c     02:59:00  02:59:00
142.K2c-2d   02:59:00  02:59:00
143.K8h-9g   02:59:00  02:59:00
144.+R6ix9i  02:59:00  02:59:00
145.K9g-8f   02:59:00  02:59:00
146.G*8d     02:59:00  02:59:00
Resigns      02:59:00  02:59:00

Even after 147.+B4f P*3e there is no mate, while white threatens
both N*7d and B*9e Px9e +Rx9e, leaving black without defense. Missing
a quick win, a hisshi and a mate: this game must have been unbearable
for Yamasaki. The shock was so big that he did not move from his
seat even after the post-mortem analysis had finished and everybody
(including Habu) had left the room. It is highly unlikely that Yamasaki
will recover enough from this to take all three remaining games.
The next game will show if the damage done to Yamasaki's confidence is
already fatal.
