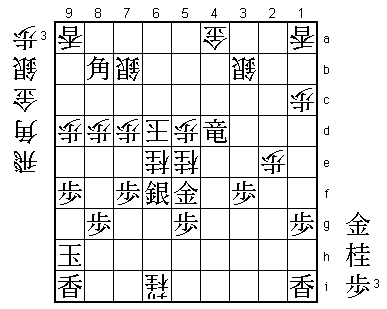
23rd Asahi Open Match Game 1
[Black "Habu Yoshiharu, Asahi"]
[White "Yamasaki Takayuki, Challenger"]
[Event "23rd Asahi Open, Game 1"]
[Date "April 7th 2005"]
1.P7g-7f     00:00:00  00:00:00
2.P3c-3d     00:00:00  00:00:00
3.P2g-2f     00:01:00  00:00:00
4.P5c-5d     00:01:00  00:02:00
5.S3i-4h     00:01:00  00:02:00
6.B2b-3c     00:01:00  00:05:00
7.K5i-6h     00:05:00  00:05:00
8.R8b-2b     00:05:00  00:14:00

Yamasaki likes this kind of position and predicted before the match that
the opening would be Gokigen Nakabisha or Mukaibisha. He might have
regretted his openness, because it turns out that Habu has prepared
something.

9.B8hx3c+    00:10:00  00:14:00
10.N2ax3c    00:10:00  00:14:00
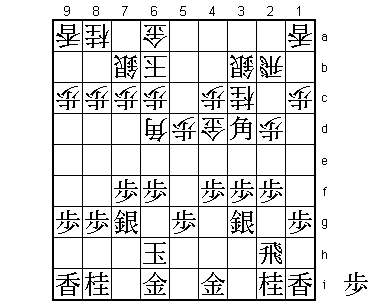
11.B*5f!?    00:10:00  00:14:00

Eleven moves into the game and already a move that has never been played
before. Like the primitive Wrong Diagonal Bishop opening, black has the
double threat of promotion and taking a pawn. However, in contrast to the
Wrong Diagonal Bishop, in this position having the bishop in hand is
considered an advantage for white that is more than enough compensation
for the pawn. It takes someone of Habu's caliber to judge that the head
of the white knight is a weakness that will cause white great difficulties.
This being said, after the game Yamasaki said that he also was a little
worried about B*5f.

12.S7a-7b    00:10:00  00:35:00
13.B5fx3d    00:10:00  00:35:00
14.S3a-3b    00:10:00  00:42:00
15.S7i-8h    00:12:00  00:42:00
16.P2c-2d    00:12:00  00:46:00
17.S8h-7g    00:14:00  00:46:00
18.K5a-6b    00:14:00  00:47:00
19.P3g-3f    00:20:00  00:47:00
20.G4a-4b    00:20:00  01:22:00
21.P4g-4f    00:25:00  01:22:00
22.B*6d      00:25:00  01:26:00
23.S4h-3g    00:31:00  01:26:00
24.G4b-5c    00:31:00  01:35:00
25.P6g-6f    00:36:00  01:35:00
26.G5c-4d    00:36:00  01:35:00

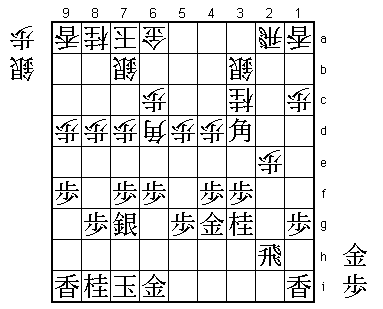
Yamasaki has an interesting playing style, with a strange preference for
moves that look unnatural or plain bad shape, but upon closer inspection
turn out to be very strong. In this game we get a couple of examples of
these moves, starting with 26.G4d. Putting the gold in front of the pawn
is bad shape, but supporting the head of the knight is more important.

27.B3d-7h    00:36:00  01:35:00
28.P7c-7d    00:36:00  01:36:00
29.G4i-5h    00:36:00  01:36:00
30.K6b-7a    00:36:00  01:36:00
31.K6h-7i    00:37:00  01:36:00
32.P9c-9d    00:37:00  01:38:00
33.P9g-9f    00:56:00  01:38:00
34.P8c-8d    00:56:00  01:41:00
35.G5h-4g    01:04:00  01:41:00
36.P2d-2e    01:04:00  01:59:00
37.P2fx2e    01:09:00  01:59:00
38.R2bx2e    01:09:00  01:59:00
39.S3g-2f    01:10:00  01:59:00
40.R2e-2a    01:10:00  02:01:00
41.P*2c      01:10:00  02:01:00
42.S3bx2c    01:10:00  02:03:00
43.S2f-3e    01:10:00  02:03:00
44.P*2e      01:10:00  02:04:00
45.S3ex4d    01:27:00  02:04:00
46.P4cx4d    01:27:00  02:04:00
47.N2i-3g    01:27:00  02:04:00
48.S2c-3b    01:27:00  02:10:00
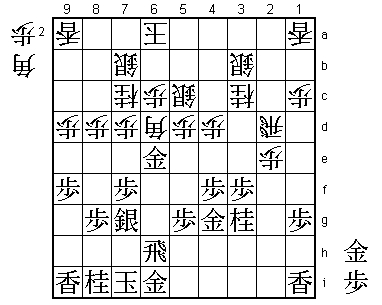
49.B7h-3d!   01:30:00  02:10:00

A move that is very easy to overlook, as it seems to have no clear
meaning. However, it invites the next move, which has a problem that
is deeply hidden.

50.R2a-2d    01:30:00  02:18:00
51.P6f-6e    01:32:00  02:18:00
52.B6d-7c    01:32:00  02:20:00
53.B3dx6a+   01:34:00  02:20:00
54.K7ax6a    01:34:00  02:20:00
55.P6e-6d    01:36:00  02:20:00
56.B7cx6d    01:36:00  02:23:00
57.R2h-6h    01:37:00  02:23:00
58.S*5c      01:37:00  02:24:00

White wants to play 58.S*6b instead, but this fails to 59.G*3e R2a
Gx4d followed by N4e and the black attack is unstoppable.

59.G*6e      01:42:00  02:24:00
60.N8a-7c!   01:42:00  02:25:00

A second typical Yamasaki move. Suddenly it seems that white has
slowed down the black attack and created one of his own from nowhere.
Lesser players than Habu would have wavered here.

61.G6ex6d    01:47:00  02:25:00
62.P6cx6d    01:47:00  02:25:00
63.N3g-4e!   01:58:00  02:25:00

The black attack is still in time, but only just...

64.N3cx4e    01:58:00  02:27:00
65.P4fx4e    01:58:00  02:27:00
66.N7c-6e    01:58:00  02:36:00
67.S7g-6f    02:01:00  02:36:00
68.N*5e      02:01:00  02:36:00
69.P4ex4d    02:20:00  02:36:00

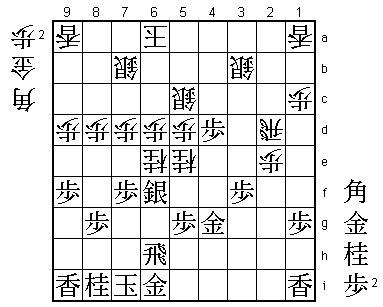
70.R2dx4d?   02:20:00  02:41:00

An important mistake that quickens the end. Yamasaki thought that
after 71.B*3e he could play 72.Rx4g+, but realized too late that
he had overlooked a vital black move. If he would have seen it
early enough, he would have played 70.Nx4g+ here. Then 71.B*3e
R2c P*2d G*5h and after both Gx5h +Nx5h Rx5h G*6g or Rx5h +Nx5h
Gx5h R3c white has the upper hand. Fortunately for black, he can
still win after Px2c+ Gx6h Gx6h G*5h Gx5h +Nx5h because there is a
long and rather difficult mate after G*5b next. However, this mate
was only found after analyzing the position for considerable time
in the post-mortem, so it is far from clear that Habu would have
found this.

71.B*3e      02:32:00  02:41:00
72.B*6b      02:32:00  02:58:00

Here Yamasaki realized that after 72.Rx4g+, black has Bx5c+ G*5b
P*6c! and now Gx6c fails to G*5b, Gx5c to G*6b and Sx6c to N*7c
K5a S*6b Gx6b G*6a!. With deep regret he played B*6b, losing all
will to fight. The rest of the game he plays all his moves without
much thought.

73.B3ex4d    02:33:00  02:58:00
74.S5cx4d    02:33:00  02:58:00
75.G4g-5f    02:35:00  02:58:00
76.B*4i      02:35:00  02:58:00
77.R6h-4h    02:36:00  02:58:00
78.B4i-6g+   02:36:00  02:58:00
79.R*4b      02:38:00  02:58:00
80.G*4a      02:38:00  02:58:00
81.R4hx4d    02:38:00  02:58:00
82.B6bx4d    02:38:00  02:58:00
83.R4bx4d+   02:38:00  02:58:00
84.+B6gx8i   02:38:00  02:58:00
85.K7ix8i    02:38:00  02:58:00
86.N*7g      02:38:00  02:58:00
87.K8i-9h    02:38:00  02:58:00
88.N7gx6i+   02:38:00  02:58:00
89.S*6b      02:38:00  02:58:00
90.K6ax6b    02:38:00  02:58:00
91.B*5c      02:38:00  02:58:00
92.K6b-7c    02:38:00  02:58:00
93.B5cx6d+   02:38:00  02:58:00
94.K7cx6d    02:38:00  02:58:00
95.B*8b      02:38:00  02:58:00
Resigns      02:38:00  02:58:00

Mate after 96.K6c G*5c or 96.S*7c Gx6e K6c +Rx5d K7b Bx7c+ Kx7c
Gx7d K8b G*8c etc. When looking at the whole game, a very convincing
win by Habu. Still, Yamasaki showed that he is a real fighter.
That promises an interesting second game, which Yamasaki must win
to avoid a nearly fatal 2-0 deficit.
