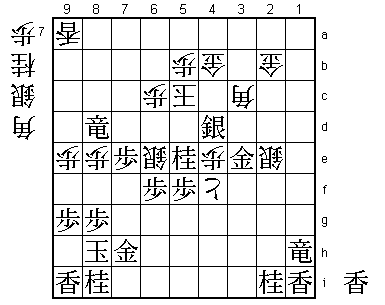
22nd Ryu-O Match Game 2
[Black "Watanabe Akira, Ryu-O"]
[White "Moriuchi Toshiyuki, Challenger"]
[Event "22nd Ryu-O sen, Game 2"]
[Date "October 28th and 29th 2009"]
1.P7g-7f     00:00:00  00:00:00
2.P3c-3d     00:00:00  00:00:00
3.P2g-2f     00:02:00  00:00:00
4.G4a-3b     00:02:00  00:00:00
5.G6i-7h     00:03:00  00:00:00
6.P4c-4d     00:03:00  00:01:00
7.P2f-2e     00:05:00  00:01:00
8.B2b-3c     00:05:00  00:01:00
9.S3i-4h     00:08:00  00:01:00
10.G6a-5b    00:08:00  00:03:00
11.P5g-5f    00:13:00  00:03:00
12.S3a-2b    00:13:00  00:09:00
13.B8h-7g    00:14:00  00:09:00
14.P8c-8d    00:14:00  00:29:00

Watanabe was taken a little by surprise by the way Moriuchi played the opening.
Up until here, white is playing an "Uso Yagura", where white tries to move into
the Yagura formation without pushing the pawn on the 8th file. However, here
Moriuchi voluntarily gives up this plan and pushes the pawn in front of the
rook anyway.

15.S7i-8h    00:22:00  00:29:00
16.P8d-8e    00:22:00  00:29:00

And here Moriuchi pushes it even further up the board.

17.K5i-6i    00:47:00  00:29:00
18.G5b-4c    00:47:00  00:47:00
19.B7g-6h    00:48:00  00:47:00
20.B3c-4b    00:48:00  00:49:00
21.S8h-7g    00:48:00  00:49:00
22.S2b-3c    00:48:00  00:49:00
23.P3g-3f    00:54:00  00:49:00
24.P5c-5d    00:54:00  01:00:00
25.S4h-3g    00:56:00  01:00:00
26.S7a-6b    00:56:00  01:05:00
27.G4i-5h    01:07:00  01:05:00
28.K5a-4a    01:07:00  01:17:00
29.P6g-6f    01:08:00  01:17:00
30.P7c-7d    01:08:00  01:23:00
31.G5h-6g    01:09:00  01:23:00
32.B4b-6d    01:09:00  01:34:00
33.K6i-7i    01:10:00  01:34:00
34.K4a-3a    01:10:00  01:34:00
35.K7i-8h    01:10:00  01:34:00
36.K3a-2b    01:10:00  01:40:00
37.B6h-4f    01:34:00  01:40:00
38.S6b-7c    01:34:00  01:42:00
39.P1g-1f    01:36:00  01:42:00
40.P9c-9d    01:36:00  01:49:00
41.P1f-1e    01:54:00  01:49:00
42.P9d-9e    01:54:00  01:57:00

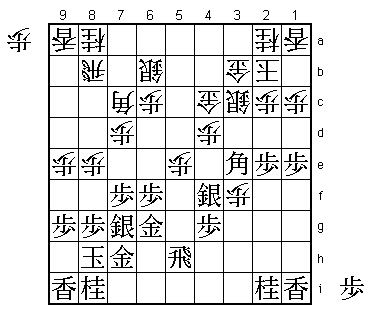
The opening has evolved into the Waki System of the Yagura, but this is only
because Watanabe was confused by Moriuchi's opening play and decided to play
it safe instead of trying to prove that Moriuchi's strategy is flawed. This
pragmatic approach is typical of Watanabe, who doesn't like to start fighting
with his king still exposed. As a consequence, black has gained no advantage
in the opening.

43.P3f-3e    01:55:00  01:57:00
44.P3dx3e    01:55:00  02:01:00
45.B4fx3e    01:55:00  02:01:00
46.P*3f      01:55:00  02:11:00
47.S3g-4f    01:55:00  02:11:00
48.S7c-6b    01:55:00  02:11:00
49.P5f-5e    02:07:00  02:11:00
50.P5dx5e    02:07:00  02:11:00
51.R2h-5h    02:16:00  02:11:00
52.B6d-7c?!  02:16:00  02:22:00

This is a new move. The joseki sequence here is 52.P3g+ Sx3g S5c R1h S5d S3f,
but Moriuchi said after the game that he didn't like that position and instead
wanted to try 52.B7c, which is a euphemism for home preparation. The reasoning
behind 52.B7c is clear. Because 53.Sx5e is no longer attacking the bishop, white
can play 54.P3g+ Nx3g P*3f and get a strong counter attack. So it seems that 52.B7c
is a reasonable move, but Watanabe has a strong answer to it, which made Moriuchi
doubt the strength of his opening idea.

53.P7f-7e!   03:20:00  02:22:00

This is a perfect start to an attack that may not be decisive, but is very hard
to defend against. The idea behind 53.P7e is to get the rook and bishop on the
same file and then start an edge attack. During this edge attack, it is easy to
get a lance in hand, which is always a threat on the 7th file.

54.R8b-8d    03:20:00  02:27:00

The other merit of 53.P7e is that this rook is now no longer working in defense.

55.P1e-1d    03:25:00  02:27:00
56.P1cx1d    03:25:00  02:32:00
57.P*1c      03:25:00  02:32:00
58.L1ax1c    03:25:00  02:46:00
59.P7ex7d    03:25:00  02:46:00
60.R8dx7d    03:25:00  02:51:00
61.R5h-1h    03:36:00  02:51:00
62.P5e-5f    03:36:00  03:11:00
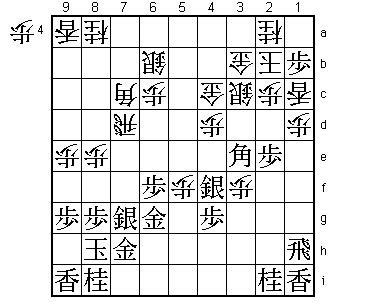
63.P*1b?!    04:18:00  03:11:00

The sealed move, but Watanabe said after the game that he regretted it and should
have played 63.Gx5f instead. With the extra pawn in hand, black threatens P*1e
Px1e Bx1c+ Nx1c P*1d which is very strong. This being said, 63.Gx5f is a hard
move to play, especially for Watanabe, who likes his king surrounded by generals.
This is probably the reason why Watanabe admitted that he was far from happy with
his position here, considering his attack without any real punch.

64.S3c-3d?!  04:18:00  04:17:00

Moriuchi also didn't like his position much, because he thought that he was forced
into pushing this silver straight up out of the Yagura position, which is bad shape.
If he would have played his opponent instead of the board, he might have tried 64.P5g+
here. During the post-mortem analysis, Watanabe immediately replied with 65.Sx5g,
which keeps the generals in the correct formation. However, then 66.P3g+ P1a+ Kx1a
Bx1c+ Nx1c Rx1d P*1b R1e +P2h L1f +Px2i P*1d N*2a and Watanabe admitted that his
attack will probably run out of steam. Therefore, after 64.P5g+ the correct reply
is 65.Gx5g, but this drives the gold away from the king and gives white strong
attacking options like P*7f. Watanabe said that this was too scary and that he
would never have played it.

65.P1b-1a+!  05:00:00  04:17:00

Well judged. If black goes straight for the breakthrough on the edge by 65.Bx1c+
Nx1c Rx1d, white has the strong counter B*6i and black cannot give his attack
decisive strength. White aims at Bx4g+ followed by Bx4f, which is very fast
because the silver drop on 6i next will threaten mate in many variations. There
is no way black can win this mutual attack.

66.K2bx1a    05:00:00  04:19:00
67.B3ex1c+   05:07:00  04:19:00
68.N2ax1c    05:07:00  04:19:00
69.R1hx1d    05:07:00  04:19:00
70.P*1b      05:07:00  04:19:00
71.R1d-1h    05:07:00  04:19:00
72.K1a-2b    05:07:00  05:02:00
73.P*1d      05:10:00  05:02:00
74.N1cx2e    05:10:00  05:06:00
75.P1d-1c+   05:11:00  05:06:00
76.K2b-3a    05:11:00  05:08:00
77.+P1cx2c   05:23:00  05:08:00
78.S3dx2c    05:23:00  05:08:00

79.P*2d!     05:25:00  05:08:00

This simply aims at promoting the rook, so seems straightforward, but Goda was
very impressed by this move. The point is that from a professional point of view,
this type of attack is a little too simplistic, often giving the opponent time
to start a counter attack. For a professional player, the first move to look at
is 79.L*3e, after which P*2d next is much more effective. However, in the
post-mortem analysis Watanabe pointed out that white can play 80.P*2d and the
black attack is suddenly much more difficult. Moriuchi had seen the same thing
here, so he was not surprised that Watanabe played 79.P*2d.

80.S2cx2d    05:25:00  05:15:00
81.R1hx1b+   05:27:00  05:15:00
82.P3f-3g+   05:27:00  05:21:00
83.P*7e!     06:11:00  05:21:00
84.R7d-8d    06:11:00  05:42:00
85.L*7d!     06:35:00  05:42:00

This attack on the other side of the board is strong, but also hard to play
because it is so far away from the enemy king. Watanabe again has judged correctly
that he cannot get to the white king with just an attack from one side.

86.B7cx4f    06:35:00  05:48:00
87.P4gx4f    06:35:00  05:48:00
88.S*2a      06:35:00  05:52:00
89.+R1b-1a   06:45:00  05:52:00
90.B*3c      06:45:00  05:52:00
91.+R1a-1h   06:51:00  05:52:00
92.P*7c      06:51:00  06:02:00
93.G6gx5f    07:02:00  06:02:00

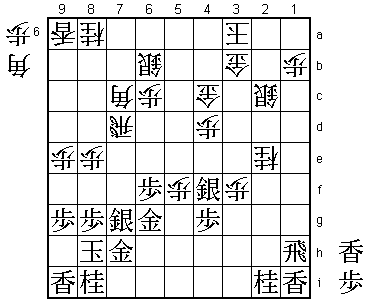
Watanabe finally picks up this pawn, but now he has a very good reason because he
wants to pick up the knight on 2e with P*2f next. If black gets a knight in hand,
the white position cannot be properly defended, as we will see.

94.P7cx7d?   07:02:00  06:14:00

Moriuchi allows black to proceed with his plans, which comes down to throwing the
towel. The only chance white has is to drop again a pawn where the opponent wants
to drop with 94.P*2f. For example, 95.P*3d Gx3d B*6a P2g+ +R5h G3e B7b+ S5a Lx7c+
K2b and because white has a lot of pieces at the head of the king it will be very
hard for black to block the white king from entering. It looks like black can play
+L7d, but after R9d it is not so easy to catch the white rook. Because black also
has a strong formation in the opponent camp, this might even become a mutual
entering king position and Watanabe admitted that this would definitely not be easy.

95.P*2f      07:03:00  06:14:00
96.+P3g-3f   07:03:00  06:31:00
97.P2fx2e    07:03:00  06:31:00
98.S2dx2e    07:03:00  06:31:00
99.B*6a      07:13:00  06:31:00

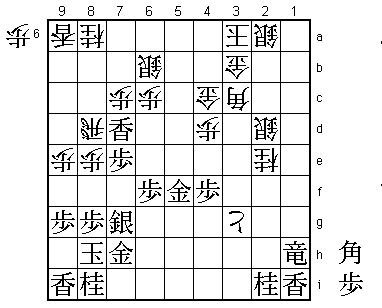
With the knight in hand, this bishop drop is devastating. It threatens both N*5e
and B5b+ next, so the next white move is forced. However, without the lance white
has no hope of attacking. Moriuchi desperately tries to make something out of
nothing from here, but he never gets any real chance.

100.L*5a     07:13:00  06:37:00
101.G5f-6e   07:15:00  06:37:00
102.R8d-8b   07:15:00  06:44:00
103.G6ex7d   07:24:00  06:44:00
104.S6b-5c   07:24:00  06:57:00
105.P*2d     07:28:00  06:57:00
106.K3a-4b   07:28:00  07:07:00
107.N*5e     07:35:00  07:07:00
108.P*5b     07:35:00  07:08:00
109.G7d-8c   07:39:00  07:08:00
110.R8b-6b   07:39:00  07:14:00
111.G8c-7b   07:40:00  07:14:00
112.R6bx6a   07:40:00  07:22:00
113.G7bx6a   07:40:00  07:22:00
114.P*7f     07:40:00  07:22:00
115.S7gx7f   07:42:00  07:22:00
116.P4d-4e   07:42:00  07:22:00
117.P*5f     07:42:00  07:22:00
118.S5c-5d   07:42:00  07:35:00
119.G6ax5a   07:46:00  07:35:00
120.K4bx5a   07:46:00  07:35:00
121.P2d-2c+  07:46:00  07:35:00
122.G3bx2c   07:46:00  07:35:00
123.R*3a     07:47:00  07:35:00
124.G*4a     07:47:00  07:42:00
125.R3ax2a+  07:47:00  07:42:00
126.G2c-2b   07:47:00  07:42:00
127.S*6b     07:50:00  07:42:00
128.K5ax6b   07:50:00  07:47:00
129.+R2ax4a  07:50:00  07:47:00
130.G4c-4b   07:50:00  07:47:00
131.+R4ax8a  07:50:00  07:47:00
132.K6b-5c   07:50:00  07:47:00
133.+R8a-8d  07:50:00  07:47:00
134.+P3fx4f  07:50:00  07:50:00
135.G*3e     07:51:00  07:50:00
136.S*6d     07:51:00  07:57:00
137.N*6e     07:52:00  07:57:00
138.S6dx6e   07:52:00  07:57:00
139.S7fx6e   07:52:00  07:57:00
140.S5dx6e   07:52:00  07:57:00
141.S*4d     07:53:00  07:57:00
Resigns      07:53:00  07:57:00

Finally, Moriuchi has enough. With the strong promoted rook on 1h, white has no
effective mating threats. There is no forced mate against the white king, but
from here the attack is quite easy so Moriuchi resigned. A very good game by
Watanabe, who now has a 2-0 lead. A dream start in his quest for a sixth consecutive
Ryu-O title.
