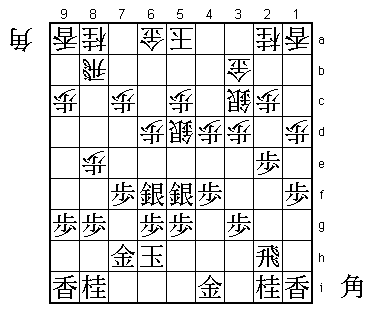
22nd Ryu-O Match Game 1
[Black "Moriuchi Toshiyuki, Challenger"]
[White "Watanabe Akira, Ryu-O"]
[Event "22nd Ryu-O sen, Game 1"]
[Date "September 14th and 15th 2009"]
1.P7g-7f 00:00:00 00:00:00
This Ryu-O match is a rematch of the match five years ago. Moriuchi then was the
title holder and lost in seven games to the then 20-year old Watanabe. Watanabe
has never looked back and won every Ryu-O title match since. Watanabe promised
before the game that he would play a different style of shogi than five years ago
and Moriuchi said that he had learned some new things since the first match between
them. Both players clearly were aware of their previous encounter.
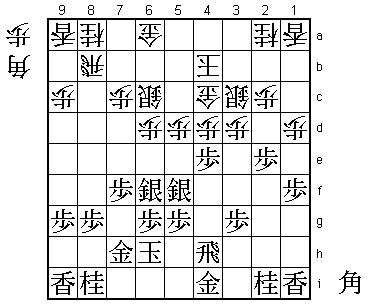
2.P8c-8d 00:00:00 00:02:00
3.P2g-2f 00:00:00 00:02:00
4.G4a-3b 00:00:00 00:05:00
5.G6i-7h 00:01:00 00:05:00
6.P8d-8e 00:01:00 00:10:00
7.B8h-7g 00:01:00 00:10:00
8.P3c-3d 00:01:00 00:10:00
9.S7i-8h 00:01:00 00:10:00
10.B2bx7g+ 00:01:00 00:11:00
The "normal" Kakugawari opening (not without tempo loss). One thing that has changed
in Watanabe's play is that he no longer tries to drag his opponent into his favorite
openings, but that he is open to any challenge, even if it means playing into your
opponent's hand. This is something that especially Habu likes to do. It is of course
a bit risky, but the rewards are huge if one manages to win in what the opponent
considered to be his comfort zone.
11.S8hx7g 00:01:00 00:11:00
12.S3a-4b 00:01:00 00:11:00
13.S3i-3h 00:02:00 00:11:00
14.S7a-7b 00:02:00 00:11:00
15.P4g-4f 00:02:00 00:11:00
16.P6c-6d 00:02:00 00:12:00
17.S3h-4g 00:11:00 00:12:00
18.S7b-6c 00:11:00 00:12:00
19.K5i-6h 00:11:00 00:12:00
20.S6c-5d 00:11:00 00:15:00
21.S4g-5f 00:23:00 00:15:00
22.P4c-4d 00:23:00 00:21:00
23.P1g-1f 00:35:00 00:21:00
24.P1c-1d 00:35:00 00:21:00
25.P2f-2e 00:49:00 00:21:00
26.S4b-3c 00:49:00 00:28:00
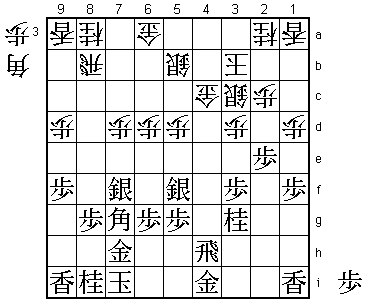
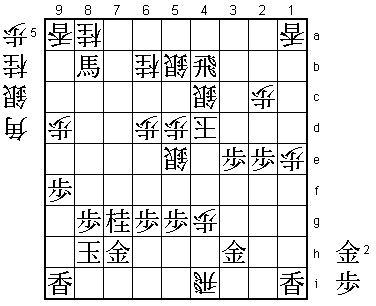
27.S7g-6f?! 00:49:00 00:28:00
This is a new move, although moving this silver up is sometimes played by white,
if white doesn't like the deeply studied variations of the symmetric Koshikakegin
position. Actually, it seems like a good idea to move this silver up and add extra
power to the black attack, so it is kind of strange that no one has played this
before. After the game Moriuchi didn't seem to be so sure of this move. He said
that he chose it because he wanted to play as positively as possible, but he also
admitted that it is a big plus for white to be able to exchange the pawn in front
of the rook.

28.P8e-8f    00:49:00  01:18:00
29.P8gx8f    00:50:00  01:18:00
30.R8bx8f    00:50:00  01:18:00
31.P*8g      00:56:00  01:18:00
32.R8f-8b    00:56:00  01:19:00
33.S6f-5e    00:57:00  01:19:00
34.S5d-6c    00:57:00  01:28:00
35.R2h-4h    01:12:00  01:28:00
36.P5c-5d    01:12:00  02:33:00
37.S5e-6f    01:13:00  02:33:00
38.G3b-4c    01:13:00  02:34:00
39.P4f-4e    01:35:00  02:34:00
40.P4dx4e    01:35:00  02:35:00
41.S5fx4e    01:36:00  02:35:00
42.P*4d      01:36:00  02:35:00
43.S4e-5f    01:36:00  02:35:00
44.K5a-4b    01:36:00  02:48:00
45.P*4e!     02:29:00  02:48:00
This was a big surprise for Watanabe. He never expected black to drop a pawn on
4e twice in a row. However, the difference between the king on 4a and the king
on 4b is important and Moriuchi has recognized this. If 46.Px4e, then 47.Sx4e
P*4d P*2d Px2d P*2b! is now possible (this square was covered by the rook when
the white king was still on 4a). Sx2b is then answered by Sx4d, Px4e by Px2a+
and N1c by the simple S5f.
46.K4b-3b 02:29:00 03:32:00
No choice, but this leaves a gaping hole on 4d. Black has gained the upper
hand here.
47.P4ex4d 03:21:00 03:32:00
48.S3cx4d 03:21:00 03:33:00
49.K6h-7i 03:21:00 03:33:00
50.S6c-5b! 03:21:00 03:35:00
51.P3g-3f 03:57:00 03:35:00
52.S4d-3c! 03:57:00 03:58:00
Watanabe has been strengthening his weak center by pulling back two silvers.
This looks like a defensive-only strategy, but he has also found a way to try
and get some attack himself.
53.S6f-7g 04:06:00 03:58:00
54.P9c-9d 04:06:00 04:05:00
55.P9g-9f 04:08:00 04:05:00
56.R8b-8e 04:08:00 04:33:00
This invites the next move, but it gives white an important foothold for
his attack.
57.P7f-7e 04:59:00 04:33:00
58.R8ex7e 04:59:00 04:41:00
59.N2i-3g 04:59:00 04:41:00
60.R7e-8e 04:59:00 04:42:00
61.S7g-7f 05:11:00 04:42:00
62.R8e-8b 05:11:00 04:42:00
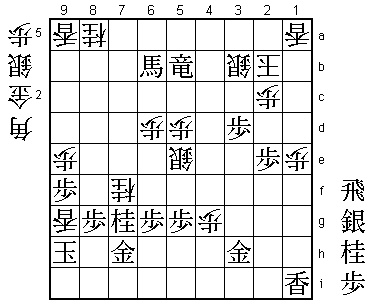
63.B*7g 05:12:00 04:42:00
64.P7c-7d! 05:12:00 06:07:00
Moriuchi acknowledged after the game that this was a very good move. White still
has to be very careful about the weaknesses on the fourth file and just plugging
the hole with P*4d doesn't help after P*4e.

65.P*4d      06:02:00  06:07:00
66.G4c-4b    06:02:00  06:08:00

Now black seems to have a huge attacking base on 4c, but white can play the
counter attack P7e any time he pleases, so the position is very complicated.

67.S5f-4e    06:28:00  06:08:00
68.S5b-5c    06:28:00  06:16:00
69.P1f-1e    06:33:00  06:16:00
70.P1dx1e    06:33:00  06:17:00
71.S4ex3d    06:46:00  06:17:00
72.S3cx3d    06:46:00  06:17:00
73.P3f-3e    06:46:00  06:17:00
74.P*4g      06:46:00  06:34:00
75.R4h-1h    06:48:00  06:34:00
76.S*5e!     06:48:00  06:45:00
Dropping back the silver here is not an easy move to play, but Watanabe has
correctly judged that this is the only way to play here. 76.Sx3e seems to be
the only move, but after 77.P4c+ Gx4c Bx1a+ black threatens L*4e or Rx1e next
and white is in trouble.

77.P3ex3d    06:48:00  06:45:00
78.S5cx4d    06:48:00  06:45:00

Now white has made it much more difficult to explore the weaknesses on the
4th file.

79.S*4e      06:53:00  06:45:00

One of the points of the white defense is that black cannot attack the
silver on 5e with P5f, because of P7e and Sx7e B*5g is a fork on king and
silver.

80.S4dx4e    06:53:00  06:59:00
81.N3gx4e    06:53:00  06:59:00
82.B*2g      06:53:00  06:59:00
83.S*3c      06:56:00  06:59:00

Watanabe's resilience invites Moriuchi's mistake. Here 83.S*4d would still
have given black the better position.

84.N2ax3c    06:56:00  06:59:00
85.P3dx3c+   06:56:00  06:59:00
86.G4bx3c    06:56:00  06:59:00
87.N4ex3c+   06:59:00  06:59:00
88.K3bx3c    06:59:00  06:59:00
89.R1h-3h    06:59:00  06:59:00
90.B2gx3h+   06:59:00  07:04:00
91.G4ix3h    06:59:00  07:04:00
92.R*4i      06:59:00  07:32:00
93.K7i-8h    06:59:00  07:32:00
94.P7d-7e    06:59:00  07:40:00
95.N*4e      07:05:00  07:40:00
96.K3c-3d    07:05:00  07:40:00
97.P*3e      07:22:00  07:40:00
98.K3dx4e    07:22:00  07:44:00
99.B*3d      07:55:00  07:44:00
100.K4e-4d   07:55:00  07:44:00

The white king is making quite a journey in this game, but there is no good
way for black to get a decisive attack against it.

101.B3dx6a+  07:55:00  07:44:00
102.P7ex7f   07:55:00  07:44:00
103.+B6a-7a  07:56:00  07:44:00
104.N*6b     07:56:00  07:50:00
105.+B7ax8b  07:56:00  07:50:00
106.P7fx7g+  07:56:00  07:50:00
107.N8ix7g   07:56:00  07:50:00
108.S*4c!    07:56:00  07:59:00

This is quite an incredible move. Here Watanabe was in byoyomi and Moriuchi
had only two minutes left. Watanabe used almost all of his time to find a
mate against the black king with three silvers. It is very close after
108.S*7i Gx7i Rx7i+ Kx7i S*6h Kx6h N*7f but the black king just survives.
Watanabe decided that there was no better way than to turn to defense, but
he also feared that playing defensively this far in the endgame was probably
losing.

109.R*4b     07:58:00  07:59:00
110.S*5b     07:58:00  07:59:00
111.+B8b-7a? 07:59:00  07:59:00

This is definitely losing. Better was 111.+B7b, which leads to a very complicated
position. For example, if 112.K3c like in the game, black can play 113.Rx5b+.
Therefore, white probably has to attack with 112.N*7f and then 113.K9h B*8i K9g
Bx7h+ is answered by +Bx6b followed by S5c G*3d K4e G3g which is a mating threat.
Still, it seems that white can just win here with +B7i K8f +Bx5g to create an
escape up the board for the king. However, this is clearly more difficult for
white than the game.

112.K4d-3c   07:59:00  07:59:00
113.G*3b     07:59:00  07:59:00
114.S4cx3b   07:59:00  07:59:00
115.R4bx5b+  07:59:00  07:59:00
116.N*7f     07:59:00  07:59:00
117.K8h-9g   07:59:00  07:59:00
118.R4ix9i+  07:59:00  07:59:00
119.G*9h     07:59:00  07:59:00
120.P9d-9e   07:59:00  07:59:00
121.P3e-3d   07:59:00  07:59:00
122.K3c-2b   07:59:00  07:59:00
123.+B7ax6b  07:59:00  07:59:00
124.+R9ix9h  07:59:00  07:59:00
125.K9gx9h   07:59:00  07:59:00
126.L*9g     07:59:00  07:59:00
Resigns      07:59:00  07:59:00
Mate after 127.K8i S*8h Gx8h G*9i K7h G*6h or 127.Kx9g Px9f K8f B*9g K8e G*7e
K8d G*9c K9e G8c. A very close game to start this Ryu-O match (Watanabe said
after the game that he only realized he had won after he found the final mate).
Moriuchi had his chances in this game, but in the end the endgame power of
Watanabe prevailed.