22nd Asahi Open Match Game 4
[Black "Fukaura Koichi, Asahi"]
[White "Habu Yoshiharu, Challenger"]
[Event "22nd Asahi Open, Game 4"]
[Date "May 7th 2004"]
1.P2g-2f 00:00:00 00:00:00
2.P3c-3d 00:00:00 00:01:00
3.P7g-7f 00:01:00 00:01:00
4.G4a-3b 00:01:00 00:02:00
5.G6i-7h 00:06:00 00:02:00
6.P8c-8d 00:06:00 00:04:00
7.P2f-2e 00:06:00 00:04:00
8.B2bx8h+ 00:06:00 00:05:00
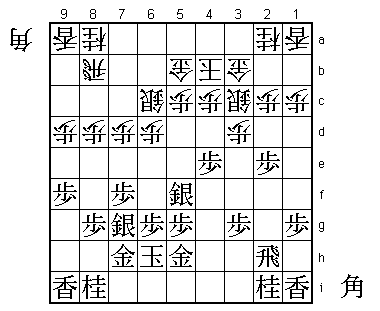
After three games with the R8e Yokofudori, this game opens with
another new interesting idea: the Kakugawari with one tempo loss.
Because white exchanges the bishops here, he loses one move compared
to the normal Kakugawari. In return, white can keep the pawn on 8d
(it is always on 8e in the normal Kakugawari), which gives more
attacking options.
9.S7ix8h 00:06:00 00:05:00
10.S3a-2b 00:06:00 00:05:00
11.S3i-3h 00:07:00 00:05:00
12.S2b-3c 00:07:00 00:06:00
13.K5i-6h 00:20:00 00:06:00
14.S7a-7b 00:20:00 00:07:00
15.P4g-4f 00:20:00 00:07:00
16.P6c-6d 00:20:00 00:08:00
17.S3h-4g 00:20:00 00:08:00
18.S7b-6c 00:20:00 00:08:00
19.S8h-7g 00:20:00 00:08:00
20.K5a-4b 00:20:00 00:08:00
21.S4g-5f 00:36:00 00:08:00
22.G6a-5b 00:36:00 00:09:00
23.G4i-5h 00:36:00 00:09:00
24.P7c-7d 00:36:00 00:10:00
25.P9g-9f 00:38:00 00:10:00
26.P9c-9d 00:38:00 00:10:00
27.P4f-4e 00:39:00 00:10:00
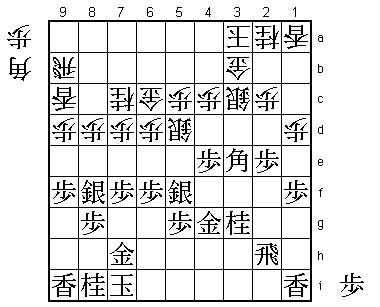
It is unusual for black to push both the pawn to 2e and 4e. With those
two advanced pawns it is difficult to open the position. Most commentators
in the press room already preferred the white position here.

28.S6c-5d    00:39:00  00:13:00
29.K6h-7i    00:39:00  00:13:00
30.K4b-3a    00:39:00  00:15:00
31.P6g-6f    00:42:00  00:15:00
32.N8a-7c    00:42:00  00:17:00
33.P3g-3f    00:43:00  00:17:00
34.G5b-6c    00:43:00  00:28:00
35.N2i-3g    00:46:00  00:28:00
36.P1c-1d    00:46:00  00:30:00
37.G5h-4g    01:01:00  00:30:00
38.L9a-9c    01:01:00  00:41:00
39.P1g-1f    01:03:00  00:41:00
40.R8b-9b    01:03:00  00:41:00
41.S7g-8f    01:03:00  00:41:00
42.K3a-2b    01:03:00  00:43:00
43.B*4f      01:08:00  00:43:00
44.K2b-3a    01:08:00  00:46:00
45.P3f-3e    01:47:00  00:46:00
46.P3dx3e    01:47:00  01:03:00
47.B4fx3e    01:47:00  01:03:00
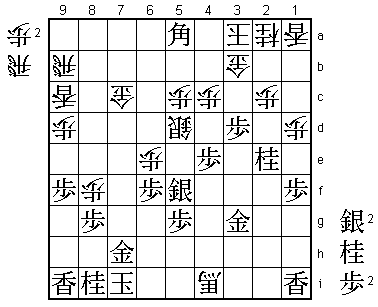
Fukaura has found a way to activate his pieces. If white allows this
bishop to retreat to 4f, white can no longer start a good attack of
his own and black will get the advantage. Ready or not, Habu has to
make his move now.

48.P6d-6e    01:47:00  01:04:00
49.P7f-7e!   01:47:00  01:04:00

Fukaura hits back harder than anyone expected. The simple threat
is Px7d Gx7d Bx5c+, but 49.P7e leads to complications that must have
been impossible to calculate at this point. Fukaura shows a lot of
courage, going all out with his title on the line.

50.P*3d      01:47:00  01:48:00
51.B3e-4f    01:50:00  01:48:00
52.P8d-8e    01:50:00  01:49:00
53.P7ex7d    02:07:00  01:49:00
54.P8ex8f    02:07:00  01:50:00

No choice. 54.Gx7d 55.S7g threatens P*7e and if white defends by
playing 56.P*7e himself, black gets a very strong attack after
57.P2d Px2d (Sx2d Bx2d Px2d S*8c) P*2e.

55.P7dx7c+   02:07:00  01:50:00
56.S*3e      02:07:00  01:50:00
57.B4fx3e    02:13:00  01:50:00
58.P3dx3e    02:13:00  01:50:00
59.P*3d      02:13:00  01:50:00
60.G6cx7c    02:13:00  02:05:00
61.P3dx3c+   02:21:00  02:05:00
62.G3bx3c    02:21:00  02:05:00
63.P*3d      02:22:00  02:05:00
64.G3c-3b    02:22:00  02:05:00
65.P2e-2d    02:25:00  02:05:00
66.P2cx2d    02:25:00  02:05:00
67.R2hx2d    02:25:00  02:05:00
68.P*2c      02:25:00  02:05:00
69.R2d-2h    02:25:00  02:05:00
70.P3e-3f    02:25:00  02:13:00
71.N3g-2e    02:28:00  02:13:00
72.P3f-3g+   02:28:00  02:21:00
73.G4gx3g    02:28:00  02:21:00
74.B*3i      02:28:00  02:24:00
75.R2h-5h    02:34:00  02:24:00
76.B*4i      02:34:00  02:27:00
77.R5h-5i    02:37:00  02:27:00
78.B3i-4h+   02:37:00  02:27:00
79.R5ix4i    02:37:00  02:27:00
80.+B4hx4i   02:37:00  02:27:00
81.B*5a!     02:40:00  02:27:00
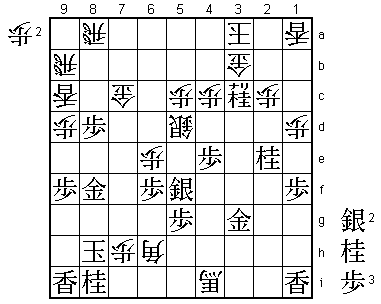
Here the white position was judged better because of the huge pawn
on 8f, but 81.B*5a is a very good move. It threatens both P3c+ and
also defends against the mating threat R*5a K8h +B7f, because black
can defend against this mating threat with Bx7c+. We now enter a
very close endgame.

82.P8fx8g+   02:40:00  02:33:00
83.G7hx8g    02:40:00  02:33:00
84.R*8a      02:40:00  02:33:00
85.P3d-3c+   02:44:00  02:33:00
86.N2ax3c    02:44:00  02:34:00
87.N2ex3c+   02:44:00  02:34:00
88.R8ax5a    02:44:00  02:34:00
89.N*2e      02:45:00  02:34:00
90.P*7h      02:45:00  02:46:00
91.K7i-8h    02:49:00  02:46:00
92.P*8f      02:49:00  02:46:00
93.G8gx8f    02:49:00  02:46:00
94.R5a-8a    02:49:00  02:46:00
95.P*8d      02:53:00  02:46:00
96.B*6h      02:53:00  02:51:00
The Habu way. This is not a mating threat, but it forces black to find
a hisshi against the white king or lose. A lot of pressure with only
7 minutes left...

97.S*4b!     02:54:00  02:51:00

The only way to put the pressure on Habu. 97.N*3d is a mating threat
(S*4b next), but then white can play 98.K4a and there is no way to
get to the white king, because both +Nx3b and S*4b are answered by K5b.

98.G3bx4b    02:54:00  02:53:00
99.N*3d      02:54:00  02:53:00
100.P*3b     02:54:00  02:54:00

If 100.K4a, there is now mate with +Nx4b etc.

101.+N3cx4b  02:56:00  02:54:00
102.R9bx4b   02:56:00  02:54:00
103.S*3c     02:57:00  02:54:00
104.P3bx3c   02:57:00  02:54:00
105.N2ex3c+  02:57:00  02:54:00

Fukaura has done everything he can. He has created a hisshi against
the white king, but had to give up some pieces to do so. Can Habu use
these pieces for mate?

106.P*8g?    02:57:00  02:55:00

He could, but Habu overlooks the mate. It is definitely not easy, but
106.N*7f is the correct move. There are many variations, but the most
important one is 107.K9h 108.S*9g 109.Nx9g. Here Habu was blinded by
the move 110.S*8i, which leads to mate after 111.Kx8i B7i+ K9h +B8h,
but after 111.K8g Bx8f+ Kx8f there is no mate because the knight on 7f
is in the way. Because of this, Habu thought there was no mate by dropping
the knight on 7f. He had overlooked that he can play 110.N8h+! to get rid
of the blocking knight. Then 111.Kx8h P*8g K9h S*8i leads to mate.
106.P*8g also looks like mating the black king, but it just comes up short.

107.K8hx7h   02:58:00  02:55:00
108.S*6i     02:58:00  02:55:00
109.K7hx6h   02:58:00  02:55:00
110.N*7f     02:58:00  02:55:00
111.G8fx7f   02:59:00  02:55:00
112.+B4i-5h  02:59:00  02:57:00
113.K6h-7g   02:59:00  02:57:00
114.S*8h     02:59:00  02:57:00
115.K7gx8g   02:59:00  02:57:00
116.R8ax8d   02:59:00  02:57:00
117.B*8e!    02:59:00  02:57:00

A very important bishop drop.

118.+B5hx7f  02:59:00  02:59:00
119.K8gx7f   02:59:00  02:59:00
120.P*7e     02:59:00  02:59:00
121.K7f-6g   02:59:00  02:59:00
122.P6ex6f   02:59:00  02:59:00
123.K6g-6h   02:59:00  02:59:00
Resigns      02:59:00  02:59:00

Because of the bishop drop on 8e, there is no mate with 124.G*5h here.
Also 123.S7i= K5i G*5h Bx5h Sx5h+ Kx5h R8h+ K4g is no mate, so Habu
resigned here. A very close and exciting game that in the end seemed
to have been decided by luck more than anything else. This match will
go the distance and because every game so far has been won by black,
the furigoma will be watched with special interest.