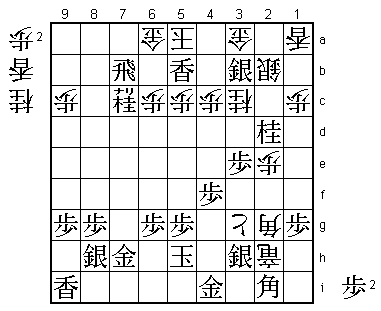
22nd Asahi Open Match Game 2
[Black "Fukaura Koichi, Asahi"]
[White "Habu Yoshiharu, Challenger"]
[Event "22nd Asahi Open, Game 2"]
[Date "April 20th 2004"]
1.P2g-2f     00:01:00  00:00:00
2.P3c-3d     00:01:00  00:02:00
3.P7g-7f     00:01:00  00:02:00
4.P8c-8d     00:01:00  00:02:00
5.P2f-2e     00:01:00  00:02:00
6.P8d-8e     00:01:00  00:02:00
7.G6i-7h     00:01:00  00:02:00
8.G4a-3b     00:01:00  00:03:00
9.P2e-2d     00:01:00  00:03:00
10.P2cx2d    00:01:00  00:03:00
11.R2hx2d    00:01:00  00:03:00
12.P8e-8f    00:01:00  00:03:00
13.P8gx8f    00:01:00  00:03:00
14.R8bx8f    00:01:00  00:04:00
15.R2dx3d    00:01:00  00:04:00
16.B2b-3c    00:01:00  00:04:00
17.R3d-3f    00:01:00  00:04:00
18.K5a-4a    00:01:00  00:04:00
19.P*8g      00:01:00  00:04:00
20.R8f-8e    00:01:00  00:04:00
21.R3f-2f    00:01:00  00:04:00
22.S3a-2b    00:01:00  00:04:00
23.K5i-5h    00:01:00  00:04:00
24.S7a-6b    00:01:00  00:05:00
25.P3g-3f    00:01:00  00:05:00
26.G6a-5a    00:01:00  00:06:00
27.S3i-3h    00:01:00  00:06:00
28.P7c-7d    00:01:00  00:07:00
29.P3f-3e    00:02:00  00:07:00

30.R8ex3e    00:02:00  00:23:00

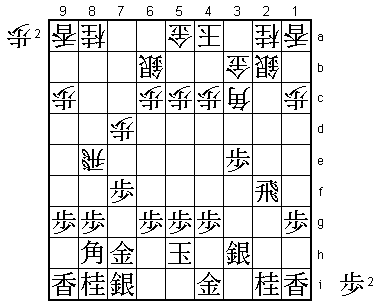
For the second time in this match the R8e Yokofudori. Up until
this move, black used only 2 minutes and white only 7 minutes.
Not surprising, as this position is one of the most often seen
positions in professional shogi these days. Here white has the
alternative 30.N7c, which sets the board on fire. Fukaura and
Habu played that way in their Oi league game in February. In that
game play continued 30.N7c Bx3c+ Nx3c P3d N4e P3c+ Nx5g+ Kx5g
B*3e K5h Bx2f +Px3b Kx3b B*6f B4d Bx4d Px4d S6h and a difficult
fight ended in a Fukaura victory.

31.B8hx3c+   00:02:00  00:23:00
32.N2ax3c    00:02:00  00:23:00
33.B*4f      00:02:00  00:23:00
34.P*2e      00:02:00  00:23:00
35.R2f-1f    00:02:00  00:23:00
36.R3e-3d    00:02:00  00:23:00
37.P*3e      00:02:00  00:23:00
38.R3d-4d    00:02:00  00:23:00
39.B4fx9a+   00:02:00  00:23:00
40.N8a-7c    00:02:00  00:23:00
41.P7f-7e    00:02:00  00:23:00
42.P*8h      00:02:00  00:24:00
43.S7ix8h    00:04:00  00:24:00
44.B*2h      00:04:00  00:24:00
45.N8i-7g    00:07:00  00:24:00
46.B2hx1i+   00:07:00  00:24:00
47.N2i-3g    00:07:00  00:24:00
48.+B1i-1h   00:07:00  00:27:00

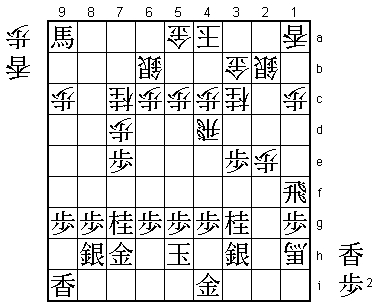
49.L*4f!     00:16:00  00:27:00

So far the game was identical to the game between Watanabe and
Habu, played earlier that month in the Kisei tournament. Watanabe
played 49.Px7d and lost the game after Rx7d +B9b R5d L*5f.
Fukaura said after the game that Px7d did not feel right and that
he thought L*4f was better. This game seems to prove him right,
as black seems to get a lasting advantage. Improvements for white
need to be found earlier than this position.

50.L*4e      00:16:00  00:44:00

The alternative is 50.R2d, but after 51.Px7d Rx7d +B9b R2d P*3d
Rx3d +B5f and P*3d next, the knight on 3c can not be saved.

51.P7ex7d    00:27:00  00:44:00
52.R4dx7d    00:27:00  00:46:00
53.+B9a-9b   00:28:00  00:46:00
54.R7d-4d    00:28:00  01:05:00
55.P*7d      00:40:00  01:05:00
56.L4ex4f    00:40:00  01:06:00
57.P7dx7c+   00:54:00  01:06:00
58.S6bx7c    00:54:00  01:07:00
59.R1fx4f    00:54:00  01:07:00
60.R4dx4f    00:54:00  01:29:00
61.P4gx4f    00:56:00  01:29:00
62.+B1h-3f   00:56:00  01:30:00
63.+B9b-4g   01:00:00  01:30:00
64.+B3fx4g   01:00:00  01:56:00
65.S3hx4g    01:00:00  01:56:00
66.B*2g      01:00:00  01:56:00
67.N*2d      01:21:00  01:56:00
68.G3b-3a    01:21:00  02:03:00

69.N7g-6e!   01:52:00  02:03:00

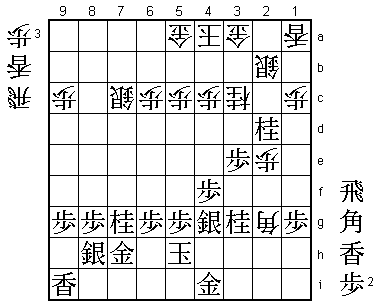
The position looks rather complicated, but black has won a knight
and such a material advantage is often decisive in a close endgame.
69.N6e is a good move that opens an escape route for the king and
this knight also supports the attack. In the press room, 69.P*2c
was also analyzed, because 70.Sx2c seems to fail to 71.B*5e with
attack on silver and knight, but after 72.P*3f S3h R*1h L*1i R2h+
P*2i Bx3h+ Px2h +Bx4i K6i S2d Bx7c+ S*6b white seems to have the
stronger attack.

70.P*3f      01:52:00  02:25:00
71.S4g-3h    02:02:00  02:25:00
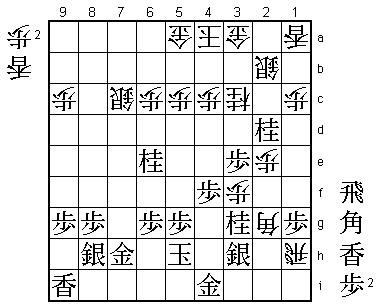
72.R*1h??    02:02:00  02:28:00

A blunder that almost immediately ends the game. After 72.Bx3h+
Gx3h Px3g+ there is still something to play for.

73.B*2i!     02:11:00  02:28:00

Like most people in the press room, Habu must have underestimated
the strength of this move. It is a defense-only move and dropping a
bishop in such a hopeless position is not a move one wants to play.
Furthermore, it seems like it can easily be met with 74.Bx3h+,
because 75.Bx1h +Bx4i Kx4i S*4g wins for white. However, the real
strength of 73.B*2i lies in 74.Bx3h+ Gx3h R1i+ G3i!. This defense
stops the white attack completely.

74.R1h-2h+   02:11:00  02:37:00
75.N6ex7c+   02:11:00  02:37:00

Attacking the king on both sides. White has no defense.

76.P3fx3g+   02:11:00  02:37:00
77.R*7b      02:14:00  02:37:00
78.G5a-6a    02:14:00  02:47:00
79.S*3b      02:17:00  02:47:00
80.K4a-5a    02:17:00  02:47:00
81.L*5b      02:17:00  02:47:00
Resigns      02:17:00  02:47:00

Mate after 82.Gx5b Rx5b+ Kx5b G*6b K4b Sx3a= or 82.K4b Sx3a= Sx3a L5a+
Kx5a G*6b K4a Gx6a and no defense. A fine win by Fukaura, tying the
match at 1-1. This game shows that Fukaura has lost nothing of his
confidence after the loss in the opening game.
