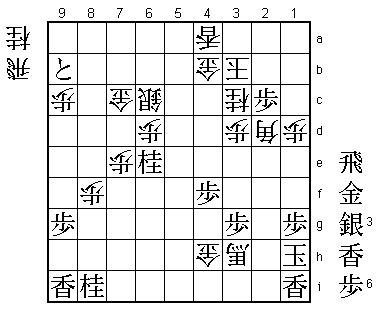
21st Ryu-O Match Game 7
[Black "Habu Yoshiharu, Challenger"]
[White "Watanabe Akira, Ryu-O"]
[Event "21st Ryu-O sen, Game 7"]
[Date "December 17th and 18th 2008"]
1.P7g-7f     00:00:00  00:00:00

For the third time in a professional shogi title match a player has come back from
3-0 down to make it 3-3. In both cases, the final game was won by the player winning
the first three games. Therefore, Watanabe has a chance to make history twice in one
game: become the first player to erase a 3-0 deficit and to become the first player
to become Lifetime Ryu-O. Of course, Habu also still has the chance to make history
twice in one game: he can become Lifetime Ryu-O by winning this game and have honorary
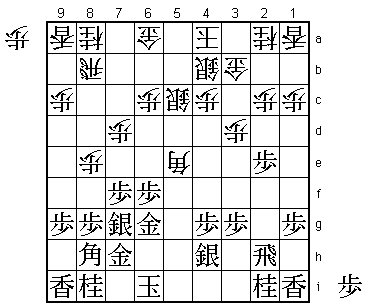
titles in all seven of the major professional titles. The pawn toss resulted in four
tokins and one pawn standing on its side, giving Habu the black pieces. This should
be an advantage, but black has won only two of the six games in this match so far.
Also, Watanabe has won two games with white in a row against Habu (game 4 and 6).

2.P8c-8d     00:00:00  00:03:00
3.S7i-6h     00:03:00  00:03:00
4.P3c-3d     00:03:00  00:05:00
5.P6g-6f     00:04:00  00:05:00
6.S7a-6b     00:04:00  00:06:00
7.P5g-5f     00:05:00  00:06:00
8.P5c-5d     00:05:00  00:08:00
9.S3i-4h     00:08:00  00:08:00
10.S3a-4b    00:08:00  00:09:00
11.G4i-5h    00:10:00  00:09:00
12.G4a-3b    00:10:00  00:10:00
13.G6i-7h    00:12:00  00:10:00
14.K5a-4a    00:12:00  00:11:00
15.K5i-6i    00:13:00  00:11:00
16.P7c-7d    00:13:00  00:19:00
17.G5h-6g    00:22:00  00:19:00
18.S6b-5c    00:22:00  00:35:00

A small surprise. Watanabe picks exactly the same opening strategy as in the sixth
game. Even though he won that game comfortably with white, his opponent is now very
familiar with this opening and it is highly unlikely that things will go as smoothly
again.

19.P2g-2f    00:39:00  00:35:00
20.P8d-8e    00:39:00  00:39:00
21.S6h-7g    00:45:00  00:39:00
22.P5d-5e    00:45:00  00:42:00
23.P5fx5e    00:47:00  00:42:00
24.B2bx5e    00:47:00  00:42:00
25.P2f-2e    00:49:00  00:42:00

Habu is the first player to change the moves compared to the game 6 where he played
25.B7i. It is interesting that in shogi the player who won the game usually changes
the moves the next time around for the reason stated above: it is highly unlikely
that the same thing will work twice.

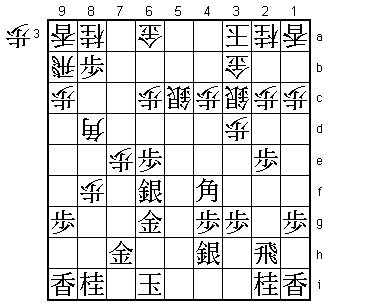
26.S4b-3c!?  00:49:00  01:03:00

Even though Habu has changed the moves, he runs into another move Watanabe has
prepared. There have been more than 60 games played with position after 25.P2e,
but 26.S5d is considered the only move here. Of course, the aim of 26.S3c is clear:
to both defend the second file and to fight in the centre at the same time. However,
the professional way of looking at this position is that you cannot have it both ways
here. 26.S3c makes the centre file more difficult to defend and is therefore considered
to lead to a badly balanced position. Still, 26.S3c is not really Watanabe's invention.
It was played against him in a practice game against a player who didn't know this
position well and more or less played S3c by accident. Watanabe then had a hard time
proving that S3c was wrong and therefore decided to try it in an official game. He
definitely surprised Habu with this, who admitted after the game that he never even
thought about 26.S3c here.

27.P6f-6e    01:21:00  01:03:00
28.B5e-7c    01:21:00  02:21:00
29.S7g-6f    01:27:00  02:21:00
30.B7c-8d    01:27:00  02:21:00
31.B8h-7i    02:23:00  02:21:00
32.K4a-3a    02:23:00  02:28:00
33.B7i-4f    02:35:00  02:28:00
34.R8b-9b    02:35:00  02:28:00
35.P7f-7e    02:36:00  02:28:00
36.P7dx7e    02:36:00  02:33:00
37.P8g-8f    02:37:00  02:33:00

This weakens the king position, but black cannot allow white to have his way in
this position.

38.P8ex8f    02:37:00  03:57:00
39.P*8b      02:50:00  03:57:00

This wins material, but white also gets a strong attack with rook, bishop and knight,
so this position is not clear.

40.N8a-7c    02:50:00  03:58:00
41.P8b-8a+   02:54:00  03:58:00
42.R9b-5b    02:54:00  04:02:00
43.+P8ax9a   03:37:00  04:02:00

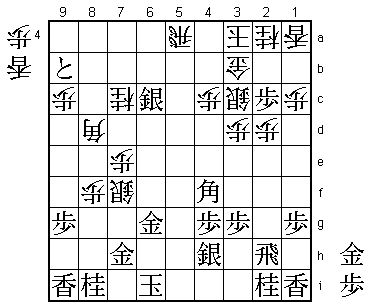
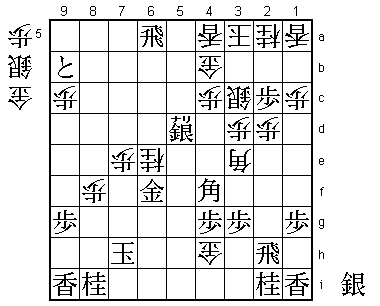
The sealed move and Watanabe admitted that he didn't like his position very much
here.

44.S5c-5d    03:37:00  04:04:00
45.P6e-6d    04:03:00  04:04:00
46.G6a-6b    04:03:00  04:20:00
47.L*5i      04:12:00  04:20:00

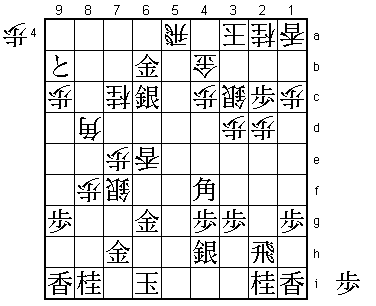
This lance drop is very strong and puts white on his heels. However, Watanabe digs
in and from now on plays very well, not allowing Habu any easy way of breaking
through.

48.P*5e      04:12:00  04:27:00
49.P2e-2d    04:32:00  04:27:00
50.P2cx2d    04:32:00  04:29:00
51.+P9a-9b   04:47:00  04:29:00
52.S5d-6e    04:47:00  05:40:00
53.S6fx5e    05:32:00  05:40:00
54.S6e-7f    05:32:00  05:54:00
55.P6dx6c+   05:40:00  05:54:00
56.G6bx6c    05:40:00  05:54:00
57.S5e-6d    05:42:00  05:54:00
58.R5b-6b    05:42:00  05:56:00
59.L5i-5b+   05:50:00  05:56:00
60.R6bx5b    05:50:00  07:03:00
61.S6dx6c=   05:51:00  07:03:00
62.R5b-5a    05:51:00  07:03:00

White is keeping the rook in play, which is very important for the counter attack.

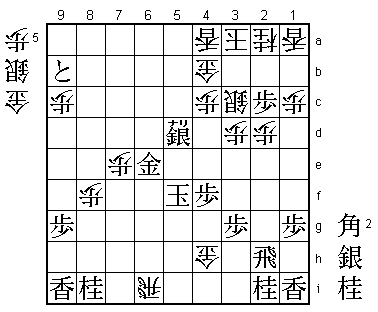
63.P*2c?     06:55:00  07:03:00

In the press room this was considered the winning move and preparations were started
for a press conference with Habu, the new Lifetime Ryu-O. In fact, this light attacking
move is a mistake that complicates the position. If black would have played 63.G*5b K2b
Gx5a P8g+ G5h-6h instead, the threat R*8b next is very strong and black has a very good
position. Habu didn't play this because he didn't like the position of the gold on 5a,
which easily can become a liability. However, after the game he admitted that keeping
the rook on the board was a mistake and that he should have taken it.

64.G3b-4b!   06:55:00  07:13:00

Easy to overlook, because it weakens the square 2b, which was the square the pawn on 2c
was attacking. However, in this case this opens an escape root for the king and also
strengthens the king position against a rook drop because white can drop a piece on 4a
that is anchored  by the gold on 4b.

65.G*6b?     07:29:00  07:13:00

After this move, the mood in the press room changed. 65.G*6b was generally condemned
as a bad choice and Habu admitted that things now became very unclear again. Correct
was 65.B6d followed again by G*5b and black still has the advantage.

66.L*6e!     07:29:00  07:19:00

This sacrifices the lance, but by forcing black to drop the final pawn, white can keep
the rook on the open centre file, where it is still very effective in attack.

67.P*6f      07:30:00  07:19:00
68.R5a-5c    07:30:00  07:20:00

This rook was supposed to be in black's hands for a while, but it is staying alive to
lead the white counter attack.

69.P6fx6e    07:32:00  07:20:00
70.S7fx6g+   07:32:00  07:33:00
71.G7hx6g    07:33:00  07:33:00
72.G*5h      07:33:00  07:33:00
73.K6i-7h    07:33:00  07:33:00
74.N7cx6e    07:33:00  07:41:00
75.G6g-6f    07:41:00  07:41:00
76.G5hx4h    07:41:00  07:43:00
77.L*5d      07:46:00  07:43:00
78.B8dx6b    07:46:00  07:43:00
79.L5dx5c+   07:47:00  07:43:00
80.B6bx5c    07:47:00  07:43:00
81.R*6a?     07:48:00  07:43:00

Another mistake by Habu. Even though the endgame is very complicated, this is
uncharacteristic. After 81.Rx4h S*5g B5e black can survive the white attack. There
is another reason why 81.R*6a is not good, which we will see later.

82.L*4a      07:48:00  07:43:00
83.S6c-5d+   07:55:00  07:43:00
84.B5c-3e!   07:55:00  07:48:00

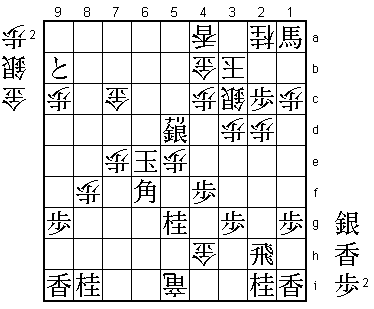
Watanabe has managed to ride the black attack and bring the bishop from its outpost
on 8d back into play. This is a mating threat, so black is forced to exchange the
bishops. The problem with R*6a then becomes clear, because this rook is very vulnerable
to a fork of king and rook. This severely restricts black's options to run away with
the king. Watanabe has managed to turn the tables, but with both players running out
of time, this game is not over yet.

85.R6ax6e+   07:56:00  07:48:00
86.B3ex4f    07:56:00  07:48:00
87.P4gx4f    07:56:00  07:48:00
88.B*8g      07:56:00  07:54:00
89.K7h-6g    07:56:00  07:54:00
90.B8gx6e+   07:56:00  07:54:00
91.G6fx6e    07:56:00  07:54:00
92.R*6i      07:56:00  07:54:00
93.K6g-5f    07:56:00  07:54:00

94.P*6d?     07:56:00  07:54:00

Now it is Watanabe's turn to make a mistake that could have cost him the game. Correct
was 94.S*7f, which wouldn't have allowed black the next move.

95.B*6f!     07:56:00  07:54:00

This strong bishop works both in attack and defence.

96.R6i-5i+   07:56:00  07:59:00
97.N*5g      07:56:00  07:59:00
98.P*5e      07:56:00  07:59:00
99.K5fx5e    07:56:00  07:59:00
100.P6dx6e   07:56:00  07:59:00
101.K5ex6e   07:57:00  07:59:00
102.G*7c     07:57:00  07:59:00

White has no choice but to drop this gold to stop the black king from entering.
However, 102.G*7c is not a mating threat, so if black can keep making mating threats
against the white king, this game is over.

103.B*2b     07:59:00  07:59:00
104.K3a-3b   07:59:00  07:59:00
105.B2bx1a+  07:59:00  07:59:00
106.P*5e     07:59:00  07:59:00

107.R2hx2d?  07:59:00  07:59:00

In byoyomi Habu misses his final chance to win this match. Correct was 107.Rx4h (the
second time Habu doesn't play this winning move), which threatens mate and at the
same time gives the black king a vital escape route.

108.P*6d     07:59:00  07:59:00
109.K6ex5e   07:59:00  07:59:00
110.S*4d     07:59:00  07:59:00
111.+S5dx4d  07:59:00  07:59:00
112.S3cx4d   07:59:00  07:59:00
113.+B1ax4d  07:59:00  07:59:00
114.G*6e     07:59:00  07:59:00
115.K5e-5d   07:59:00  07:59:00
116.S*6c     07:59:00  07:59:00
117.K5d-4e   07:59:00  07:59:00
118.P4cx4d   07:59:00  07:59:00
119.B6fx4d   07:59:00  07:59:00
120.N2a-3c   07:59:00  07:59:00
121.K4e-3f   07:59:00  07:59:00
122.B*4g     07:59:00  07:59:00
123.K3f-2f   07:59:00  07:59:00
124.+R5ix2i  07:59:00  07:59:00
125.L*2g     07:59:00  07:59:00

126.P1c-1d!  07:59:00  07:59:00

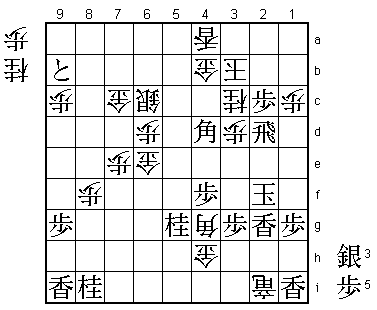
In the press room this move was met with surprise, but white still lacks material to
go straight for the black king, so closing the escape route to 1e is actually the
deciding move.

127.N5gx6e   07:59:00  07:59:00
128.P*2e     07:59:00  07:59:00
129.K2f-1f   07:59:00  07:59:00
130.+R2ix2g  07:59:00  07:59:00
131.K1fx2g   07:59:00  07:59:00
132.L*2f     07:59:00  07:59:00
133.B4dx2f   07:59:00  07:59:00
134.P2ex2f   07:59:00  07:59:00
135.K2gx2f   07:59:00  07:59:00
136.B*3e     07:59:00  07:59:00
137.K2f-2g   07:59:00  07:59:00
138.B4g-3h+  07:59:00  07:59:00
139.K2g-1h   07:59:00  07:59:00
140.B3ex2d   07:59:00  07:59:00
Resigns      07:59:00  07:59:00

Finally the outcome of this game and of the match is clear. Habu resigned here because
there is no defence against the white attack and the white king cannot be mated.
Watanabe pulls of the impossible by beating Habu four times in a row to come back
from 3-0 down and defend his Ryu-O title. A well-deserved Lifetime Meijin title for
Watanabe, who has shown great resilience in the five Ryu-O matches he won. Three times
he needed seven games to defend his title: in 2004 against Moriuchi, in 2006 against
Sato and now against Habu. Being cool under immense pressure is clearly one of Watanabe's
greatest strengths. How much this devastating experience will have an influence on Habu
still remains to be seen. All things considered, he still had a great year, appearing
in all seven title matches held in 2008. Not only that, the three matches he lost were
all in the final game, so he was actually very close to pull off another Seven Crown
sweep. This will not happen in 2009, because he is already out of the Kio challenger
tournament, but I more than expect him to make another strong run in next year's Ryu-O
tournament. But today is all about Lifetime Ryu-O Watanabe, who himself seemed stunned
about his amazing comeback. Congratulations to him and thanks for showing everyone that
even in shogi it is only over when the fat lady sings.
