21st Ryu-O Match Game 5
[Black "Watanabe Akira, Ryu-O"]
[White "Habu Yoshiharu, Challenger"]
[Event "21st Ryu-O sen, Game 5"]
[Date "December 4th and 5th 2008"]
1.P7g-7f 00:01:00 00:00:00
2.P8c-8d 00:01:00 00:05:00
3.S7i-6h 00:06:00 00:05:00
4.P3c-3d 00:06:00 00:06:00
5.P6g-6f 00:06:00 00:06:00
6.S7a-6b 00:06:00 00:09:00
7.P5g-5f 00:06:00 00:09:00
8.P5c-5d 00:06:00 00:11:00
9.S3i-4h 00:07:00 00:11:00
10.S3a-4b 00:07:00 00:15:00
11.G4i-5h 00:08:00 00:15:00
12.G4a-3b 00:08:00 00:18:00
13.G6i-7h 00:09:00 00:18:00
14.K5a-4a 00:09:00 00:19:00
15.K5i-6i 00:11:00 00:19:00
16.G6a-5b 00:11:00 00:22:00
17.S6h-7g 00:12:00 00:22:00
18.S4b-3c 00:12:00 00:25:00
19.B8h-7i 00:13:00 00:25:00
20.B2b-3a 00:13:00 00:27:00
21.P3g-3f 00:15:00 00:27:00
22.P4c-4d 00:15:00 00:28:00
23.G5h-6g 00:17:00 00:28:00
24.P7c-7d 00:17:00 00:31:00
25.S4h-3g 00:26:00 00:31:00
26.B3a-6d 00:26:00 00:39:00
27.B7i-6h 00:28:00 00:39:00
28.G5b-4c 00:28:00 00:44:00
29.K6i-7i 00:29:00 00:44:00
30.K4a-3a 00:29:00 00:46:00
31.K7i-8h 00:30:00 00:46:00
32.K3a-2b 00:30:00 00:48:00
33.S3g-4f 00:42:00 00:48:00
34.S6b-5c 00:42:00 01:02:00
35.N2i-3g 00:46:00 01:02:00
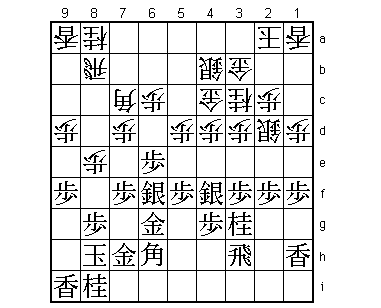
For the second time, Watanabe needs to win to keep his Ryu-O title. It is no wonder
he turns to the Yagura, in which he is considered to be one of the top experts. Of
course, the same can be said about Habu. The S4f-N3g formation is the most popular
way of playing the Yagura with black these days.
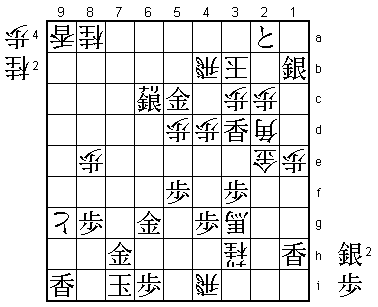
36.P9c-9d 00:46:00 01:06:00
37.P1g-1f 00:49:00 01:06:00
38.P1c-1d 00:49:00 01:10:00
39.P2g-2f 00:51:00 01:10:00
40.S3c-2d 00:51:00 01:21:00
41.R2h-3h 01:04:00 01:21:00
42.P8d-8e 01:04:00 02:08:00
43.L1i-1h 01:19:00 02:08:00
44.S5c-4b 01:19:00 02:10:00
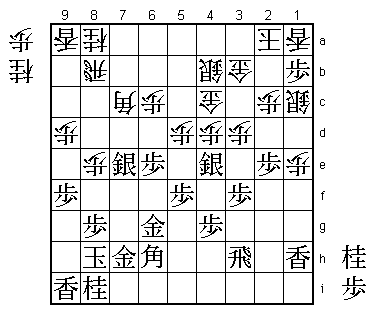
White is putting everything on a strong defence by making a four general castle.
Black will attack first, but because the white castle is strong, it is easy to
make a mistake and get killed by the counter attack.
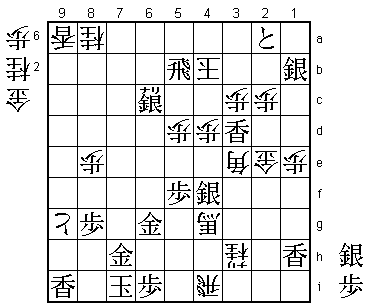
45.P9g-9f 01:49:00 02:10:00
46.N2a-3c 01:49:00 02:37:00
47.P6f-6e 03:18:00 02:37:00
48.B6d-7c 03:18:00 02:42:00
49.S7g-6f 03:18:00 02:42:00
50.K2b-2a 03:18:00 03:01:00
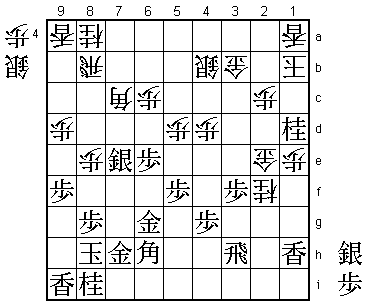
This is an idea that was played by Miyata (5-dan) in a qualification game for the
Oza title against Katsumata (6-dan) on October 17th. The first reason for playing
this is to pull back the silver to 3a and change into a low Kikumizu Yagura formation,
which is strong against an attack from the top. The second idea behind 50.K2a is
that white now threatens P4e, a pawn that black can only take if he is willing to
give up the silver or the knight (as we will see later). If white plays 50.P4e
immediately, it follows 51.Nx4e Nx4e Sx4e N*5c Sx3d Gx3d P3e and it is hard for
white to defend, because if the gold moves, black has the knight drop on 3d next.
The point of 50.K2a is that this knight drop on 3d is no longer a check, so white
has good fighting chances then.

51.P7f-7e!   03:27:00  03:01:00

Katsumata played the exchange of the centre pawns with 51.P5e here, but Watanabe
said after the game that he didn't understand why this would be effective, so he
attacked the head of the bishop on 7c instead. Judging from this game, 51.P7e is
clearly better than 51.P5e.

52.P7dx7e    03:27:00  03:09:00
53.S6fx7e    03:27:00  03:09:00
54.P4d-4e    03:27:00  03:10:00
55.N3gx4e    03:57:00  03:10:00
56.N3cx4e    03:57:00  03:13:00
57.P1f-1e    04:19:00  03:13:00

The sealed move. Watanabe is now starting his attack in earnest.

58.P1dx1e    04:19:00  03:16:00
59.S4fx4e    04:19:00  03:16:00
60.P*4d      04:19:00  03:21:00
61.P2f-2e    04:24:00  03:21:00
62.S2d-1c    04:24:00  03:35:00
63.P*1b!     04:35:00  03:35:00
An important move. This draws the king closer to the attacking pieces, because white
cannot take this pawn with the lance. After 64.Lx1b P*1d Sx1d P6d Px4e Px6c+ B1i+
P*1c N*2f Px1b+ Kx1b L*8d is good for black.

64.K2ax1b    04:35:00  04:14:00
65.S4ex3d    05:00:00  04:14:00
66.G4cx3d    05:00:00  04:14:00
67.P*1d      05:00:00  04:14:00
68.S1cx1d    05:00:00  04:16:00
69.N*2f      05:00:00  04:16:00
70.G3dx2e    05:00:00  04:18:00
71.N2fx1d    05:06:00  04:18:00
72.N*2f      05:06:00  04:57:00
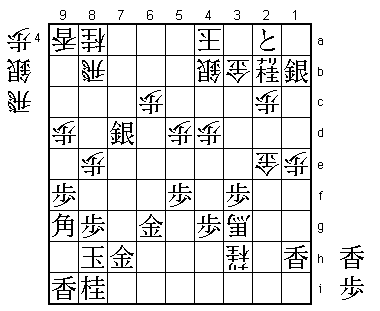
73.P6e-6d!   05:32:00  04:57:00

Watanabe ignores the attack on the rook and goes straight for the king. As he explained
after the game: "P6d is the first move a professional looks at". Of course, 74.Px6d
is not possible because this blocks the diagonal of the bishop, so black can play
75.R2h next. Then 76.Nx1h+ fails to Rx2e and black has a winning advantage. Therefore,
white has to take the rook on 3h, but then black creates a tokin on 6c and the white
king is attacked from both sides. This looks very good for black, and Habu admitted
after the game that he felt here that there was no way to stop the black attack.
However, Watanabe wasn't really convinced himself. The attack may have been difficult
to stop, but the lack of material to support it worried him. If this position would
have come up in one of the first three games, he might have shied away from this
variation, but the lucky break in the fourth game seemed to have convinced him that
the only way to beat Habu is to play positively.

74.N2fx3h+   05:32:00  04:58:00
75.P6dx6c+   05:32:00  04:58:00
76.B7c-3g+   05:32:00  05:14:00
77.S*1c      05:45:00  05:14:00
78.K1b-2a    05:45:00  05:14:00
79.P*1b      05:45:00  05:14:00
80.L1ax1b    05:45:00  05:15:00
81.P*2b      05:45:00  05:15:00
82.K2a-3a    05:45:00  05:18:00
83.S1cx1b=   05:45:00  05:18:00
84.P8e-8f    05:45:00  05:19:00
85.P2b-2a+   06:40:00  05:19:00
86.K3a-4a    06:40:00  05:20:00
87.B6hx8f    06:40:00  05:20:00
88.P*6b      06:40:00  06:03:00
89.N1d-2b+   06:40:00  06:03:00
90.P6bx6c    06:40:00  06:03:00
91.S7e-7d    06:40:00  06:03:00
92.P*8e      06:40:00  06:19:00
93.B8f-9g    06:41:00  06:19:00
94.P9d-9e?   06:41:00  06:40:00

White has gone through some pains to get out of the wedge attack, but with 94.P9e
Habu again allows black to attack the king from both sides. Better would have been
94.P*7g. The conclusion of the post-mortem analysis was that after 95.G6gx7g P9e
Sx2c+ Gx2c +Nx2c P6d S6c+ Px9f +P2b black is still winning, because Px9g+ can be
answered with Lx9g and black also threatens mate with +P3b K5a +Px4b, but it still
seems that white had better attacking chances here than in the game.

95.S7dx6c+   07:01:00  06:40:00
96.P9ex9f    07:01:00  06:47:00
97.+N2bx3b   07:05:00  06:47:00
98.K4ax3b    07:05:00  06:47:00
99.B9gx4b+   07:05:00  06:47:00
100.R8bx4b   07:05:00  07:06:00
101.L*3d     07:17:00  07:06:00
102.P*3c     07:17:00  07:06:00
103.G*5c     07:18:00  07:06:00

This all looks great for black, but Watanabe still wasn't convinced that black is
winning. In fact, black needs to find one more good move to win this game.

104.S*9g     07:18:00  07:22:00
105.N8ix9g   07:21:00  07:22:00
106.P9fx9g+  07:21:00  07:22:00
107.K8h-7i   07:21:00  07:22:00
108.R*4i     07:21:00  07:38:00
109.P*6i     07:22:00  07:38:00
110.B*2d     07:22:00  07:39:00
Kubo (8-dan), who was analyzing this game in the press room, was wondering how
black could respond to this bishop drop. It seems that the only way to defend here
is to drop a silver on 6h, 5g or 4f, but none of these are good. 110.S*4f is answered
by R4a and 110.S*5g or S*6h is answered by N*4a and the black attack is not easy. Did
Habu wave his magic endgame wand again?

111.P3f-3e!  07:44:00  07:39:00

This is the perfect reply. 111.Gx3e is impossible because 112.Gx4b Kx4b R*4a Kx4a S*5b
leads to mate, so black has to take with the bishop. But then S*4f works, because it
is attacking both bishops, while at the same time securing a safe escape route for
the black king up the board. Watanabe later admitted that he hadn't seen 111.P3e before
this position actually occurred and that he was a little lucky that even though he
hadn't calculated this accurately, there was still a way to win.

112.B2dx3e   07:44:00  07:55:00
113.S*4f     07:45:00  07:55:00
114.+B3gx4g  07:45:00  07:59:00
115.G5cx4b   07:45:00  07:59:00
116.K3bx4b   07:45:00  07:59:00
117.R*5b     07:45:00  07:59:00
Resigns      07:45:00  07:59:00
Mate after 118.K4c Lx3c+ Kx3c R2b+ K4c S*5b K3d +Rx2c, so Habu resigned here. Watanabe
may have been a little lucky in the end, but objectively Habu lost this game without
any real chance to win. It seems like Watanabe's form is improving which should be a
little worrying for Habu. Of course, he still has a great chance to put this match away
with the black pieces in game 6. But if Watanabe can steal that game suddenly all the
pressure will be on Habu, because he runs the risk of becoming the first player ever
to lose a seven game match after a 3-0 lead. Anyway, there is no reason for Watanabe
to stop his strategy of throwing caution in the wind, so the sixth game should be very
entertaining again.