21st Ryu-O Match Game 4
[Black "Habu Yoshiharu, Challenger"]
[White "Watanabe Akira, Ryu-O"]
[Event "21st Ryu-O sen, Game 4"]
[Date "November 26th and 27th 2008"]
1.P2g-2f     00:00:00  00:00:00
2.P8c-8d     00:00:00  00:02:00
3.P2f-2e     00:02:00  00:02:00
4.P8d-8e     00:02:00  00:03:00
5.G6i-7h     00:05:00  00:03:00
6.G4a-3b     00:05:00  00:04:00
7.P2e-2d     00:12:00  00:04:00
8.P2cx2d     00:12:00  00:04:00
9.R2hx2d     00:12:00  00:04:00
10.P*2c      00:12:00  00:04:00
11.R2d-2h    00:12:00  00:04:00

This is the first time Habu and Watanabe have played the Aigakari opening against
each other. Of course, Habu plays the popular rook pullback to 2h.

12.S7a-7b    00:12:00  00:06:00
13.S3i-3h    00:14:00  00:06:00
14.P3c-3d    00:14:00  00:07:00
15.P9g-9f    00:25:00  00:07:00
16.P9c-9d    00:25:00  00:17:00
17.P1g-1f    00:36:00  00:17:00
18.P1c-1d    00:36:00  00:24:00
19.S3h-2g    00:52:00  00:24:00
20.P8e-8f    00:52:00  00:27:00
21.P8gx8f    00:52:00  00:27:00
22.R8bx8f    00:52:00  00:27:00
23.P*8g      00:53:00  00:27:00
24.R8f-8d    00:53:00  00:28:00
25.S2g-3f    00:54:00  00:28:00
26.K5a-5b    00:54:00  00:47:00
27.P7g-7f    01:08:00  00:47:00
28.P7c-7d    01:08:00  00:53:00
29.B8hx2b+   01:26:00  00:53:00
30.S3ax2b    01:26:00  00:53:00
31.S7i-8h    01:26:00  00:53:00
32.S7b-7c    01:26:00  01:51:00
33.S8h-7g    01:50:00  01:51:00
34.S7c-6d    01:50:00  01:54:00
35.S3f-4e    02:19:00  01:54:00
36.P7d-7e    02:19:00  02:11:00
37.S4e-5f    02:45:00  02:11:00
38.S2b-3c    02:45:00  02:47:00
39.P6g-6f    03:15:00  02:47:00
40.S3c-4d    03:15:00  02:50:00
41.S5f-6g    03:36:00  02:50:00

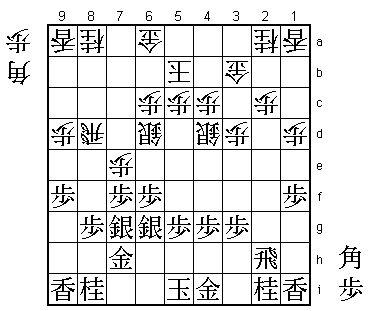
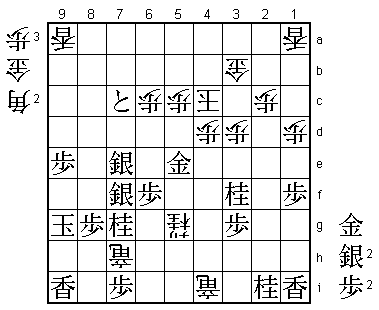
Habu has made a Silver Yagura, but when we look at this position there is no way
of telling which route this silver followed to get to 6g. Tracing it back, it
actually had the choice of taking the pawn on 3d, but Habu decided to pull it
back from 4e to 6g instead. The Silver Yagura is a very strong castle, stronger
than the normal Yagura with two golds, so this seems like a sound opening strategy.
Actually, it is a little bit like Watanabe's style, who likes to combine a middle
game fight with strengthening his own king position. In this game, the roles are
reversed with Habu building a strong castle formation while Watanabe doesn't have
a real castle formation. After the game, Habu admitted that he had some doubts
about his strategy here, calling it "maybe a little passive".

42.G6a-7b    03:36:00  03:10:00
43.K5i-6h    03:36:00  03:10:00
44.N8a-7c    03:36:00  03:18:00
45.G4i-5h    03:40:00  03:18:00
46.N2a-3c    03:40:00  03:28:00
47.K6h-7i    03:46:00  03:28:00
48.P7ex7f    03:46:00  03:55:00
49.S6gx7f    03:49:00  03:55:00
50.S4d-5e    03:49:00  04:13:00
51.P*7e      04:22:00  04:13:00
52.P9d-9e    04:22:00  05:37:00

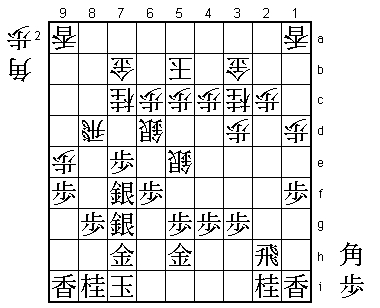
Watanabe has built a very aggressive formation with both silvers and both knights
moving forward. There is no point in waiting any further and after 84 minutes of
thought he decides to attack, even though he is playing with the white pieces.

53.B*7d!     04:57:00  05:37:00

After the simple 53.Px9e, white gets everything he wants after 54.P*9g G5h-6g Lx9e
S8f R9d. Despite the strong castle, all white pieces are working in attack. 53.B*7d
looks like it is putting the bishop in a tight spot but it is a strong reply to the
edge attack, because Px9f is answered by P*9b and black also threatens P6e next.

54.P*8h      04:57:00  06:13:00

Watanabe is forced to adjust his attacking plans as he didn't expect the bishop
drop on 7d. This pawn drop forces the king closer to the edge attack area.

55.K7ix8h    05:03:00  06:13:00
56.G7b-8c    05:03:00  06:14:00

Because P6e is still a threat, white has no choice but to further weaken his king
position in return for a small material advantage. The general opinion here was
that black had the advantage.

57.P9fx9e    05:09:00  06:14:00
58.G8cx7d    05:09:00  06:22:00
59.P7ex7d    05:09:00  06:22:00
60.R8dx7d    05:09:00  06:22:00
61.P*7e      05:09:00  06:22:00
62.R7d-8d    05:09:00  06:22:00
63.G5h-6g    05:10:00  06:22:00
64.P*7d!     05:10:00  06:43:00

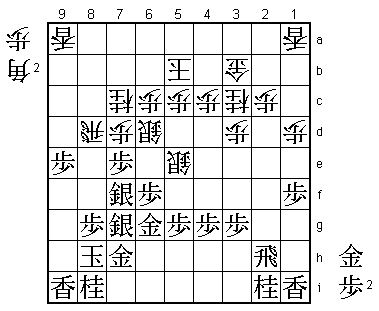
A very strong fighting move that Habu had overlooked. It seems like this move is
nonsense, because white has just moved the rook from 7d to 8d in response to P*7e
and the same thing will happen after 65.Px7d Rx7d P*7e R8d. Also, black has moved
up the gold to 6g, which makes the castle formation even more difficult to attack.
However, Watanabe has seen that there is an important difference between having
the gold on 5h and 6g. With the gold on 6g, the pawn on 4g is no longer defended.
White will ride the exchange of pieces on the seventh file to switch the rook to
the fourth file and promote on 4g. This will cost white a knight and allows black
to make a promoted pawn on 7c near the king, but Watanabe has correctly judged
that this is his only fighting chance.

65.P7ex7d    05:34:00  06:43:00
66.R8dx7d    05:34:00  06:43:00
67.P*7e      06:03:00  06:43:00
68.S6dx7e    06:03:00  06:43:00
69.S7fx7e    06:03:00  06:43:00
70.R7dx7e    06:03:00  06:43:00
71.S7g-7f    06:04:00  06:43:00
72.R7e-7d    06:04:00  06:43:00
73.S*7e      06:05:00  06:43:00
74.R7d-4d    06:05:00  06:44:00
75.P*7d      06:05:00  06:44:00
76.R4dx4g+   06:05:00  06:48:00

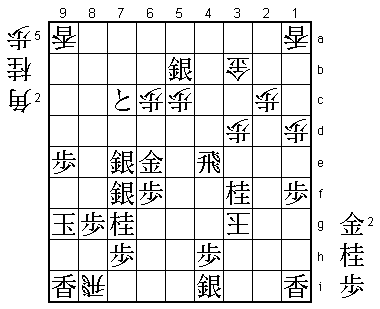
The sequence up to here is almost forced. Habu admitted after the game that even
though he will get a material advantage and the white king looks weak, he was far
from sure that his position was better here.

77.P*2d      06:10:00  06:48:00

Important pawn drop to bring the rook into play.

78.P2cx2d    06:10:00  06:48:00
79.P7dx7c+   06:10:00  06:48:00
80.+R4g-4i   06:10:00  06:54:00
81.R2hx2d    06:30:00  06:54:00
82.P*2c      06:30:00  07:01:00
83.R2dx3d    06:31:00  07:01:00
84.P4c-4d    06:31:00  07:20:00
85.P*7i      06:58:00  07:20:00

86.K5b-4c!   06:58:00  07:23:00

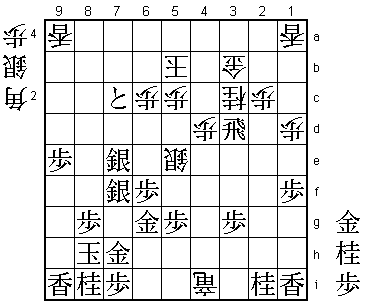
Watanabe starts to show why he is the Ryu-O title holder. The obvious move here is
86.S*4e because 87.R3e P*3d is good for white, but after 87.Rx3c+ Gx3c N*2e G3d
N*3e! the black attack cannot be stopped with white having only major pieces in
hand. Furthermore, in this position white has absolutely no chance to build an
attack against the black king, so black doesn't need to hurry which is important
if the attack is being played with minor pieces only. Why 86.K4c is much better
than S*4e will become clear soon.

87.R3d-3e    07:00:00  07:23:00
88.S*4e      07:00:00  07:24:00
89.G6g-5f    07:12:00  07:24:00

The black rook is lost, so getting this gold involved in the attack is the only
way to keep the attack going. However, by moving this gold out of the castle, the
black castle is importantly weakened. This is just enough for white to set up a
counter attack which makes this a very close mutual attacking endgame instead of
a one-sided black attacking fiesta.

90.P*7g!     07:12:00  07:30:00

Another important pawn drop to weaken the black castle, setting up the attack with
two rooks. Black still has the lead here, but any mistake can be fatal, which is
not a desirable situation when you are running out of time and there is the extra
pressure of playing to close out the match.

91.N8ix7g    07:34:00  07:30:00
92.P*3d      07:34:00  07:30:00
93.R3ex4e    07:34:00  07:30:00
94.N3cx4e    07:34:00  07:30:00
95.G5fx5e    07:34:00  07:30:00
96.R*2h      07:34:00  07:30:00
97.N*3f      07:37:00  07:30:00
98.R2hx7h+   07:37:00  07:38:00
99.K8h-9g    07:38:00  07:38:00

No choice. 99.Px7h B*7i or 99.Kx7h G*6h K8h +Rx7i K9g +Rx9i S*9h +Rx9h Kx9h L*9f
lead to mate. Suddenly, there is not much left of the strong black castle.

100.N4ex5g+! 07:38:00  07:43:00

Another strong endgame move. This promoted knight helps in attack and at the same
time, it opens the line of the promoted rook 4i, which now defends the pawn on 4d.

101.G5ex4d   07:43:00  07:43:00
102.+R4ix4d  07:43:00  07:43:00
103.S*5b     07:43:00  07:43:00

This is the start of a white king dance in the centre of the board. This silver
will become a useless piece of wood for the rest of the game, but black had no
choice. Because the promoted rook on 4d is working all the way to 8d, black cannot
immediately take the promoted rook on 7h. First the king must be forced to 5d,
after which the rook line is blocked so that black can safely take on 7h.

104.K4c-5d   07:43:00  07:43:00
105.P7ix7h   07:43:00  07:43:00
106.+R4d-4i! 07:43:00  07:45:00

In this endgame, many moves by Watanabe deserve an exclamation mark, but this is
probably the best. Black can take this rook (and is more or less forced to do this),
but the checks needed for this help the white king to get closer to an entering
position. It becomes more and more difficult to find a good way to avoid the white
king from entering. Watanabe is showing some great stuff here, but so far Habu has
not made any obvious mistake and it is still black who has the advantage.

107.G*6e     07:50:00  07:45:00
108.K5d-4e   07:50:00  07:45:00
109.R*4d     07:50:00  07:45:00
110.K4e-5f   07:50:00  07:52:00
111.R4dx4i   07:50:00  07:52:00
112.G*4h     07:50:00  07:55:00
113.S*3h     07:51:00  07:55:00
114.G4hx4i   07:51:00  07:55:00
115.R*5e     07:53:00  07:55:00
116.K5f-4f   07:53:00  07:55:00
117.S3hx4i   07:53:00  07:55:00
118.G*4e     07:53:00  07:57:00
119.P*4g     07:53:00  07:57:00
120.+N5gx4g  07:53:00  07:57:00
121.P*4h     07:53:00  07:57:00
122.+N4gx3g  07:53:00  07:59:00
123.N2ix3g   07:54:00  07:59:00
124.K4fx3g   07:54:00  07:59:00
125.R5ex4e   07:54:00  07:59:00
126.R*8i!    07:54:00  07:59:00

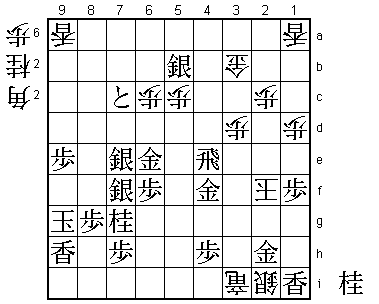
It is quite rare for a rook drop on 8i to work both in attack and defence, but this
is the case here. Of course this rook threatens to simply take the lance on 9i, but
we will later see that it is much more important that it works the other way.

127.G*3h?    07:59:00  07:59:00

Habu uses his last five minutes for this move, maybe feeling instinctively that
there is a win here. His instincts were right, but the move he finally plays is
wrong. In the post-mortem analysis the following variation was found: 127.R4g K2h
G*3h Kx1i R1g L*1h G*2h Rx9i+ N*9h N*2f R2g Nx3h+ (+Rx4i G*2i and mate) Sx3h G*3i
P*5i! which is a very difficult variation ending with a very unusual hisshi move
with a pawn drop (+Rx5i fails to N*4i). It is no wonder Habu didn't find this in
five minutes, but all credit should go to Watanabe, who succeeded in keeping the
black road to victory so narrow that it was almost impossible to find.

128.K3gx3f   07:59:00  07:59:00
129.G*4f     07:59:00  07:59:00
130.K3f-2f   07:59:00  07:59:00

The final point of this game is that black now has a mate, but only with a pawn drop.
This is of course nothing more than dumb luck for Watanabe, but in this game it can
be said that he forced his own luck.

131.L9i-9h   07:59:00  07:59:00
132.R8ix4i+  07:59:00  07:59:00
133.P*3i     07:59:00  07:59:00
134.S*2i     07:59:00  07:59:00
135.G3h-2h   07:59:00  07:59:00
136.+R4ix3i  07:59:00  07:59:00
Resigns      07:59:00  07:59:00

Black now can only save the gold on 2h by letting the white king in (137.G1g K3g etc.).
The white king is then safe and even though black also has good chances to make an
entering himself, black has only one major piece so he will not have enough points
to force a replay. Habu therefore resigned here, missing his first chance to take
the Ryu-O title from Watanabe. In this game, Watanabe showed why Moriuchi, Kimura
and Sato (twice) couldn't beat him and why he is considered the great hope of the
younger generation. With his back against the wall he played his best shogi of this
match so far. He is still 3-1 down which is obviously not a good situation, but if
he can continue playing this way in the next game with the black pieces, he may be
able to put some pressure on Habu.
