21st Ryu-O Match Game 2
[Black "Habu Yoshiharu, Challenger"]
[White "Watanabe Akira, Ryu-O"]
[Event "21st Ryu-O sen, Game 2"]
[Date "October 30th and 31st 2008"]
1.P7g-7f     00:00:00  00:00:00
2.P8c-8d     00:00:00  00:02:00
3.S7i-6h     00:02:00  00:02:00
4.P3c-3d     00:02:00  00:03:00
5.P6g-6f     00:03:00  00:03:00
6.S7a-6b     00:03:00  00:04:00
7.P5g-5f     00:05:00  00:04:00
8.P5c-5d     00:05:00  00:06:00
9.S3i-4h     00:05:00  00:06:00
10.S3a-4b    00:05:00  00:07:00
11.G4i-5h    00:11:00  00:07:00
12.G4a-3b    00:11:00  00:09:00
13.G6i-7h    00:14:00  00:09:00
14.K5a-4a    00:14:00  00:10:00
15.K5i-6i    00:16:00  00:10:00
16.G6a-5b    00:16:00  00:13:00
17.S6h-7g    00:21:00  00:13:00
18.S4b-3c    00:21:00  00:15:00
19.B8h-7i    00:29:00  00:15:00
20.B2b-3a    00:29:00  00:16:00
21.P3g-3f    00:32:00  00:16:00
22.P4c-4d    00:32:00  00:20:00
23.G5h-6g    00:39:00  00:20:00
24.P7c-7d    00:39:00  00:24:00
25.S4h-3g    00:46:00  00:24:00
26.B3a-6d    00:46:00  00:27:00
27.B7i-6h    00:47:00  00:27:00
28.G5b-4c    00:47:00  00:32:00
29.K6i-7i    00:49:00  00:32:00
30.K4a-3a    00:49:00  00:38:00
31.K7i-8h    00:53:00  00:38:00
32.K3a-2b    00:53:00  00:40:00
33.S3g-4f    00:55:00  00:40:00
34.S6b-5c    00:55:00  00:43:00
35.N2i-3g    00:55:00  00:43:00
36.P9c-9d    00:55:00  00:47:00
37.P2g-2f    00:59:00  00:47:00
38.S3c-2d    00:59:00  00:49:00
39.P1g-1f    00:59:00  00:49:00
40.P1c-1d    00:59:00  00:50:00
41.R2h-3h    01:02:00  00:50:00
42.B6d-7c    01:02:00  00:52:00
43.L1i-1h    01:03:00  00:52:00
44.P9d-9e    01:03:00  01:01:00
45.P6f-6e    01:13:00  01:01:00
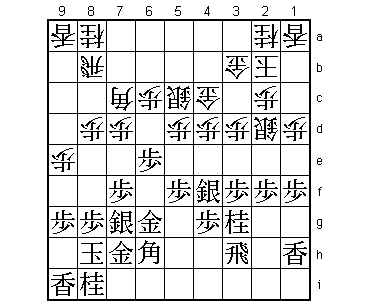
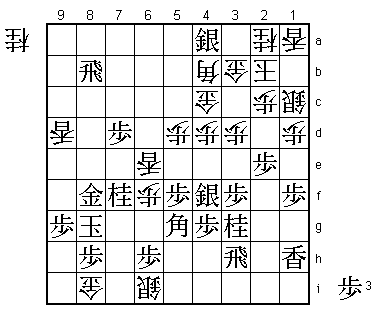
Watanabe has picked a classis Yagura opening for his first game with the white pieces.
The formation with S4f-N3g is a popular one and the position after 45.P6e is still
known. Actually, Watanabe has played 45.P6e himself before, as well as Miyata (5-dan),
who share Shoshi (7-dan) as their teacher. Therefore, it is very likely that they
have studied this position together. The point of 45.P6e is that in this type of
position black will play the knight attack N2e after white strengthens the castle
with S4b. The best counter attack to this is P4e Sx4e B1i+, but with the pawn on 6e,
black can counter this with B4f +Bx4f Px4f and then strongly threatens B*6f next.
There is no good defence against this threat, so white cannot play P4e after N2e if
black plays P6e. Therefore, white has to find a way to attack before being attacked
himself.
46.N8a-9c 01:13:00 01:20:00
47.S7g-6f 01:20:00 01:20:00
48.N9c-8e 01:20:00 01:22:00
This is an attack that Watanabe has played before in the B1 Junisen game against
Namekata in September. He lost that game, but in the post-mortem analysis he explained
that Namekata had told him that he didn't like his position after the middle game,
so Watanabe decided to give it another try here.
49.P7f-7e 02:00:00 01:22:00
50.P7dx7e 02:00:00 01:26:00
51.S6fx7e 02:00:00 01:26:00
52.R8b-9b 02:00:00 01:31:00
53.P8g-8f 02:11:00 01:31:00
54.N8ex9g+ 02:11:00 01:37:00
55.K8hx9g 02:11:00 01:37:00
56.P9e-9f 02:11:00 01:40:00
57.K9g-8g 02:11:00 01:40:00
58.P9f-9g+ 02:11:00 01:41:00
59.L9ix9g 02:11:00 01:41:00
60.P*9f 02:11:00 01:41:00
61.L9gx9f 02:11:00 01:41:00
62.R9bx9f 02:11:00 01:41:00
63.P*9g 02:11:00 01:41:00
64.R9f-9d 02:11:00 01:54:00
65.P*7d 02:32:00 01:54:00
66.B7c-5a 02:32:00 02:07:00
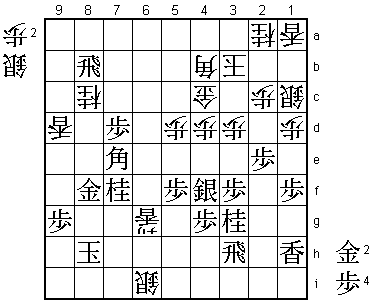
The position is still very similar to the game between Namekata and Watanabe. The move
order is slightly different (Namekata played P*7d earlier), but this position is
identical except for the position of the white rook. Watanabe pulled back the rook
to 9c against Namekata, while here the rook went to 9d.
67.B6h-5g 03:07:00 02:07:00
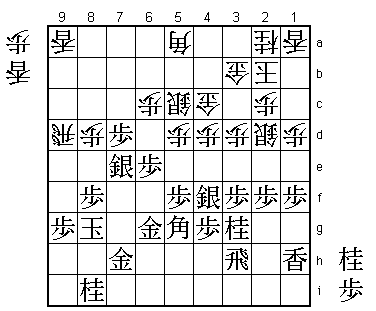
This is an important difference with the way Namekata played. Namekata played 67.P2e
S1c and only then B5g. Habu playing 67.B5g without P2e S1c is an improvement. With
the silver on 1c, white has the option to move into an Anaguma formation later with
L1b-K1a-S2b. Without the silver on 1c, this option is much less attractive.
68.P*9h?! 03:07:00 04:20:00
Without the option of switching to the Anaguma, Watanabe sees no other way than to
try and force the issue and attack. This is not necessarily bad, but former Ryu-O
Fujii (9-dan) had an interesting analysis of the position and Watanabe's state of
mind here. In this position black has many different ways to play and white's options
are fairly limited. Because white is unable to pin down where the danger is coming
from, he has to read many different variations, which will include a number of
bad-looking ones. When this happens, it is very hard to keep confidence in one's
own position and this often leads to bad moves or moves that are possible overplays
like 68.P*9h. Fujii writes that one of Watanabe's greatest qualities is his ability
for positive thinking. Even if the position is a little bad, he never gets down about
it and always plays with a lot of confidence, luring his opponents into making mistakes.
The fact that he plays forcing moves like 68.P*9h made Fujii worry a little about the
lack of positive attitude displayed by Watanabe in this match so far.
69.P2f-2e 03:50:00 04:20:00
70.S2d-1c 03:50:00 04:22:00
71.K8gx9h 03:50:00 04:22:00
72.P6c-6d 03:50:00 04:25:00
73.P6ex6d 04:30:00 04:25:00
74.L*6a 04:30:00 04:25:00
75.N*7f 04:34:00 04:25:00
76.P8d-8e 04:34:00 04:57:00
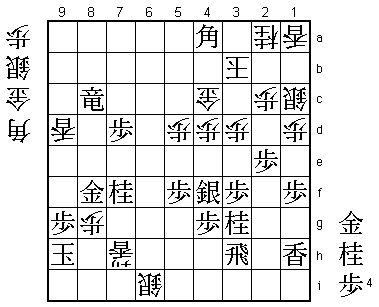
77.G6g-7g 04:40:00 04:57:00
This looks like a good move, because the head of the king now looks very well defended,
but there is a snag.

78.B5a-4b?   04:40:00  05:49:00

Here Watanabe could have made the position very close with 78.Px8f Gx8f B9e!. The simple
threat is Bx8f Sx8f P*9f which activates the rook-lance combination and the white attack
is very hard to stop. After B9e, G7h-8g seems like the strongest defence, but then Bx8f
Gx8f P*8e Gx8e G*7g! is a very strong move. Nx7g fails to Rx9g+ and Gx9d Gx7f removes
the important knight on 7f, so white now threatens both Lx9d and Sx6d next. White is
behind in material, but the attack is not easily stopped. Watanabe said in the
post-mortem analysis that he had looked at B9e, but that he thought that the attack
could be stopped after that.

79.P6d-6c+   05:05:00  05:49:00
80.L6ax6c    05:05:00  05:50:00
81.P7d-7c+   05:05:00  05:50:00
82.L6c-6e    05:05:00  05:53:00
83.+P7c-6c   05:29:00  05:53:00
84.P*7d      05:29:00  06:07:00
85.+P6cx5c   05:36:00  06:07:00
86.G4cx5c    05:36:00  06:11:00
87.S7e-8d    05:36:00  06:11:00
88.P*6f      05:36:00  06:11:00
89.P*6h      05:36:00  06:11:00
90.P7d-7e    05:36:00  06:14:00
91.S8dx7e    05:45:00  06:14:00
92.G5c-4c    05:45:00  06:14:00
93.S*8c      05:54:00  06:14:00
94.B4bx7e    05:54:00  06:15:00
95.S8cx9d=   05:54:00  06:15:00
96.L9ax9d    05:54:00  06:15:00
97.R*8b      06:32:00  06:15:00
98.P8ex8f    06:32:00  06:26:00
99.P*8h      06:35:00  06:26:00
100.B7e-4b   06:35:00  06:27:00
101.P*7e     06:37:00  06:27:00
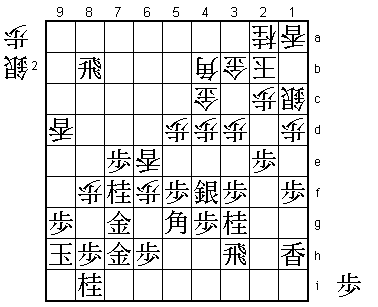
Fujii was very surprised with Habu's way of playing the endgame here. The combination
of 97.R*8b, 99.P*8h and 101.P*7e is very hard to play for a professional, because it
seems very passive. The rook on 8b is already defending the 8th file, so P*8h seems to
be overdoing it. Also, 101.P*7e is just protecting the head of the knight, which is
still quite far removed from the king, so this again seems to be overly defensive.
Especially when the position is good like the black position here, professional
players usually try to attack to avoid that the lead slips away. Fujii admires
Habu's ability to look for the best move in any position regardless of the flow
of the game (attacking when ahead, defending when behind).

102.P*7d     06:37:00  06:31:00
103.P7ex7d   06:40:00  06:31:00
104.S*6i     06:40:00  07:02:00
105.G7h-7i   06:42:00  07:02:00
106.S*5h     06:42:00  07:06:00
107.G7ix6i   06:47:00  07:06:00
108.S5hx6i=  06:47:00  07:06:00
109.S*4a     06:48:00  07:06:00
110.G*7h     06:48:00  07:09:00
111.G7gx8f   07:09:00  07:09:00
112.G7hx8i   07:09:00  07:18:00
113.K9h-8g   07:13:00  07:18:00
114.G8ix8h   07:13:00  07:21:00

Watanabe is one of those players which are easy to read. That is to say, they don't
(or can't) hide their state of mind during the game very well. For a while now, Watanabe
had been playing like he had already lost interest in this game, looking around and
to the ceiling. However, here his demeanour suddenly changed and he started leaning
forward towards the board like a tiger seeing prey, fully concentrating. He had found
a very promising move, but unfortunately for him, it is based on a miscalculation. When
he realized his mistake, he wondered if 114.Gx8h was bad, but even after 114.P6g+ Px6g
Lx6g+ B9c+ the black king cannot be mated. For example, Sx7h= Rx7h +Lx7h +Bx9d and
removing the important lance on 9d gives the black king the running space that is
needed to make an entering king.

115.K8gx8h   07:13:00  07:21:00
116.P6f-6g+  07:13:00  07:21:00
117.P6hx6g   07:16:00  07:21:00
118.L6ex6g+  07:16:00  07:21:00
119.S4ax3b+  07:25:00  07:21:00
120.K2bx3b   07:25:00  07:21:00
121.B5g-7e   07:25:00  07:21:00
122.N*8c     07:25:00  07:28:00
Watanabe played this move with a lot of noise, almost like he wanted to push the
knight through the board. Almost like a "gotcha" statement. However, after a few
minutes, his expression darkened and he looked up in despair. He had realized that
his money move was a dud. 122.N*8c indeed looks like a move to turn the tables.
If the rook takes this knight, the bishop on 4b is no longer pinned and white can
play Bx7e. Watanabe thought that this would win for white, but...

123.R8bx8c+  07:47:00  07:28:00

Now 123.Bx7e Gx7e is a mating threat because white has given up the knight (B*4a
K2b Bx2c+ Kx2c +Rx4c S*3c N*3e etc.). Habu wasn't really sure how to win the position
from here, but after Rx8c+ he was confident that the black king could no longer be
mated.

124.P*8g     07:47:00  07:33:00

There is no way to save the position from here, so Watanabe just makes a hisshi
position after which he is mated.

125.K8h-9h   07:48:00  07:33:00
126.+L6g-7h  07:48:00  07:54:00
127.B7ex4b+  07:49:00  07:54:00
128.G4cx4b   07:49:00  07:54:00
129.G*4c     07:49:00  07:54:00
130.G4bx4c   07:49:00  07:54:00
131.B*4a     07:49:00  07:54:00
Resigns      07:49:00  07:54:00
And mate after 132.K2b (or Kx4a +Rx4c) Bx2c+ Kx2c +Rx4c S*3c N*3e Px3d G*3d etc.
A close game, but Watanabe never really had a chance to win. Furthermore, his slightly
passive attitude seems to indicate that he thinking a little bit too much about his
opponent and the occasion of playing for the Lifetime Ryu-O honours. He will have to
change his state of mind quickly or this match will be over. Still, the pattern in
this match so far is similar to the Ryu-O match two years ago where Watanabe started
struggling badly against an in form Sato Yasumitsu, also dropping the first two games.
A miraculous escape in the third game turned the match around and Watanabe won in seven
games. Therefore, it seems too early to write off Watanabe yet.