21st Asahi Open Match Game 4
[Black "Fukaura Koichi, Challenger"]
[White "Horiguchi Kazushiza, Asahi"]
[Event "21st Asahi Open, Game 4"]
[Date "May 1st 2003"]
1.P2g-2f     00:00:00  00:00:00
2.P8c-8d     00:00:00  00:01:00
3.P7g-7f     00:00:00  00:01:00
4.G4a-3b     00:00:00  00:10:00
5.G6i-7h     00:00:00  00:10:00
6.P8d-8e     00:00:00  00:10:00
7.B8h-7g     00:00:00  00:10:00
8.P3c-3d     00:00:00  00:10:00
9.S7i-8h     00:00:00  00:10:00
10.B2bx7g+   00:00:00  00:10:00
11.S8hx7g    00:00:00  00:10:00
12.S3a-4b    00:00:00  00:10:00
13.S3i-3h    00:00:00  00:10:00
14.S7a-7b    00:00:00  00:10:00
15.P9g-9f    00:00:00  00:10:00
16.P9c-9d    00:00:00  00:28:00
17.P4g-4f    00:00:00  00:28:00
18.P6c-6d    00:00:00  00:28:00
19.S3h-4g    00:00:00  00:28:00
20.S7b-6c    00:00:00  00:28:00
21.K5i-6h    00:00:00  00:28:00
22.G6a-5b    00:00:00  00:28:00
23.P1g-1f    00:00:00  00:28:00
24.P1c-1d    00:00:00  00:28:00
25.G4i-5h    00:01:00  00:28:00
26.P7c-7d    00:01:00  00:29:00
27.P3g-3f    00:01:00  00:29:00
28.K5a-4a    00:01:00  00:29:00
29.K6h-7i    00:01:00  00:29:00
30.K4a-3a    00:01:00  00:29:00
31.S4g-5f    00:01:00  00:29:00
32.S6c-5d    00:01:00  00:29:00
33.P4f-4e    00:05:00  00:29:00
34.N8a-7c    00:05:00  00:32:00
35.P6g-6f    00:08:00  00:32:00
36.G5b-6c    00:08:00  00:34:00
37.N2i-3g    00:09:00  00:34:00
38.S4b-3c    00:09:00  00:37:00

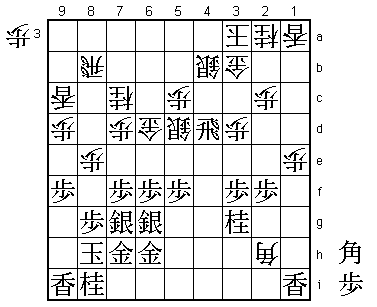
The main point of this variation of the Kakugawari opening is the pawn on
4e. This pawn is pushed in part to avoid P4d by white, but a more important
objective is to drop the bishop on 4f, which is a very powerful position
for the bishop. In the past, there have been 12 professional games with
the P4e variation and in all of these games black sooner or later dropped
the bishop on 4f. Furthermore, black won 10 out of these 12 games (white
won one game and one game ended in sennichite). Fukaura will have been
fully aware of this data and it is therefore a token of his strength that
he decides to do it differently in this game. He elects to keep the bishop
in hand and support the pawn on 4e with the rook.
39.R2h-4h 00:10:00 00:37:00
40.L9a-9c?! 00:10:00 00:40:00
This lance becomes a target for attack, but white is already running out
of moves in this position.
41.K7i-8h 00:13:00 00:40:00
42.S3c-4b 00:13:00 00:46:00
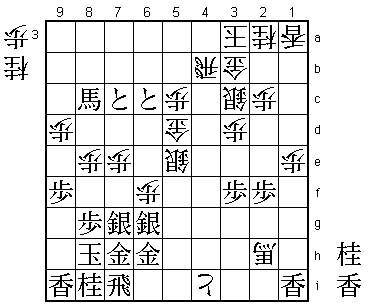
43.G5h-6h 00:32:00 00:46:00
Fukaura's new plan. He strengthens his castle by pulling all his generals
back around his king. White has only two generals in defense, which might
be a big factor once the position is opened up.
44.S4b-3c 00:32:00 00:52:00
45.S5f-6g 00:35:00 00:52:00
46.S3c-4b 00:35:00 01:49:00
47.P5g-5f 00:47:00 01:49:00
48.P6d-6e 00:47:00 01:49:00
Horiguchi's patience has run out. Opening the position here might well be
suicidal, though.
49.P6fx6e 00:52:00 01:49:00
50.S5dx6e 00:52:00 01:49:00
51.B*5e 00:53:00 01:49:00
52.B*6d 00:53:00 01:49:00
53.P*6f 01:40:00 01:49:00
54.S6e-5d 01:40:00 01:49:00
55.B5ex6d 01:40:00 01:49:00
56.G6cx6d 01:40:00 01:49:00
57.P1f-1e 01:40:00 01:49:00
58.P1dx1e 01:40:00 01:50:00
59.P4e-4d 01:40:00 01:50:00
60.P4cx4d 01:40:00 02:33:00
61.R4hx4d 01:40:00 02:33:00
62.B*2h 01:40:00 02:33:00
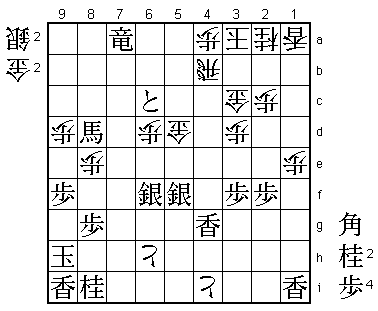
63.B*7a!?    01:49:00  02:33:00

The point, but in the end not 100% satisfactory for black. Kato Hifumi
suggested 63.B*9a after the game. Fukaura said that this might be playable,
but that after 64.R7b Rx5d Px5d S*8c R7a B8b+ R4a +Bx7c Bx3g+ P6e S3c
Px6d R4i+ he feared the attack of the two rooks.

64.R8b-5b    01:49:00  02:46:00

Not much choice. After 64.R9b, Fukaura planned to play 65.P*4c Gx4c (Sx4c
Rx6d; S4bx4c Bx5c+) Rx4c+ S5dx4c G*8b which is good for black.

65.B7ax9c+   02:07:00  02:46:00

A change of plan. Fukaura initially intended 65.P5e Sx5e Rx6d Sx6d G*6b,
but realized in time that after Rx6b Bx6b+ Bx3g+ is not so clear. White
might have good chances to make an entering king here.

66.B2hx3g+   02:07:00  02:46:00
67.+B9c-8c   02:07:00  02:46:00
68.S4b-3c    02:07:00  02:46:00
69.R4d-4i    02:07:00  02:46:00
70.G6d-6c    02:07:00  02:46:00
71.P5f-5e    02:07:00  02:46:00
72.S5dx5e    02:07:00  02:51:00
73.P7f-7e    02:10:00  02:51:00
74.P*4h      02:10:00  02:59:00
75.R4i-3i    02:11:00  02:59:00
76.+B3g-2h   02:11:00  02:59:00
77.R3i-7i    02:13:00  02:59:00
78.P7dx7e    02:13:00  02:59:00
79.P*7d      02:13:00  02:59:00
80.N7c-6e    02:13:00  02:59:00
81.P6fx6e    02:13:00  02:59:00
82.R5b-4b    02:13:00  02:59:00
83.P7d-7c+   02:13:00  02:59:00
84.G6c-5d    02:13:00  02:59:00
85.P6e-6d    02:14:00  02:59:00
86.P4h-4i+   02:14:00  02:59:00
87.P6d-6c+   02:14:00  02:59:00
88.P*6f?     02:14:00  02:59:00
Horiguchi has spent a lot of time in this game and this is the moment
he regretted that. He had a chance here to get back in the game. The
simple 88.R4h+ would have made the endgame very close. For example,
89.G5h +R3i is good for white as the threat +B4f next is quite
devastating.

89.L*4g!     02:18:00  02:59:00

This lance gets lost, but white can only get a good attack with a
promoted rook. This now takes too long to accomplish.

90.P*4f      02:18:00  02:59:00
91.S6g-5f    02:18:00  02:59:00
92.P4fx4g+   02:18:00  02:59:00
93.+P6cx5c!  02:19:00  02:59:00

The move that Horiguchi overlooked in byoyomi. Combined with black's
next move, this gives the black attack decisive strength.

94.G5dx5c    02:19:00  02:59:00
95.N*4e      02:19:00  02:59:00
96.S5ex5f    02:19:00  02:59:00
97.+B8cx5f   02:20:00  02:59:00
98.G5c-5d    02:20:00  02:59:00
99.N4ex3c+   02:22:00  02:59:00
100.G3bx3c   02:22:00  02:59:00
101.+P7c-6c  02:24:00  02:59:00
102.N*8d     02:24:00  02:59:00
103.+B5fx6f  02:27:00  02:59:00
104.N*7f     02:27:00  02:59:00
105.K8h-9h   02:27:00  02:59:00
106.N7fx6h+  02:27:00  02:59:00
107.G7hx6h   02:29:00  02:59:00
108.L*6e     02:29:00  02:59:00
109.+B6fx7e  02:33:00  02:59:00
110.P*6d     02:33:00  02:59:00
111.+B7ex8d  02:37:00  02:59:00
112.L6ex6h+  02:37:00  02:59:00
113.S7gx6h   02:37:00  02:59:00
114.+B2h-5e  02:37:00  02:59:00
115.S*6f     02:37:00  02:59:00
116.P*7h     02:37:00  02:59:00
117.R7ix7h   02:37:00  02:59:00
118.+B5e-5f  02:37:00  02:59:00
119.R7h-7a+  02:38:00  02:59:00
120.P*4a     02:38:00  02:59:00
121.S*6g     02:40:00  02:59:00
122.+P4g-5g  02:40:00  02:59:00
123.S6gx5f   02:40:00  02:59:00
124.+P5gx6h  02:40:00  02:59:00
125.L*4g!    02:40:00  02:59:00
Another lance drop on 4g to finish the game. 126.Rx4g+ Sx4g G*7h looks
dangerous, but is met with +Bx8e which defends against the mating threat
and threatens mate next with +Rx4a.

126.G*8h     02:40:00  02:59:00
127.K9hx8h   02:40:00  02:59:00
128.G*7h     02:40:00  02:59:00

Desperate try. White has to give up too much material.

129.+R7ax7h  02:40:00  02:59:00
130.+P6hx7h  02:40:00  02:59:00
131.K8hx7h   02:40:00  02:59:00
132.R*4h     02:40:00  02:59:00
133.P*6h     02:43:00  02:59:00
134.R4bx4g+  02:43:00  02:59:00
135.S5fx4g   02:43:00  02:59:00
136.S*7f     02:43:00  02:59:00
137.G*4b     02:44:00  02:59:00
138.P4ax4b   02:44:00  02:59:00
139.G*4a     02:44:00  02:59:00
140.K3ax4a   02:44:00  02:59:00
141.+B8d-5a  02:44:00  02:59:00
142.K4a-3b   02:44:00  02:59:00
143.+B5ax4b  02:44:00  02:59:00
144.K3bx4b   02:44:00  02:59:00
145.R*7b     02:44:00  02:59:00
146.K4b-4c   02:44:00  02:59:00
147.R7b-5b+  02:44:00  02:59:00
148.K4c-4d   02:44:00  02:59:00
149.N*5f     02:44:00  02:59:00
Resigns      02:44:00  02:59:00
Simple mate after 150.K4e N*3g. A fine performance by Fukaura in this game
finishes a solid match in which he showed that he was just a little too
strong for Horiguchi at this moment. However, Horiguchi is a very gifted
player and it is highly likely that we will see him back at the big stage
in the not too distant future.