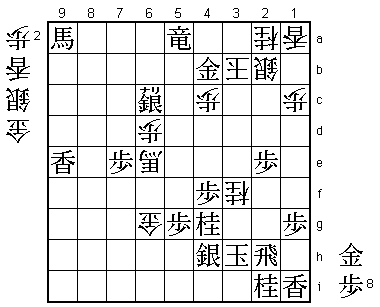
21st Asahi Open Match Game 3
[Black "Horiguchi Kazushiza, Asahi"]
[White "Fukaura Koichi, Challenger"]
[Event "21st Asahi Open, Game 3"]
[Date "April 21st 2003"]
1.P7g-7f     00:00:00  00:00:00
2.P3c-3d     00:00:00  00:00:00
3.P2g-2f     00:00:00  00:00:00
4.P8c-8d     00:00:00  00:00:00
5.P2f-2e     00:00:00  00:00:00
6.P8d-8e     00:00:00  00:00:00
7.G6i-7h     00:00:00  00:00:00
8.G4a-3b     00:00:00  00:00:00
9.P2e-2d     00:00:00  00:00:00
10.P2cx2d    00:00:00  00:00:00
11.R2hx2d    00:00:00  00:00:00
12.P8e-8f    00:00:00  00:00:00
13.P8gx8f    00:00:00  00:00:00
14.R8bx8f    00:00:00  00:00:00
15.R2dx3d    00:00:00  00:00:00
16.B2b-3c    00:00:00  00:00:00
17.R3d-3f    00:00:00  00:00:00
18.S3a-2b    00:00:00  00:00:00
19.G4i-3h    00:00:00  00:00:00
20.K5a-4a    00:00:00  00:00:00
21.K5i-5h    00:00:00  00:00:00
22.R8f-8d    00:00:00  00:00:00
23.P*8g      00:00:00  00:00:00
24.S7a-6b    00:00:00  00:00:00
25.R3f-2f    00:00:00  00:00:00
26.P5c-5d    00:00:00  00:00:00
27.S3i-4h    00:00:00  00:00:00
28.P5d-5e    00:00:00  00:00:00
29.S7i-6h    00:00:00  00:00:00
30.G6a-5a    00:00:00  00:03:00
31.P3g-3f    00:00:00  00:03:00
32.R8d-3d    00:00:00  00:04:00

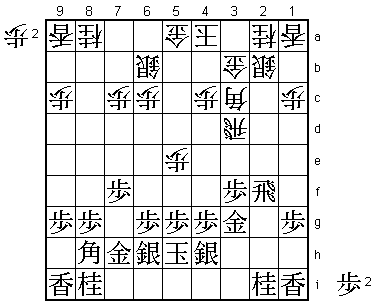
No reason for Fukaura to change his strategy after his convincing win
in the first game, so again the "Fukaura special" R3d in the Chuza-style
Yokofudori. Horiguchi is the one who has to come up with something new.

33.G3h-3g    00:00:00  00:04:00

Here it is. In game 1, black's attack started with S3g instead of G3g.
Actually, Fukaura has experience with G3g, as this was played by Nakata
Hiroki against him earlier.

34.P7c-7d    00:00:00  00:10:00
35.R2f-2h    00:00:00  00:10:00

But now the game is in completely new territory. Pulling back the rook
gives white little hope of a good attack on the right side of the board
(moves like B4d and P*2e are no longer possible), so he changes his plans
to attack on the left side instead.

36.N8a-7c    00:00:00  00:16:00
37.G3g-4f    00:02:00  00:16:00
38.P7d-7e    00:02:00  00:16:00
39.P7fx7e    00:03:00  00:16:00
40.R3d-2d    00:03:00  00:17:00
41.P*2e      00:04:00  00:17:00
42.R2d-8d    00:04:00  00:17:00
43.S6h-7g    00:17:00  00:17:00
44.P9c-9d    00:17:00  00:25:00
45.P9g-9f    00:48:00  00:25:00

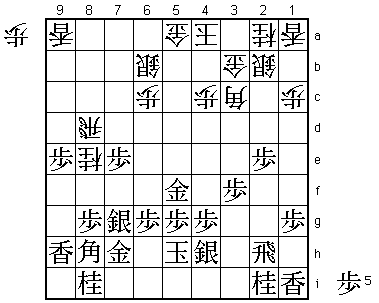
Come and get me if you can. Horiguchi is fully aware that this gives white
a chance to attack on the edge. However, if black allows the extension
P9e next by white, it will be hard for black to defend against a later
attack. Horiguchi is counting on his evaluation that an edge attack at
this point is premature and that with proper defense he will be able to
counter it.

46.P9d-9e    00:48:00  01:13:00
47.P9fx9e    00:48:00  01:13:00
48.P5e-5f    00:48:00  01:13:00
49.G4fx5f    00:51:00  01:13:00
50.P*9h      00:51:00  01:15:00
51.L9ix9h    00:51:00  01:15:00
52.N7c-8e!?  00:51:00  01:17:00

Fukaura throws a curve ball. The normal attack is 52.P*9g Lx9g N8e which
leads to a difficult position after S8f Bx8h+ Gx8h Nx9g+ Nx9g L*2f Rx2f
B*4d L*3e. Hard to judge, but the main reason Fukaura did not play this
is that he knew that Horiguchi would have spent most of his time on the
natural attack. Time is a big factor in matches like the Asahi Open, where
the players only have 3 hours per game.

53.S7g-8f    01:03:00  01:17:00
54.B3cx8h+   01:03:00  01:20:00
55.G7hx8h    01:03:00  01:20:00
56.B*9i      01:03:00  01:20:00
57.G8h-7h    01:04:00  01:20:00
58.P*8h      01:04:00  01:22:00
59.N8i-7g    01:26:00  01:22:00
60.N8ex7g+   01:26:00  01:22:00
61.G7hx7g    01:26:00  01:22:00
62.P8h-8i+   01:26:00  01:22:00

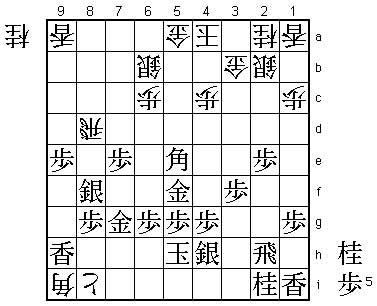
White has managed to make a tokin, but the problem is how to make his
pieces work together to force a final breakthrough before black can
counter.

63.B*5e      01:36:00  01:22:00

Defends against the immediate threat 64.Bx7g+ Sx8g Rx8g+ and the black
position collapses.
64.L9ax9e? 01:36:00 02:05:00
A big mistake that turns the game in blackˇÇs favor. There are two
alternatives that were better here. Horiguchi expected 64.N*4d G4f
+P7i S3g B8h+ K4i which he considered better for black. However, after
64.N*4d G4f, white can also play Bx7g+ Bx7g G*7f B5e Gx8f. Using the gold
in this way is bad style but in this case it might work as N*7d is
simply met with G7f followed by Rx8g+ and the white attack is faster
than the black attack. Even better was probably the simple 64.N3c,
suggested by Ouchi. Then 65.Bx9a+ still fails to Bx7g+ followed by
Rx8g+ and 65.N*7d N*6d seems good for white.
65.L9hx9e 02:15:00 02:05:00
66.N*4d 02:15:00 02:07:00
67.G5f-4f 02:37:00 02:07:00
68.+P8i-8h 02:37:00 02:17:00
69.B5e-9a+ 02:42:00 02:17:00
70.P*7f 02:42:00 02:23:00
71.G7gx7f 02:42:00 02:23:00
72.+P8hx8g 02:42:00 02:24:00
73.S8f-8e 02:42:00 02:24:00
74.R8d-6d 02:42:00 02:33:00
75.N*7d 02:48:00 02:33:00
76.P*7c 02:48:00 02:40:00
77.N7dx6b+ 02:48:00 02:40:00
78.G5ax6b 02:48:00 02:40:00
79.S8e-7d 02:53:00 02:40:00
80.+P8g-7g 02:53:00 02:40:00
81.G7f-6e 02:53:00 02:40:00
82.+P7gx6g 02:53:00 02:46:00
83.K5hx6g 02:53:00 02:46:00
84.N*5d 02:53:00 02:46:00
85.G6ex6d 02:55:00 02:46:00
86.B9i-6f+ 02:55:00 02:46:00
87.K6g-5h 02:55:00 02:46:00
88.P6cx6d 02:55:00 02:47:00
89.R*8a 02:55:00 02:47:00
90.P*5a 02:55:00 02:47:00
91.S7dx7c+ 02:55:00 02:47:00
92.G6b-5b 02:55:00 02:48:00
93.P*6g 02:57:00 02:48:00

94.+B6f-7f   02:57:00  02:51:00

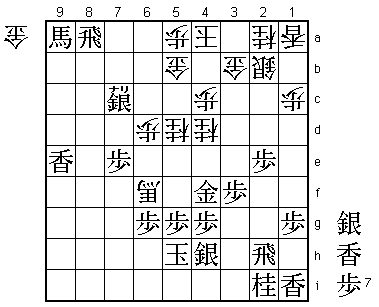
Also, 94.+B6e G3e or 94.Nx4f Px4f +B6e +B9b wins for black.

95.L*5e      02:57:00  02:51:00
96.G*7g      02:57:00  02:52:00
97.K5h-4i    02:57:00  02:52:00
98.G7gx6g    02:57:00  02:52:00
99.K4i-3h    02:58:00  02:52:00
100.G3b-4b   02:58:00  02:52:00
101.S*6c     02:58:00  02:52:00
102.N5dx4f   02:58:00  02:53:00
103.P4gx4f   02:58:00  02:53:00
104.+B7f-6e  02:58:00  02:53:00
105.N*4g     02:58:00  02:53:00
106.G5bx6c   02:58:00  02:59:00
107.+S7cx6c  02:58:00  02:59:00
108.K4a-3b   02:58:00  02:59:00

Only after Horiguchi saw that 108.Nx3f would lead to mate (109.Rx5a+
K3b +Rx4b Kx4b +Sx5c K3b G*4b K3c P*3d Kx3d P*3e) he felt he had won
the game.

109.L5e-5c+  02:58:00  02:59:00
110.N4dx3f   02:58:00  02:59:00
111.+L5cx4b  02:58:00  02:59:00
112.K3bx4b   02:58:00  02:59:00
113.R8ax5a+  02:58:00  02:59:00
114.K4b-3b   02:58:00  02:59:00
115.G*4b     02:58:00  02:59:00
Resigns      02:58:00  02:59:00

Mate after 116.K3c G*2d K4d +R5c or 116.K2c P2d K3c P*3d Kx3d P*3e K4d
G*3d. A fine game by Horiguchi and exactly what he needed after more
or less being blown away in the first two games. He will need two more
to defend his Asahi Open title.
