21st Asahi Open Match Game 2
[Black "Fukaura Koichi, Challenger"]
[White "Horiguchi Kazushiza, Asahi"]
[Event "21st Asahi Open, Game 2"]
[Date "April 11th 2003"]
1.P2g-2f     00:00:00  00:00:00
2.P8c-8d     00:00:00  00:01:00
3.P2f-2e     00:00:00  00:01:00
4.P8d-8e     00:00:00  00:01:00
5.G6i-7h     00:00:00  00:01:00
6.G4a-3b     00:00:00  00:01:00
7.P2e-2d     00:00:00  00:01:00
8.P2cx2d     00:00:00  00:01:00
9.R2hx2d     00:00:00  00:01:00
10.P*2c      00:00:00  00:01:00
11.R2d-2h    00:00:00  00:01:00

Moving the rook back to 2h in the Aigakari is not known as the most
attacking way to play the opening, but it is played quite often in
professional games and Fukaura will have prepared it thoroughly.

12.P9c-9d    00:00:00  00:11:00
13.P9g-9f    00:00:00  00:11:00
14.S7a-7b    00:00:00  00:11:00
15.S3i-3h    00:00:00  00:11:00
16.P3c-3d    00:00:00  00:11:00
17.S3h-2g    00:00:00  00:11:00
18.P8e-8f    00:00:00  00:11:00
19.P8gx8f    00:00:00  00:11:00
20.R8bx8f    00:00:00  00:11:00
21.P*8g      00:00:00  00:11:00
22.R8f-8d    00:00:00  00:11:00
23.S2g-3f    00:00:00  00:11:00
24.R8d-7d    00:00:00  00:12:00

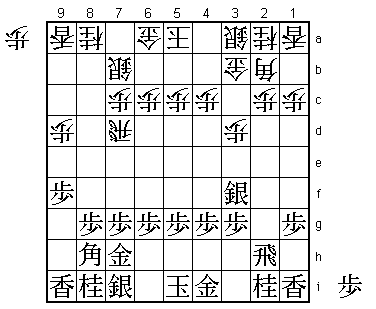
The hineribisha strategy. This is usually adopted by black, but because
this is a relatively slow opening, there is not much difference when it
is played by white. The ideas are to make it hard for black to open the
diagonal of the bishop, which makes it hard for black to build a good
castle formation. In the end, white will move the rook over to the
right side of the board and use the Mino castle for the king. The game
becomes a kind of ranging rook game and this might be one of the
reasons that white does not have very good results with this opening.
Players who are used to static rook positions often have a hard time
finding good plans in ranging rook positions.

25.K5i-6i    00:02:00  00:12:00
26.P1c-1d    00:02:00  00:12:00
27.P1g-1f    00:02:00  00:12:00
28.K5a-6b    00:02:00  00:12:00
29.S7i-6h    00:02:00  00:12:00
30.K6b-7a    00:02:00  00:12:00
31.K6i-7i    00:02:00  00:12:00
32.K7a-8b    00:02:00  00:13:00
33.P4g-4f    00:06:00  00:13:00
34.S3a-4b    00:06:00  00:15:00
35.S3f-4g    00:17:00  00:15:00
36.P3d-3e    00:17:00  00:16:00
37.G4i-3h    00:18:00  00:16:00
38.S4b-3c    00:18:00  00:23:00
39.P6g-6f    00:32:00  00:23:00
40.S3c-4d    00:32:00  00:44:00
41.P5g-5f    01:01:00  00:44:00
42.P5c-5d    01:01:00  00:44:00
43.P7g-7f    01:01:00  00:44:00
44.R7dx7f    01:01:00  00:53:00
45.G3h-4h    01:01:00  00:53:00
46.R7f-7d    01:01:00  00:57:00
47.G4h-5g    01:01:00  00:57:00
48.P5d-5e    01:01:00  00:57:00
49.P6f-6e    01:02:00  00:57:00
50.P5ex5f    01:02:00  01:18:00
51.S4gx5f    01:04:00  01:18:00
52.P*5e      01:04:00  01:19:00
53.S5f-4g    01:08:00  01:19:00
54.S4d-5c    01:08:00  01:23:00
55.G5g-6f    01:08:00  01:23:00
56.R7d-2d    01:08:00  01:29:00
57.P*2e      01:08:00  01:29:00
58.R2d-3d    01:08:00  01:29:00
59.B8h-7g    01:09:00  01:29:00
60.S5c-5d    01:09:00  01:40:00
61.S6h-6g    01:09:00  01:40:00
62.B2b-3c    01:09:00  01:41:00
63.K7i-8h    01:10:00  01:41:00
64.G3b-4b    01:10:00  01:42:00

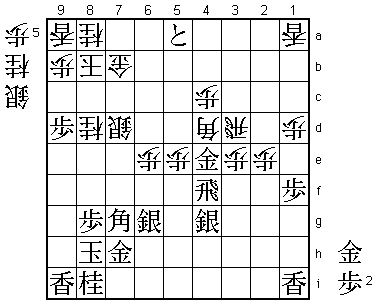
65.P2e-2d!   01:26:00  01:42:00

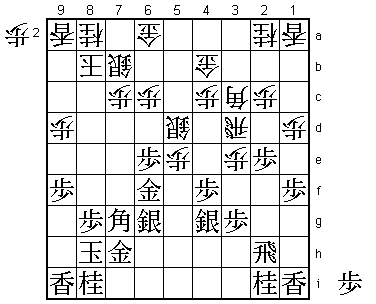
White hoped to complete his castle with G3b-4b-5b, but Fukaura does not
allow it and attacks.

66.P2cx2d    01:26:00  01:42:00
67.P3g-3f    01:26:00  01:42:00
68.P6c-6d?   01:26:00  02:07:00

Horiguchi did not like 68.Px3f R3h B4d Sx3f P*3g Rx3g B2f R2g Rx3f
P*3g but he still should have tried this.

69.P6ex6d    01:28:00  02:07:00
70.P*6e      01:28:00  02:07:00
71.G6f-7f    01:28:00  02:07:00

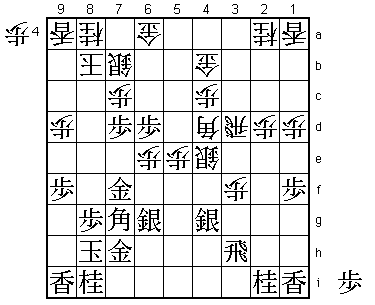
The pawn on 6d actually becomes a good attacking base for black in
combination with another strong attack...

72.P3ex3f    01:28:00  02:08:00
73.R2h-3h    01:29:00  02:08:00
74.B3c-4d    01:29:00  02:14:00
75.P4f-4e    01:57:00  02:14:00
76.S5dx4e    01:57:00  02:18:00
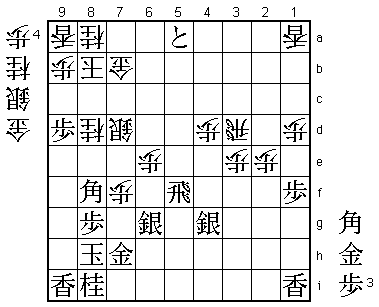
77.P*7d!     01:57:00  02:18:00

There it is. White is in trouble.

78.S4e-5d    01:57:00  02:34:00

78.Px7d is answered by 79.Gx6e and black threatens both Gx5e and P*7c
Nx7c Gx7d. Furthermore, with the open diagonal to the king, there is
always the threat of a check with Bx5e.

79.R3hx3f    02:03:00  02:34:00
80.P*3e      02:03:00  02:34:00
81.P7dx7c+   02:05:00  02:34:00
82.S7bx7c    02:05:00  02:34:00
83.R3f-4f    02:05:00  02:34:00
84.G4b-5c    02:05:00  02:40:00
85.P*7e      02:06:00  02:40:00
86.G6a-7b    02:06:00  02:45:00
87.P9f-9e    02:10:00  02:45:00

88.G5cx6d?   02:10:00  02:56:00

Horiguchi is too focused on taking this nasty pawn. Correct was
88.Px9e and after for example 89.P*9c Gx6d Lx9e P*9d Lx9d G8c P9b+
Lx9b Lx9b+ Kx9b things are far from easy for black. "This would
probably take more than 200 moves to win" (Fukaura).

89.P9ex9d    02:10:00  02:56:00
90.P*9b      02:10:00  02:56:00
91.P*5b      02:12:00  02:56:00
92.N2a-3c?!  02:12:00  02:58:00

The final mistake. Horiguchi hoped to get some counter play with S4e
followed by P3f, but this is not going to happen. Better was 92.P3f
Sx3f P5f which gives white some hope.

93.N2i-3g!   02:12:00  02:58:00

The perfect reply. 92.N3c now only leads to a knight exchange that
gives the black attack decisive strength.

94.N3c-2e    02:12:00  02:58:00
95.N3gx2e    02:17:00  02:58:00
96.P2dx2e    02:17:00  02:58:00
97.P5b-5a+   02:24:00  02:58:00
98.N*8d      02:24:00  02:58:00
99.G7f-8e    02:26:00  02:58:00
100.S5d-6c   02:26:00  02:59:00
101.N*7d     02:29:00  02:59:00

The decisive move.

102.S7cx7d   02:29:00  02:59:00

Or 102.K8c R8f and white can not defend against Gx8d Sx8d Rx8d Kx8d B9e.

103.P7ex7d   02:29:00  02:59:00
104.G6dx7d   02:29:00  02:59:00
105.G8ex7d   02:30:00  02:59:00
106.S6cx7d   02:30:00  02:59:00
107.S*6a     02:30:00  02:59:00
108.G*6b     02:30:00  02:59:00
109.S6ax7b+  02:34:00  02:59:00
110.G6bx7b   02:34:00  02:59:00
111.G*4e!    02:35:00  02:59:00

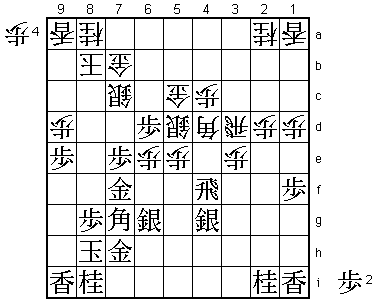
This ends all of white's hope to keep his position together. Black wins
material and also threatens to bring the bishop into play on 5e.

112.P*7f     02:35:00  02:59:00
113.B7g-8f   02:35:00  02:59:00
114.P5e-5f   02:35:00  02:59:00
115.G4ex4d   02:35:00  02:59:00
116.P4cx4d   02:35:00  02:59:00
117.R4fx5f   02:38:00  02:59:00
Resigns      02:38:00  02:59:00

Horiguchi has no choice but to resign. He is a bishop against a knight
behind, his pieces are not working and he canˇÇt avoid the promotion
of the rook. For the second game in a row he has not been able to
threaten Fukaura's king at all. Will he be able to turn things around
with black in the third game?
