21st Asahi Open Match Game 1
[Black "Horiguchi Kazushiza, Asahi"]
[White "Fukaura Koichi, Challenger"]
[Event "21st Asahi Open, Game 1"]
[Date "April 3rd 2003"]
1.P7g-7f 00:01:00 00:00:00
2.P3c-3d 00:01:00 00:00:00
3.P2g-2f 00:01:00 00:00:00
4.P8c-8d 00:01:00 00:00:00
5.P2f-2e 00:01:00 00:00:00
6.P8d-8e 00:01:00 00:00:00
7.G6i-7h 00:01:00 00:00:00
8.G4a-3b 00:01:00 00:00:00
9.P2e-2d 00:01:00 00:00:00
10.P2cx2d 00:01:00 00:00:00
11.R2hx2d 00:01:00 00:00:00
12.P8e-8f 00:01:00 00:00:00
13.P8gx8f 00:01:00 00:00:00
14.R8bx8f 00:01:00 00:00:00
15.R2dx3d 00:01:00 00:00:00
16.B2b-3c 00:01:00 00:00:00
17.R3d-3f 00:02:00 00:00:00
18.S3a-2b 00:02:00 00:01:00
19.G4i-3h 00:04:00 00:01:00
20.K5a-4a 00:04:00 00:02:00
21.K5i-5h 00:06:00 00:02:00
22.R8f-8d 00:06:00 00:03:00
23.P*8g 00:06:00 00:03:00
24.S7a-6b 00:06:00 00:03:00
25.R3f-2f 00:06:00 00:03:00
26.P5c-5d 00:06:00 00:04:00
27.S3i-4h 00:07:00 00:04:00
28.P5d-5e 00:07:00 00:04:00
29.P3g-3f 00:09:00 00:04:00
30.R8d-3d 00:09:00 00:10:00
31.S4h-3g 00:11:00 00:10:00
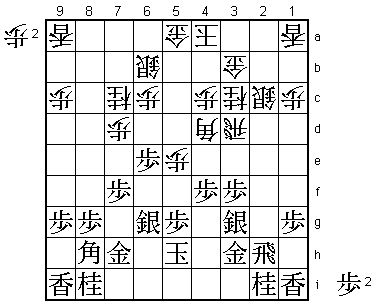
32.B3c-4d 00:11:00 00:12:00
The popular Chuza Yokofudori was no surprise. Fukaura is playing a very
positive game with R3d followed by B4d, putting pressure on the black
position. He has played this before and also played it a few times in
training games. Horiguchi must have known this, but still has trouble to
find something good against this formation.
33.R2f-2h 00:12:00 00:12:00
34.N2a-3c 00:12:00 00:12:00
35.S7i-6h 00:17:00 00:12:00
36.G6a-5a 00:17:00 00:12:00
37.P6g-6f 00:58:00 00:12:00
38.P7c-7d 00:58:00 00:25:00
39.S6h-6g 00:58:00 00:25:00
40.N8a-7c 00:58:00 00:26:00
41.P4g-4f 01:16:00 00:26:00
42.S2b-2c 01:16:00 00:36:00
43.P6f-6e?! 02:01:00 00:36:00
The Asahi Open match is played with relatively short thinking times
(3 hours per player), which means that good opening preparation is very
important. Fukaura is known for preparing well and this might have been
the deciding factor in this game. Horiguchi has already used 2 hours and
the fighting hasn't even started yet. 43.P6e is played after long thought,
but probably not good.
44.P*2f! 02:01:00 00:58:00
Good reply. Black is suddenly in trouble.
45.S3gx2f 02:05:00 00:58:00
46.R3dx3f 02:05:00 00:58:00
47.G3h-3g 02:29:00 00:58:00
Not a move that one wants to play, as both gold and silver are in an
awkward position. Trying to go for sennichite might be an option here
with 47.S3g R3d P*3f P*2f, but both players had seen that white can
play 48.R3e instead of R3d which gives white a good position.
48.R3f-3d 02:29:00 01:01:00
49.P*3e 02:29:00 01:01:00
50.R3d-1d 02:29:00 01:02:00
51.G3g-4g 02:34:00 01:02:00
White threatened to win the silver with P*2e, so Horiguchi decides to
try to weather the storm and rearrange his generals.
52.P5e-5f 02:34:00 01:28:00
53.S6gx5f 02:36:00 01:28:00
54.B4dx8h+ 02:36:00 01:29:00
55.G7hx8h 02:36:00 01:29:00
56.P7d-7e 02:36:00 01:29:00
57.S2f-3g 02:37:00 01:29:00
58.P*2f 02:37:00 01:53:00
59.R2hx2f 02:37:00 01:53:00
60.P*2e 02:37:00 01:55:00
61.R2f-2h 02:37:00 01:55:00
62.P7ex7f 02:37:00 01:55:00
63.S5f-6g 02:37:00 01:55:00
64.R1d-7d 02:37:00 01:56:00
65.P*7e 02:40:00 01:56:00
66.R7d-2d 02:40:00 02:00:00
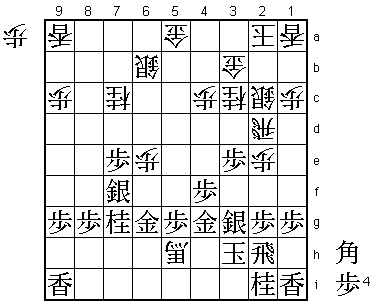
67.S6gx7f? 02:46:00 02:00:00
This is an important oversight. So far, Horiguchi had managed to keep
his position together and Fukaura started to worry that he would run
out of moves. Correct was 67.P*2g. For example, 68.B*4d B*6f Bx6f Sx6f
B*9d K5i and it is difficult for white to find a way to break trough.
68.P*3h! 02:46:00 02:04:00
Now black has to allow promotion of the pawn or the bishop. The only
compensation for black is that white no longer has any pawns in hand.
69.K5h-4i 02:50:00 02:04:00
70.B*6i?! 02:50:00 02:29:00
A change of plan that was unnecessary. Fukaura planned 70.B*5d 71.P*2g
72.Nx6e and now he thought that because this knight has to be sacrificed,
the attack wasn't sound. However, after 73.B*6g P3i+ Kx3i Nx5g+ Gx5g
P*3f S4h P2f Px2f P*2g white seems to have a decisive attack.
71.K4ix3h 02:53:00 02:29:00
72.B6i-5h+ 02:53:00 02:29:00
73.G8h-7g 02:53:00 02:29:00
Black has managed to connect his generals again, but the price has been
high.
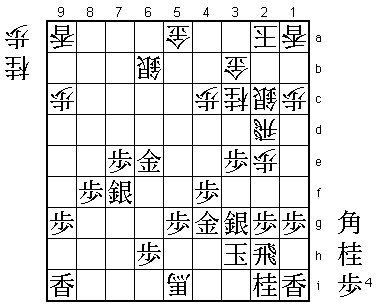
74.P6c-6d 02:53:00 02:31:00
With this move, white gets a pawn in hand again, which was the last
troubling thing in his position. From here on, it seemed only a matter
of time before black would have to resign. Still, in short games it is
hard to play an endgame perfectly...
75.G7g-6g 02:59:00 02:31:00
76.P6dx6e 02:59:00 02:32:00
77.P*2g 02:59:00 02:32:00
78.K4a-3a 02:59:00 02:34:00
79.N8i-7g 02:59:00 02:34:00
80.K3a-2a 02:59:00 02:36:00
Typical Fukaura play. He takes two moves to improve his king position
instead of attacking immediately with the risk of overextending his
position.

81.P8g-8f!?  02:59:00  02:36:00

Interesting move. Horiguchi wants to put pressure on the white rook and
this move is in preparation for that. Objectively, white can just play
R6d followed by P6f here, but Horiguchi is trying everything to make
something happen and almost succeeds.

82.P6e-6f    02:59:00  02:37:00
83.G6gx6f    02:59:00  02:37:00
84.+B5h-5i   02:59:00  02:38:00
85.P*6h      02:59:00  02:38:00
86.R2d-6d    02:59:00  02:38:00
87.N7g-6e    02:59:00  02:38:00
88.N7cx6e    02:59:00  02:41:00
89.G6fx6e    02:59:00  02:41:00
90.R6d-2d?   02:59:00  02:42:00
A mistake that might have been costly. Correct was 90.R6c and white has
all kinds of nasty knight drops (on 5c, 7c or 8d) and would have won
easily.

91.P1g-1f?   02:59:00  02:42:00

In byoyomi, Horiguchi misses a very good chance. 91.N*3f could have
turned the table. For example, 92.R8d P8e (using the speculative 81.P8f)
R9d P9f and the white rook is in big trouble. On the other hand, if the
white rook leaves the 4th rank, black can launch a strong counter
attack with moves like N*1e and P3d. 91.P1f is one preparation move
too many. Horiguchi was afraid that the knight on 3f might become a
target for attack and that Fukaura had deliberately allowed this move.

92.P*3f      02:59:00  02:42:00

This must have been a relief for Fukaura. Without the knight drop on 3f,
white can cruise to victory.

93.S3gx3f    02:59:00  02:42:00
94.N*4d      02:59:00  02:42:00
95.N*4h      02:59:00  02:42:00
96.+B5ix6h   02:59:00  02:46:00
97.P4f-4e    02:59:00  02:46:00
98.P*5f      02:59:00  02:48:00
99.P5gx5f    02:59:00  02:48:00
100.N4dx3f   02:59:00  02:48:00
101.N4hx3f   02:59:00  02:48:00
102.R2d-8d   02:59:00  02:48:00
103.P8f-8e   02:59:00  02:48:00
104.R8d-9d   02:59:00  02:48:00
105.G6e-5e   02:59:00  02:48:00
106.S*4f     02:59:00  02:48:00
107.K3h-4i   02:59:00  02:48:00
108.+B6h-7i  02:59:00  02:48:00
109.K4i-5h   02:59:00  02:48:00
110.S4fx4g+  02:59:00  02:50:00
111.K5hx4g   02:59:00  02:50:00
112.G*4f     02:59:00  02:50:00
113.K4g-5h   02:59:00  02:50:00
114.+B7i-5g  02:59:00  02:55:00
115.K5h-6i   02:59:00  02:55:00
116.G4fx5f   02:59:00  02:55:00
117.G5ex5f   02:59:00  02:55:00
118.+B5gx5f  02:59:00  02:55:00
119.N*1e     02:59:00  02:55:00
120.P*6g     02:59:00  02:55:00
121.N1ex2c+  02:59:00  02:55:00
122.G3bx2c   02:59:00  02:56:00
123.P4e-4d   02:59:00  02:56:00
124.G*6h     02:59:00  02:58:00
125.R2hx6h   02:59:00  02:58:00
126.P6gx6h+  02:59:00  02:58:00
127.K6ix6h   02:59:00  02:58:00
128.R*7h     02:59:00  02:58:00
Resigns      02:59:00  02:58:00
White wins after 129.K5i Rx7f+ which threatens mate with N*6g next.
Fukaura had a little scare in the endgame, but played this game almost
flawlessly. A win with white in the first game of a best of five match
is very important and he should already be considered the favorite in
this match. Horiguchi needs something good with white in game 2 to
avoid going two down with three to play.