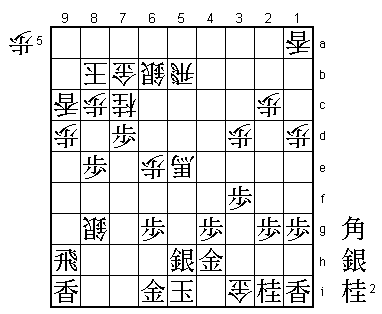
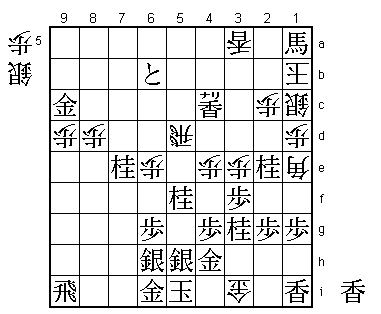
20th Ryu-O Match Game 6
[Black "Watanabe Akira, Ryu-O"]
[White "Sato Yasumitsu, Challenger"]
[Event "20th Ryu-O sen, Game 6"]
[Date "December 12th and 13th 2007"]
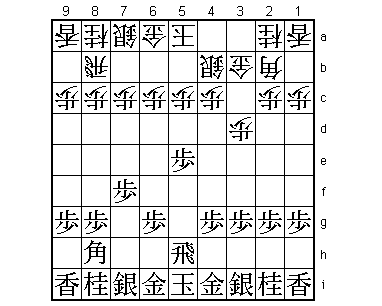
1.P7g-7f     00:00:00  00:00:00
2.G4a-3b     00:00:00  00:02:00
3.P5g-5f     00:22:00  00:02:00
4.P3c-3d     00:22:00  00:11:00
5.P5f-5e     00:24:00  00:11:00
6.S3a-4b     00:24:00  00:22:00
7.R2h-5h     00:26:00  00:22:00

Watanabe does it again! Last year he was also 3-2 up when Sato played 2.G3b in
the sixth game. This is an invitation to play Furibisha which is not Watanabe's
natural playing style. Still, Watanabe took up the challenge, played Furibisha
and lost badly. In the seventh game Sato again got the white pieces and again
played 2.G3b. This time Watanabe declined the invitation, played 3.G7h and after
4.K4i the game became a normal Ibisha opening and Watanabe won the game for his
third consecutive Ryu-O title. One would think that Watanabe would never play
Furibisha in an important game again, but he is a stubborn fellow. When he was
asked about the position after 2.G3b for an opening series in the magazine Shogi
Sekai, he already said that even though he played 3.G7h in the final game of the
Ryu-O match, he still thought that 3.P5f was a good way of playing and that he
wanted to play that again. A man of his words, he play the Furibisha again on
the big stage.

8.R8b-5b!?   00:26:00  00:42:00

This was a big surprise. The double Nakabisha opening is rarely seen in professional
shogi.

9.S3i-3h     00:53:00  00:42:00

White had a nasty threat: 9.K4h P5d Px5d Bx8h+ Sx8h B*4e, but Watanabe sees it and
defends. We are already in unknown territory here.

10.K5a-6b    00:53:00  01:02:00
11.P4g-4f    01:14:00  01:02:00
12.K6b-7b    01:14:00  01:15:00
13.P9g-9f    01:15:00  01:15:00
14.S4b-5a    01:15:00  01:53:00
15.S3h-4g    01:17:00  01:53:00
16.S5a-6b    01:17:00  01:55:00
17.P9f-9e    01:45:00  01:55:00
18.K7b-8b    01:45:00  02:02:00
19.B8h-7g    02:16:00  02:02:00
20.P7c-7d    02:16:00  02:42:00
21.S7i-6h    02:21:00  02:42:00
22.S7a-7b    02:21:00  02:46:00
23.S6h-5g    02:23:00  02:46:00
24.P6c-6d    02:23:00  03:31:00
25.S5g-5f    03:13:00  03:31:00
26.S7b-6c    03:13:00  03:41:00
27.G4i-3h    03:21:00  03:41:00
28.G6a-7b    03:21:00  03:49:00
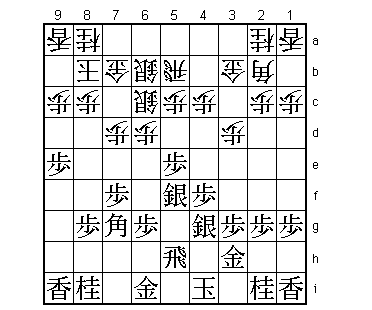
29.K5i-4i    03:56:00  03:49:00

This was the sealed move. Only 28 moves played on the first day is not a record,
but definitely a very slow development. With both players unfamiliar with the position,
every move becomes important and they both take their time to develop their pieces
in the right way. This king move seems to indicate that the game will continue as a
strategic battle for a while, but Sato has other plans...

30.G3b-3c!   03:56:00  03:59:00

Played after only ten minutes, so it seems that Sato spent a lot of time thinking
about this move on the first day. The plan is interesting: 31.K3i G4d P4e G3e P3f
G2e N3g G2d and the gold has been chased around to 2d where it could move straight
from 2d. Therefore, black seems to have gained three free moves here. However, by
doing so, the black pieces have now moved to squares where they are vulnerable to
an attack on the third file. This is one of those rare cases where even getting
three free moves is making the position weaker.

31.S5f-4e    05:23:00  03:59:00

Watanabe tries to make it difficult for Sato to activate the gold, but in the end
he doesn't succeed and Sato manages to exchange the passive gold on 3b for the
silver. Sato gets the better position here.

32.P1c-1d    05:23:00  04:22:00
33.B7g-6f    05:30:00  04:22:00
34.G3c-4d    05:30:00  04:35:00
35.S4ex4d    05:31:00  04:35:00
36.P4cx4d    05:31:00  04:35:00
37.N8i-7g    05:31:00  04:35:00
38.R5b-4b    05:31:00  04:37:00
39.N7g-8e    05:39:00  04:37:00
40.P6d-6e    05:39:00  04:58:00
41.B6f-4h    05:44:00  04:58:00
42.S*8d      05:44:00  05:40:00
43.P8g-8f    05:45:00  05:40:00
44.B2b-1c    05:45:00  05:42:00
45.G*5f      06:02:00  05:42:00

Both players have dropped back the general that was exchanged into their own camp.
This is because black attacks the edge, while white attack through the 4th file.
The defence needed the generals to slow down the attack.

46.N2a-3c    06:02:00  05:42:00
47.K4i-3i    06:02:00  05:42:00
48.N8a-7c    06:02:00  05:58:00
49.R5h-8h    06:19:00  05:58:00
50.P4d-4e    06:19:00  06:01:00
51.P4fx4e    06:21:00  06:01:00
52.P5c-5d    06:21:00  06:01:00
53.P5ex5d    06:41:00  06:01:00
54.S6cx5d    06:41:00  06:07:00
55.P9e-9d    06:42:00  06:07:00
56.P9cx9d    06:42:00  06:07:00
57.P*9b      06:42:00  06:07:00
58.L9ax9b    06:42:00  06:25:00
59.P7f-7e    06:43:00  06:25:00
60.P*5e      06:43:00  06:54:00
61.G5f-4f    06:43:00  06:54:00
62.S5dx4e    06:43:00  07:13:00
63.G4fx4e    06:47:00  07:13:00
64.N3cx4e    06:47:00  07:13:00
65.P*4f      06:47:00  07:13:00
66.P5e-5f    06:47:00  07:20:00
67.S4gx5f    06:53:00  07:20:00
68.B1cx4f    06:53:00  07:20:00
69.P*9c      06:56:00  07:20:00
70.L9bx9c    06:56:00  07:21:00
71.P7ex7d    07:01:00  07:21:00

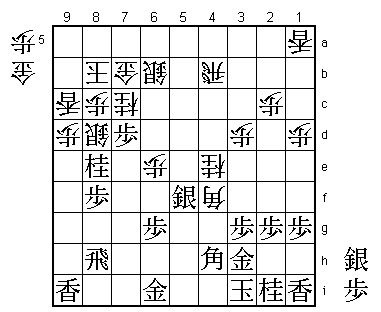
72.S8dx8e!   07:01:00  07:25:00

Good timing. White has a strong attack with N5g+, but by first taking this knight,
the black pawn on 8e is blocking a future knight drop on 8e, which is the most
dangerous square.

73.P8fx8e    07:11:00  07:25:00
74.N4e-5g+   07:11:00  07:25:00
75.P*4g!     07:12:00  07:25:00

Black is in serious trouble, because the white attack in the centre is stronger
and quicker than the attack on 7c. 75.P*4g is the best defensive option, inviting
the mistake.

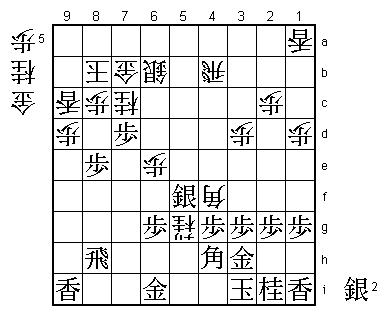
76.+N5gx4h?  07:12:00  07:33:00

Going strongly is Sato's style and in this position that works against him. Correct
was to pull the bishop back temporarily with 76.B2d. Black has only two silvers in
hand and moves like 77.S*6a just seem to give white the material he needs.

77.G3hx4h    07:12:00  07:33:00
78.N*3f      07:12:00  07:34:00
79.P3gx3f    07:16:00  07:34:00
80.B*2h      07:16:00  07:45:00

Most likely a change of plan. Dropping the bishop on a diagonal where there is
already a bishop is bad attacking style. Sato probably meant to play 80.Bx1i+ here,
but realised that after 81.S*2h +B1h the attack N*6d followed by N*7e was stronger
than expected.

81.K3i-4i    07:16:00  07:45:00
82.B4f-5e    07:16:00  07:45:00
83.S5fx5e    07:26:00  07:45:00
84.G*3i      07:26:00  07:45:00

Again a bad style attacking move. In the press room Watanabe was judged to have a
winning position, but things are not so easy.

85.K4i-5i    07:26:00  07:45:00
86.B2hx5e+   07:26:00  07:45:00
87.R8h-9h    07:26:00  07:45:00

This looks strong, because B*7e next is a mating threat with attack on the white
rook.

88.R4b-5b!   07:26:00  07:48:00

Sato defends against the threat of the bishop drop with a strong move of his own.
This is a mating threat (after +B7g next).

89.S*5h      07:28:00  07:48:00

Suddenly the atmosphere in the press room changed and those who thought that Sato
was winning were the majority.

90.S*8g      07:28:00  07:50:00

91.R9h-9g    07:30:00  07:50:00
92.S8g-8h=   07:30:00  07:50:00
93.R9g-9h!   07:59:00  07:50:00

Cool under pressure is one of Watanabe's greatest strengths. This looks like an ugly
rook manoeuvre, just moving back and forth. However, it is very important for chasing
the silver away from the black king. If 93.R8g then 94.S7g+ is winning for white.
Also 93.R9f P9e R7e S7g+ is bad.

94.S8hx9i+   07:59:00  07:57:00
95.R9h-9f    07:59:00  07:57:00
96.R5b-5d    07:59:00  07:57:00
97.B*6a      07:59:00  07:57:00
98.+B5e-7g?  07:59:00  07:58:00

In the post-mortem analysis this position wasn't analyzed deeply, but Suzuki Daisuke
suggested that Sato might still have had chances to win after 98.K7a Bx7b+ Kx7b.

99.S*6h      07:59:00  07:58:00
100.+B7g-4d  07:59:00  07:58:00
101.N*7e     07:59:00  07:58:00
102.K8b-7a   07:59:00  07:58:00
103.B6ax7b+  07:59:00  07:58:00
104.K7ax7b   07:59:00  07:58:00
105.P8e-8d   07:59:00  07:58:00
106.P8cx8d   07:59:00  07:58:00
107.G*8c     07:59:00  07:58:00
108.K7b-6a   07:59:00  07:58:00
109.P7dx7c+  07:59:00  07:58:00
110.K6a-5b   07:59:00  07:58:00
111.+P7cx6b  07:59:00  07:58:00
112.K5b-4c   07:59:00  07:58:00
113.N2i-3g   07:59:00  07:58:00
114.P*4e     07:59:00  07:59:00
115.N*5f     07:59:00  07:59:00
116.+B4d-2b  07:59:00  07:59:00
117.G8cx9c   07:59:00  07:59:00
118.K4c-3b   07:59:00  07:59:00
119.L*4d     07:59:00  07:59:00
120.K3b-2a   07:59:00  07:59:00
121.L4d-4c+  07:59:00  07:59:00
122.P3d-3e   07:59:00  07:59:00
123.S*3c     07:59:00  07:59:00
124.L*3a     07:59:00  07:59:00
125.S3cx2b+  07:59:00  07:59:00
126.K2ax2b   07:59:00  07:59:00
127.B*4d     07:59:00  07:59:00
128.K2b-1b   07:59:00  07:59:00
129.R9fx9i   07:59:00  07:59:00
130.B*1e     07:59:00  07:59:00
131.N*2e     07:59:00  07:59:00
132.S*2b     07:59:00  07:59:00
133.S*1c     07:59:00  07:59:00
134.S2bx1c   07:59:00  07:59:00
135.B4dx1a+  07:59:00  07:59:00
Resigns      07:59:00  07:59:00

After 136.Kx1a Nx1c+ white has no gold in hand, so there is no defence. For example
S*2a L*1b Sx1b S*2b is simple mate. The black king is still defended very well, so
Sato resigned here. Probably the most interesting game of this match with both players
playing very well. A 135 move game without any opening theory to guide the early stages
is even rarer than the double Nakabisha that was played. Sato seems to have found his
form just a little too late to get back in this match. Watanabe wins his fourth straight
Ryu-O title and is already close to the Lifetime Ryu-O title, which is waiting for the
player who wins five Ryu-O titles.
