20th Ryu-O Match Game 4
[Black "Watanabe Akira, Ryu-O"]
[White "Sato Yasumitsu, Challenger"]
[Event "20th Ryu-O sen, Game 4"]
[Date "November 21st and 22nd 2007"]
1.P7g-7f 00:00:00 00:00:00
2.P3c-3d 00:00:00 00:02:00
3.P2g-2f 00:02:00 00:02:00
4.P9c-9d 00:02:00 00:03:00
5.P2f-2e 00:11:00 00:03:00
6.B2bx8h+ 00:11:00 00:04:00
7.S7ix8h 00:11:00 00:04:00
8.S3a-2b 00:11:00 00:04:00
9.S3i-3h 00:32:00 00:04:00
10.S2b-3c 00:32:00 00:04:00
11.K5i-6h 00:32:00 00:04:00
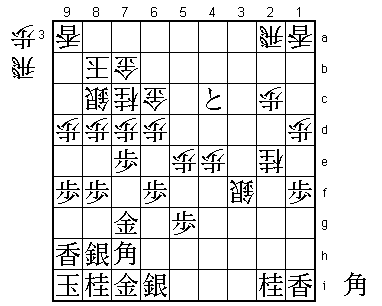
12.R8b-2b 00:32:00 00:20:00
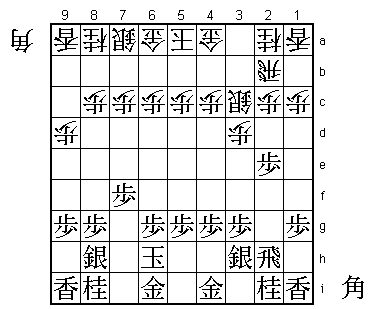
This is one of those openings that only Sato dares to play. Black has the fork
13.B*6e here and after 14.B*7d Bx4c+ G4a-5b +Bx5b Gx5b G*7e the bishops are exchanged
again. Black has won a pawn, but white gets the gold in hand, so it is not immediately
clear who is better. However, the small number of games played with this opening seem
to indicate that it is easier to win with the extra pawn.
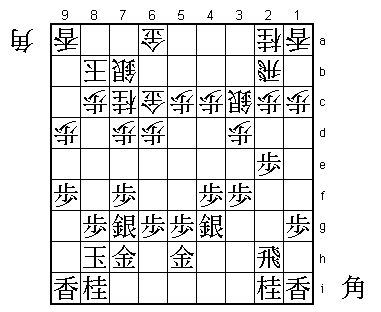
13.P9g-9f 00:45:00 00:20:00
Watanabe is not having any of it. After the game he said that his intention was to
play a slow, strategic game and that is what he does.
14.K5a-6b 00:45:00 00:25:00
Note that there is an interesting trap here. 14.K6b doesn't seem to defend against
the fork 15.B*6e, but then 16.B*7b Bx4c+ P6d closes the escape route of the promoted
bishop and after P7e P5d it is trapped.
15.K6h-7h 00:48:00 00:25:00
16.K6b-7b 00:48:00 00:25:00
17.P4g-4f 00:57:00 00:25:00
18.K7b-8b 00:57:00 00:36:00
19.S3h-4g 00:58:00 00:36:00
20.S7a-7b 00:58:00 00:45:00
21.P3g-3f 01:07:00 00:45:00
22.G4a-5b 01:07:00 01:25:00
23.G4i-5h 01:12:00 01:25:00
24.P6c-6d 01:12:00 01:27:00
Both players are careful not to push the central pawn to make a bishop drop on 3i or
3a impossible.
25.S8h-7g 01:29:00 01:27:00
26.P7c-7d 01:29:00 01:29:00
27.K7h-8h 01:29:00 01:29:00
28.G5b-6c 01:29:00 01:29:00
29.G6i-7h 01:29:00 01:29:00
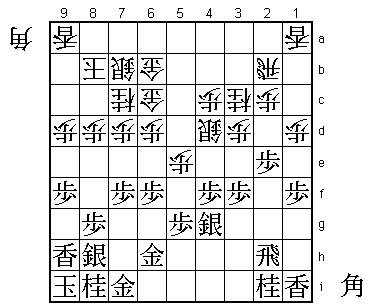
30.N8a-7c?! 01:29:00 01:38:00
Fujii called this a typical Sato move. It seems clear that Watanabe is aiming to change
his position into an anaguma and Sato shows with this knight move that he is ready to
attack the anaguma. However, as the next move shows, 30.N7c is a dud and Fujii suggested
here to change into a Silver Crown formation here with 30.P8d L9h S8c K9i G7b.
31.L9i-9h 02:20:00 01:38:00
Watanabe plays the anaguma anyway! He has correctly judged that Sato has no real fast
attack. For example 32.P2d Px2d Rx2d and now both Rx2d Sx2d R*2b N6e B*4a G6c-6b and
P*2e R2b K9i are good for black.
32.S3c-4d 02:20:00 03:03:00
33.K8h-9i 02:27:00 03:03:00
34.N2a-3c 02:27:00 03:07:00
35.S7g-8h 02:29:00 03:07:00
36.P5c-5d 02:29:00 03:07:00
37.P1g-1f 02:33:00 03:07:00
38.P1c-1d 02:33:00 03:07:00
39.G5h-6h 02:59:00 03:07:00
40.P8c-8d 02:59:00 03:10:00
41.G7h-7i 03:41:00 03:10:00
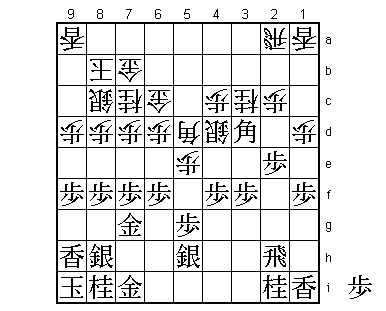
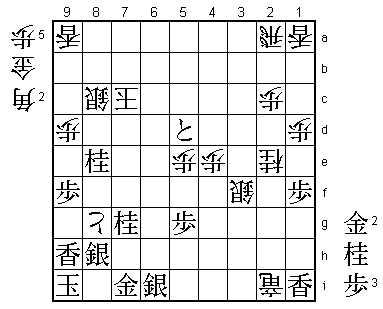
42.P5d-5e 03:41:00 04:01:00
The sealed move.
43.P6g-6f 03:50:00 04:01:00
44.G6a-6b 03:50:00 04:10:00
This shows that white has suffered a strategic defeat. Sato wants to move into the
Silver Crown, but cannot do this in the normal way because 44.S8c fails to 45.P2d
Px2d B*3a R3b Rx2d Rx3a R2b+ which forks king and rook. Still, the situation is not
so bad as Sato thinks.

45.S4g-5h    04:12:00  04:10:00
46.B*5d      04:12:00  04:43:00

This is a nice spot for the bishop.

47.B*6g      04:34:00  04:43:00
48.R2b-2a    04:34:00  05:11:00
49.G6h-7g    05:35:00  05:11:00

Watanabe hated to have to move the gold here, which is not the proper square in the
anaguma. However, he saw nothing better.

50.S7b-8c    05:35:00  05:20:00
51.B6gx3d    05:38:00  05:20:00
52.G6b-7b    05:38:00  05:28:00
53.P8g-8f    05:42:00  05:28:00
54.G6c-5c?   05:42:00  06:06:00

The only real mistake that Sato makes in this game, but a very important one. He had
a chance here to start a strong attack here with 54.P6e Px6e Nx6e. Then it is most
natural to pull the gold back with G7g-7h, but then P*6f G7i-6h P7e Px7e N4e! Px4e
S3c wins the bishop on 3d. Furthermore, white can later attack with P8e followed by
Px8f or P*8f. If black moves the gold to 8g instead of 7h after Nx6e, then P*6f is
also very interesting for white. Against the anaguma the knight almost always jumps
to 8e, so Watanabe had probably underestimated the strength of the attack through 6e.

55.B3d-7h    06:04:00  06:06:00
56.B5dx3f    06:04:00  06:12:00
57.P*3d      06:07:00  06:12:00
58.N3cx2e    06:07:00  06:12:00
59.P4f-4e    06:07:00  06:12:00
60.S4d-3e    06:07:00  06:27:00
61.P3d-3c+   06:07:00  06:27:00

This is a big promoted pawn and the black advantage is now clear.

62.S3e-4f    06:07:00  06:27:00
63.P4e-4d    06:31:00  06:27:00
64.P4cx4d    06:31:00  06:27:00
65.S5h-6i    06:41:00  06:27:00

Looks like an awkward spot for the silver, but it now helps with keeping the king safe.

66.P4d-4e    06:41:00  06:29:00
67.R2h-2f    06:44:00  06:29:00
68.S4f-3e    06:44:00  06:30:00
69.R2fx3f    06:44:00  06:30:00
70.S3ex3f    06:44:00  06:30:00
71.+P3c-4c   06:47:00  06:30:00
72.G5c-6c    06:47:00  06:30:00
73.P7f-7e!   06:47:00  06:30:00
The deciding move. It looks like a simple pawn sacrifice, but the more important aim
is to bring the inactive bishop on 7h into play through 8g. Even Sato tipped his hat
in the post-mortem analysis, saying that he had completely overlooked this way of
bringing the bishop to life.

74.R*2h      06:47:00  06:49:00
75.B7h-8g    06:50:00  06:49:00
76.P6d-6e    06:50:00  06:59:00
77.P6fx6e    06:50:00  06:59:00
78.R2hx2i+   06:50:00  06:59:00
79.B*4d      07:03:00  06:59:00
80.P*6h      07:03:00  07:09:00
81.S6i-7h    07:05:00  07:09:00
82.G6c-5d    07:05:00  07:09:00
83.P6e-6d    07:05:00  07:09:00
84.G5dx4d    07:05:00  07:09:00
85.+P4cx4d   07:05:00  07:09:00
86.N*6e      07:05:00  07:28:00
87.+P4d-5d   07:15:00  07:28:00
88.N6ex7g+   07:15:00  07:53:00
89.N8ix7g    07:16:00  07:53:00
90.P6h-6i+   07:16:00  07:57:00
91.S7hx6i    07:16:00  07:57:00
92.P8d-8e    07:16:00  07:57:00
93.P7ex7d    07:21:00  07:57:00
94.P8ex8f    07:21:00  07:57:00
95.P7dx7c+   07:21:00  07:57:00
96.G7bx7c    07:21:00  07:57:00
97.P6d-6c+   07:21:00  07:57:00

Much faster than winning the rook with 97.+P6c.

98.P8fx8g+   07:21:00  07:57:00
99.+P6cx7c   07:21:00  07:57:00
100.K8bx7c   07:21:00  07:57:00
101.N*8e     07:21:00  07:57:00
Resigns      07:21:00  07:57:00
Mate after 101.K8d N*7f K7e G*6e Kx7f Sx8g Kx8g (Kx7g S7h) S7h K7f G*8g. A strong game
by Watanabe, who seems to be firing on all cylinders now. He has quickly taken a 3-1
lead and if it wasn't for his endgame blunder in game 2, this match would already be
over. Sato needs to do something quickly, or he will just become a footnote in Watanabe's
Ryu-O title dominance.