20th Asahi Open Match Game 4
Black: Horiguchi Kazushiza, 5-dan
White: Sugimoto Masataka, 6-dan
20th Asahi Open, Game 4, May 1st 2002
1.P7g-7f 00:02:00 00:00:00
2.P3c-3d 00:02:00 00:00:00
3.P2g-2f 00:02:00 00:00:00
4.P4c-4d 00:02:00 00:00:00
5.S3i-4h 00:02:00 00:00:00
6.S3a-3b 00:02:00 00:00:00
7.P5g-5f 00:02:00 00:00:00
8.P9c-9d 00:02:00 00:00:00
9.K5i-6h 00:04:00 00:00:00
10.R8b-4b 00:04:00 00:00:00
11.K6h-7h 00:04:00 00:00:00
12.S3b-4c 00:04:00 00:00:00
13.G4i-5h 00:13:00 00:00:00
14.P9d-9e 00:13:00 00:01:00
Sugimoto likes to play an active Furibisha game, but in this match he
has thus far not been very successful. In each game, Horiguchi managed
to take the sting out of the Furibisha attack and slow down the pace
of the game. Horiguchi is a specialist in the late middle game and
endgame, so a slow paced game is in his favour.
15.B8h-7g 00:15:00 00:01:00
16.K5a-6b 00:15:00 00:01:00
17.S4h-5g 00:16:00 00:01:00
18.K6b-7b 00:16:00 00:01:00
19.K7h-8h 00:17:00 00:01:00
20.K7b-8b 00:17:00 00:01:00
21.P2f-2e 00:23:00 00:01:00
22.B2b-3c 00:23:00 00:01:00
23.L9i-9h 00:29:00 00:01:00
24.S4c-5d 00:29:00 00:06:00
25.S5g-6f 00:39:00 00:06:00
26.P6c-6d 00:39:00 00:10:00
27.K8h-9i 00:42:00 00:10:00
28.P4d-4e 00:42:00 00:11:00
29.P5f-5e 00:42:00 00:11:00
30.S5d-6c 00:42:00 00:14:00
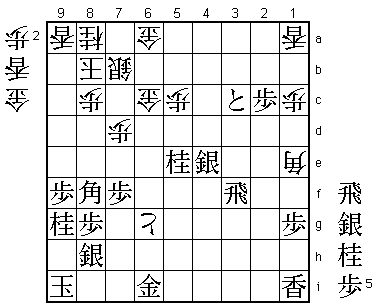
31.G5h-5g!? 00:45:00 00:14:00
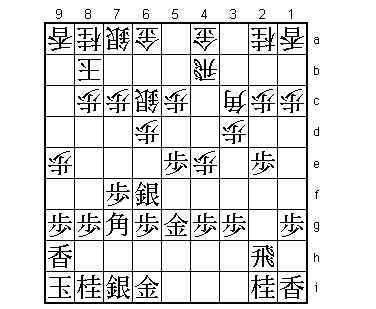
Interesting new plan. Normal would be to play 31.R2f to defend against
the pawn exchange on 4f and move the gold into the castle with
G5h-6h-7h. Black's plan is to go straight for the pawn on 4e.
After the game, Horiguchi said he hadn't studied this plan at
home, but that he just couldn't help himself playing it when he saw it.
32.S7a-7b 00:45:00 01:07:00
33.S7i-8h 00:46:00 01:07:00
34.G4a-5b 00:46:00 01:07:00
35.G5g-5f 00:47:00 01:07:00
36.P7c-7d 00:47:00 01:08:00
37.P3g-3f 00:48:00 01:08:00
38.P6d-6e 00:48:00 01:18:00
39.S6f-5g 00:57:00 01:18:00
40.S6c-6d 00:57:00 01:22:00
41.N2i-3g 00:58:00 01:22:00
42.G5b-6c 00:58:00 01:24:00
43.N3gx4e 01:37:00 01:24:00
44.B3c-4d 01:37:00 01:26:00
45.P2e-2d 01:52:00 01:26:00
46.P2cx2d 01:52:00 01:27:00
47.R2hx2d 01:52:00 01:27:00
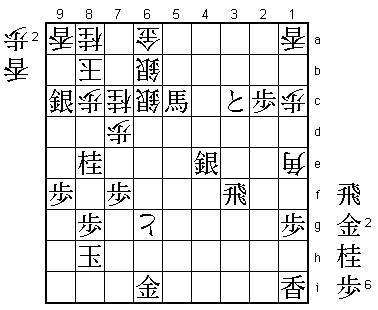
48.N2a-3c! 01:52:00 01:27:00
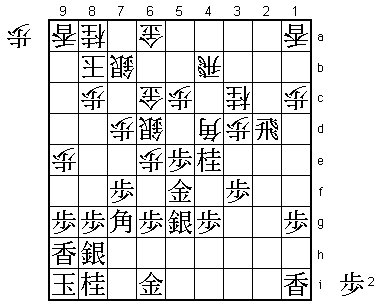
Black has won the pawn and seems to have a breakthrough here, but
Sugimoto has a typical Furibisha counter. Using the opening up of
the game by the Ibisha side to develop one's own pieces is the
name of the game when you are a Furibisha player. White has a
strong four-general castle and black has a hanging gold on 6i.
Even when black promotes first, if white can get a rook in black's
camp he will get the advantage.

49.P4g-4f    02:11:00  01:27:00

No choice. 49.Nx3c+ Bx3c R2c+ B1e +R2g P*2f +R3h R2b P*2h R2e is
good for white.

50.N3cx4e    02:11:00  01:30:00
51.P4fx4e    02:12:00  01:30:00
52.R4b-2b    02:12:00  01:30:00
53.P*2c      02:14:00  01:30:00
54.B4d-3c    02:14:00  01:30:00
55.R2d-2g!   02:17:00  01:30:00
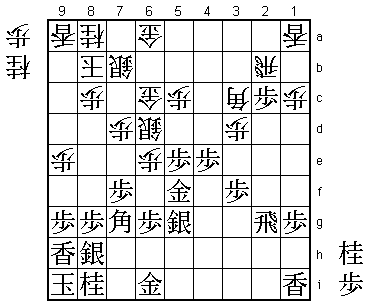
An important move. Black is walking a tightrope in this delicate
position. Some commentators even thought that white already had
the advantage here. This would have been the case after a careless
55.Rx3d Rx2c P*2d Bx2d R3b+ Bx5g+ Gx5g R2i+ and even after the
solid looking defence N*5i, white has the best chances to win.
55.R2g seems to hand over the initiative, but white has no good
way to make use of that.

56.P*2f      02:17:00  02:03:00
57.R2gx2f    02:19:00  02:03:00
58.R2b-4b?   02:19:00  02:03:00
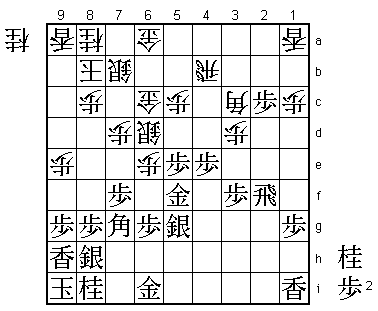
Looks like the most natural move, but is actually the decisive mistake.
The only move to stay in the game was 58.R6b. Then, if black plays
59.P3e like in the game, white can start an strong looking attack
of his own after 60.P7e Px3d Px7f. Sugimoto feared 59.P4d after R6b,
but then 60.R4b! is a good continuation. After 61.G4e white can
choose between 62.N*8e followed by Rx4d or simply 62.Bx4d and
white still has chances to win.

59.P3f-3e    02:24:00  02:03:00
60.N*8e      02:24:00  02:04:00
61.B7g-8f    02:25:00  02:04:00
62.S6dx5e    02:25:00  02:10:00
63.P3ex3d    02:25:00  02:10:00
64.B3c-1e    02:25:00  02:10:00
65.R2f-3f    02:28:00  02:10:00
66.S5ex5f    02:28:00  02:14:00
67.S5gx5f    02:28:00  02:14:00
68.P9e-9f    02:28:00  02:19:00
69.P9gx9f    02:28:00  02:19:00
70.P*9g      02:28:00  02:21:00
71.L9hx9g    02:37:00  02:21:00
72.N8ex9g+   02:37:00  02:27:00
73.N8ix9g    02:37:00  02:27:00
74.P6e-6f    02:37:00  02:29:00
75.P3d-3c+   02:43:00  02:29:00
76.R4bx4e    02:43:00  02:53:00
77.S5fx4e    02:43:00  02:53:00
78.P6fx6g+   02:43:00  02:53:00
79.N*5e!     02:48:00  02:53:00
For a moment, it looked like white got some attack with the promoted
pawn on 6g, but after this strong knight drop it is clear that black
is still winning. White tries a desperate attack, but simply doesn't
have enough pieces to make it work.

80.G*7h      02:48:00  02:55:00
81.N5ex6c+   02:52:00  02:55:00
82.S7bx6c    02:52:00  02:55:00
83.B8fx5c+   02:53:00  02:55:00

Horiguchi had calculated that he had mate in this position if he
would get a knight and gold, so white can't play 84.N*7g Sx7g +Px7g
Gx7h +Px7h as black has a (rather long) mate after N*9d. However, the
safest way to win here would have been the simple 83.N8e.

84.G7hx8h    02:53:00  02:56:00
85.K9ix8h    02:53:00  02:56:00
86.S*6b      02:53:00  02:56:00
87.N9g-8e    02:56:00  02:56:00
88.N*7c      02:56:00  02:58:00
89.S*9c      02:57:00  02:58:00
Resigns      02:57:00  02:58:00
Mate after 90.Nx9c N*9d K7b G*8b or 90.Lx9c Nx9c+ Kx9c L*9d Kx9d
R*9b etc. With this win, 27-year old Horiguchi gets his first
tournament victory as a professional. He showed a lot of mental
toughness to bounce back from a loss in the first game and win
three games in a row after that. Horiguchi is still young, so
it can be expected that this victory will give him the confidence
to get good results in other tournament as well.