20th Asahi Open Match Game 3
Black: Sugimoto Masataka, 6-dan
White: Horiguchi Kazushiza, 5-dan
20th Asahi Open, Game 3, April 17th 2002
1.P7g-7f     00:01:00  00:00:00
2.P3c-3d     00:01:00  00:00:00
3.P1g-1f     00:01:00  00:00:00
4.P8c-8d     00:01:00  00:02:00
5.P6g-6f     00:02:00  00:02:00
6.S7a-6b     00:02:00  00:02:00
7.S7i-7h     00:02:00  00:02:00
8.P5c-5d     00:02:00  00:02:00
9.R2h-6h     00:03:00  00:02:00
10.K5a-4b    00:03:00  00:02:00
11.S7h-6g    00:03:00  00:02:00
12.K4b-3b    00:03:00  00:02:00
13.S3i-3h    00:03:00  00:02:00
14.G6a-5b    00:03:00  00:02:00
15.G6i-5h    00:03:00  00:02:00
16.S6b-5c    00:03:00  00:56:00
17.P1f-1e    00:05:00  00:56:00
18.B2b-3c    00:05:00  01:00:00
19.P4g-4f    00:05:00  01:00:00
20.K3b-2b    00:05:00  01:00:00
21.P3g-3f    00:05:00  01:00:00
22.P8d-8e    00:05:00  01:00:00
23.B8h-7g    00:05:00  01:00:00
24.P4c-4d    00:05:00  01:06:00
25.N2i-3g    00:05:00  01:06:00
26.G5b-4c    00:05:00  01:09:00
27.P6f-6e    00:16:00  01:09:00
28.G4a-3b    00:16:00  01:09:00
29.S3h-4g    00:16:00  01:09:00
30.P7c-7d    00:16:00  01:15:00
31.G4i-3h    00:18:00  01:15:00

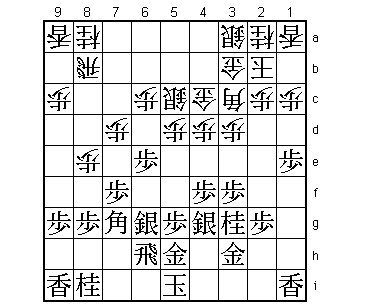
This position is quite often played in professional games, for example
in the title match games between Fujii and Habu. Interesting are the
different styles with which this position can be handled. Most often
played is 31.N2e B5a P4e, which is in the Fujii-style: "attack when
you can". Sugimoto is a Furibisha player with a different temperament.
He prefers 31.G3h, inviting the opponent to play one more move to
weaken his position. If white would answer with 32.L1b, black attacks
with 33.N2e.

32.P9c-9d    00:18:00  01:35:00

Horiguchi doesn't take the risk. After 32.P9d the game slows down.

33.K5i-4h    00:58:00  01:35:00
34.B3c-5a    00:58:00  01:44:00
35.P9g-9f    01:00:00  01:44:00
36.B5a-7c    01:00:00  01:44:00
37.S6g-5f    01:13:00  01:44:00
38.N2a-3c    01:13:00  01:48:00
39.K4h-3i    01:13:00  01:48:00
40.K2b-2a    01:13:00  01:48:00
41.K3i-2h    01:18:00  01:48:00
42.S5c-4b    01:18:00  01:51:00
43.R6h-8h    01:24:00  01:51:00
44.B7c-6b    01:24:00  01:53:00
45.S5f-6g    01:24:00  01:53:00
46.N8a-7c    01:24:00  02:12:00
47.S6g-6f    01:36:00  02:12:00
48.B6b-5c    01:36:00  02:12:00
49.P5g-5f    01:40:00  02:12:00
50.S3a-2b    01:40:00  02:14:00

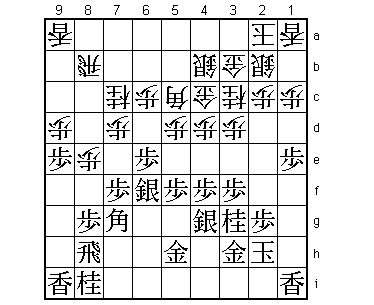
White has managed to get into the "Millennium castle" and seems to
have the upper hand here. Sugimoto didn't agree with the general
opinion, even though with the next move he admits that he has to
open the game before white can complete his castle with S4b-3a.

51.P9f-9e?!  01:58:00  02:14:00

The alternative is 51.P5e, but after Px5e Sx5e Nx6e B5i P3e is a
problem for black. Then Px3e P*3f Sx3f P*5f is good for white.
However, 51.P9e also seems to be in white's favour. Despite the
confidence with which Sugimoto played in this position, it seems
that his opening is a little suspect.

52.P9dx9e    01:58:00  02:14:00
53.P5f-5e    01:58:00  02:14:00
54.P5dx5e    01:58:00  02:16:00
55.P7f-7e    01:58:00  02:16:00
56.P7dx7e    01:58:00  02:19:00
57.L9ix9e    02:12:00  02:19:00
58.P7e-7f    02:12:00  02:20:00
59.B7g-5i    02:13:00  02:20:00
60.L9ax9e    02:13:00  02:20:00
61.P*7d      02:13:00  02:20:00

More natural is 61.Bx9e, but Sugimoto didn't like 62.R9b P*9f
S4b-3a!. After Bx7c+ Rx9f L*9b P*9g Lx9g Bx9g+ Nx9g Rx9g+ black is
a full bishop up, but the difference in rook activity still makes
this a better position for white.

62.P7f-7g+   02:13:00  02:23:00
63.S6fx7g    02:30:00  02:23:00
64.L9e-9g+   02:30:00  02:26:00
65.R8h-6h    02:30:00  02:26:00
66.+L9gx8g   02:30:00  02:26:00
67.P7dx7c+   02:30:00  02:26:00
68.+L8gx7g   02:30:00  02:41:00
69.N8ix7g    02:30:00  02:41:00
70.R8b-9b    02:30:00  02:43:00
71.L*9h      02:42:00  02:43:00

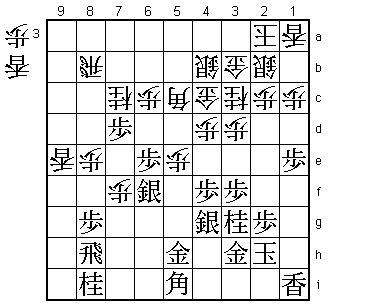
And black seems to be OK, as 72.P*9g is answered strongly by 73.P6d.

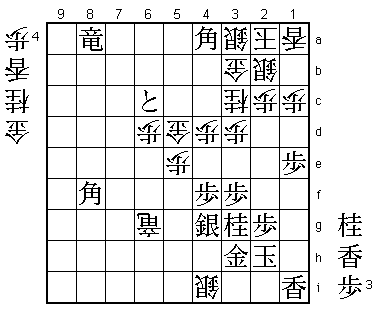
72.B5c-9g+!  02:42:00  02:43:00

Great bishop sacrifice that shows that white still has the upper hand.
Not only is the rook activated, +Px6c is no long a powerful move as it
doesn't attack the bishop anymore.

73.L9hx9g    02:43:00  02:43:00
74.R9bx9g+   02:43:00  02:43:00
75.+P7cx6c   02:44:00  02:43:00
76.P*7f?!    02:44:00  02:50:00

Better was 76.L*5f Sx5f L*5g Gx5g Px5f. Now the game gets quite close
again.

77.P*5d      02:47:00  02:50:00
78.L*5a!     02:47:00  02:56:00

Good move. This importantly slows down the black attack.

79.P5d-5c+   02:51:00  02:56:00
80.L5ax5c    02:51:00  02:56:00
81.P6e-6d    02:51:00  02:56:00
82.P7fx7g+   02:51:00  02:56:00
83.R6h-6e    02:51:00  02:56:00
84.S4b-3a    02:51:00  02:57:00
85.+P6cx5c   02:52:00  02:57:00
86.G4cx5c    02:52:00  02:57:00
87.B*4a      02:57:00  02:57:00
88.+P7g-6g   02:57:00  02:59:00
89.P6d-6c+   02:58:00  02:59:00
90.G5c-4c    02:58:00  02:59:00
91.G5hx6g    02:59:00  02:59:00
92.G4c-5d    02:59:00  02:59:00
93.R6ex8e    02:59:00  02:59:00
94.+R9gx6g   02:59:00  02:59:00
95.B5i-8f    02:59:00  02:59:00
96.P*6d      02:59:00  02:59:00
97.R8e-8a+   02:59:00  02:59:00
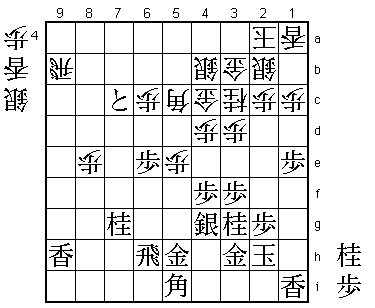
98.S*4i?     02:59:00  02:59:00

Hard to see in byoyomi, but 98.N*2e first and playing 100.S*4i only
after 99.N*2i would have been better. Now Sugimoto gets a chance to
really get back in the game.

99.+P6c-5b?  02:59:00  02:59:00

A chance missed. Sugimoto really regretted this move after the game.
Turning to defence with 99.N*5i would have been better, even though it
seems that after 100.+Rx4g Nx4g N*2d R*7b G*4b Bx3b+ Gx3b G*4a L*4b
white can still stop the black attack.

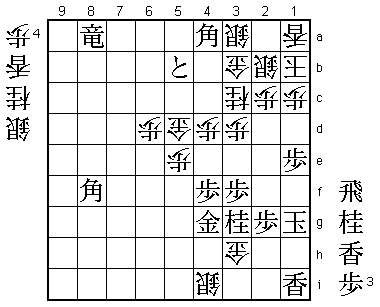
100.+R6gx4g  02:59:00  02:59:00
101.G3hx4g   02:59:00  02:59:00
102.G*3h     02:59:00  02:59:00
103.K2h-1g   02:59:00  02:59:00
104.K2a-1b!  02:59:00  02:59:00

The game winner. This early escape just give white the breathing space
needed to mate the black king.

105.N*2e     02:59:00  02:59:00
106.G3hx3g   02:59:00  02:59:00
107.B4ax3b+  02:59:00  02:59:00
108.S3ax3b   02:59:00  02:59:00
109.P1e-1d   02:59:00  02:59:00
110.N3cx2e   02:59:00  02:59:00
111.K1g-2f   02:59:00  02:59:00
112.P1cx1d   02:59:00  02:59:00
113.P*1c     02:59:00  02:59:00
114.S2bx1c   02:59:00  02:59:00
115.R*4b     02:59:00  02:59:00
116.S*1e     02:59:00  02:59:00
117.L1ix1e   02:59:00  02:59:00
118.B*1g     02:59:00  02:59:00
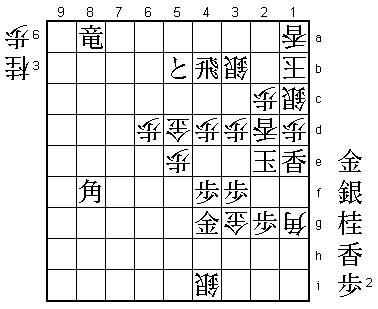
119.K2fx2e   02:59:00  02:59:00
120.L*2d     02:59:00  02:59:00
Resigns      02:59:00  02:59:00

Mate after 121.Kx3d N*2b or 121.K1f Px1e etc. An interesting game that
showed that even at the top level there can be an important difference
of opinion about a middle game position. In the end it turned out that
Horiguchi was right and this brings him within one game of tournament
victory. Sugimoto has to win with white in the fourth game to stay in
the match.
