20th Asahi Open Match Game 1
Black: Sugimoto Masataka, 6-dan
White: Horiguchi Kazushiza, 5-dan
20th Asahi-open, Game 1, March 26th 2002
1.P1g-1f     00:03:00  00:00:00

This year the Zen-Nihon Pro Tournament changed its name to the "Asahi
Open Tournament". Probably to profile the sponsor a little more and
also to emphasize that a number of amateurs are allowed to enter this
tournament. Of course there are no amateurs in the final (will we ever
see this happen?), but the finalists are almost as big a surprise.
No A class professionals or former title holders, but Sugimoto and
Horiguchi fight for the honour to be the first Asahi Open champion.
Both player appear for the first time on the big stage (this tournament
is often called the "eight title") and both played an official game
in formal kimono for the first time. Especially Sugimoto admitted
that he was very nervous before the game. The three minutes taken
for the first move were mainly used to stop his hand from shaking
too much. Dropping a piece on the floor at your first move would
indeed be a nightmare. Finally, Sugimoto managed to settle a little
and play 1.P1f. This might have surprised many players only a couple
of years ago, but today it is almost a normal opening move for
Furibisha players. The idea is to push on the edge early to get a
quick attack against the anaguma if the Ibisha side aims for this
castle.

2.P3c-3d     00:03:00  00:02:00
3.P7g-7f     00:03:00  00:02:00
4.P8c-8d     00:03:00  00:02:00
5.P6g-6f     00:03:00  00:02:00
6.S7a-6b     00:03:00  00:02:00
7.S7i-7h     00:03:00  00:02:00
8.K5a-4b     00:03:00  00:02:00
9.R2h-6h     00:03:00  00:02:00
10.K4b-3b    00:03:00  00:03:00
11.S3i-3h    00:03:00  00:03:00
12.P5c-5d    00:03:00  00:03:00
13.P1f-1e    00:04:00  00:03:00
14.G6a-5b    00:04:00  00:04:00
15.S7h-6g    00:05:00  00:04:00
16.B2b-3c    00:05:00  00:09:00
17.P3g-3f    00:14:00  00:09:00
18.P8d-8e    00:14:00  00:10:00
19.B8h-7g    00:15:00  00:10:00
20.B3c-2d    00:15:00  00:24:00
21.G6i-5h    00:25:00  00:24:00
22.P4c-4d    00:25:00  00:25:00
23.P6f-6e    00:26:00  00:25:00
24.G5b-4c    00:26:00  00:25:00
25.K5i-4h    00:34:00  00:25:00
26.K3b-2b    00:34:00  00:25:00
27.K4h-3i    00:35:00  00:25:00
28.G4a-3b    00:35:00  00:25:00
29.K3i-2h    00:48:00  00:25:00
30.P9c-9d    00:48:00  00:28:00
31.S3h-3g    00:50:00  00:28:00

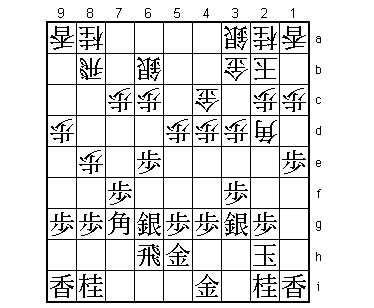
So far, play went more or less as expected. Sugimoto is famous for
his Furibisha play and Horiguchi is mainly an Ibisha player. Black's
opening strategy seemed to be moving towards a quick attack, but
Sugimoto already gave up this idea when he played 25.K4h. The move
31.S3g looks a little odd, but black is moving into an anaguma
castle himself here. With both players opting for a slow game,
the loss of moves is not particularly important.

32.L1a-1b    00:50:00  00:31:00
33.L1i-1h    00:52:00  00:31:00
34.K2b-1a    00:52:00  00:31:00
35.K2h-1i    00:52:00  00:31:00
36.S3a-2b    00:52:00  00:32:00
37.G5h-4h    00:52:00  00:32:00
38.S6b-5c    00:52:00  00:34:00
39.P4g-4f    00:58:00  00:34:00
40.P7c-7d    00:58:00  00:42:00
41.G4i-3i    01:00:00  00:42:00
42.R8b-7b    01:00:00  00:46:00
43.S6g-6f    01:03:00  00:46:00
44.S5c-4b    01:03:00  00:46:00
45.G4h-3h    01:05:00  00:46:00
46.S4b-3a    01:05:00  00:47:00
47.R6h-7h    01:08:00  00:47:00
48.N8a-7c    01:08:00  01:06:00
49.P7f-7e    01:28:00  01:06:00
50.P7dx7e    01:28:00  01:06:00
51.B7g-5i    01:28:00  01:06:00
52.B2d-4b    01:28:00  01:08:00
53.S3g-2h    01:28:00  01:08:00
54.P5d-5e    01:28:00  01:18:00
55.B5i-2f    01:38:00  01:18:00
56.R7b-5b    01:38:00  01:33:00
57.P6e-6d    01:42:00  01:33:00

58.B4bx6d?   01:42:00  01:57:00

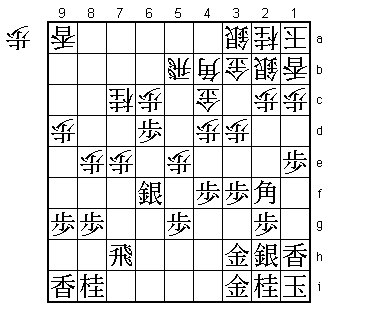
This speeds up the game considerably, as both players can now
develop their major pieces ("sabaki"). However, this usually
turns out well for the Furibisha side and this is also the case
in this game. Horiguchi should have been patient and play 58.Px6d
instead. After 59.Rx7b P*7b! white has the strong threat P6e with
attack on rook and silver and seems to have the upper hand.
Horiguchi didn't like the idea of having to drop a pawn back on 7b.

59.S6fx7e    01:47:00  01:57:00
60.B6d-4b    01:47:00  01:59:00
61.S7e-7d    02:02:00  01:59:00
62.P5e-5f    02:02:00  01:59:00
63.S7dx6c=   02:20:00  01:59:00
64.R5b-5e    02:20:00  01:59:00
65.R7hx7c+   02:20:00  01:59:00
66.P5fx5g+   02:20:00  02:00:00
67.P*5c      02:21:00  02:00:00
68.P*5a      02:21:00  02:02:00
69.N8i-7g    02:26:00  02:02:00
70.B4b-2d    02:26:00  02:09:00
71.P5c-5b+   02:26:00  02:09:00
72.P5ax5b    02:26:00  02:09:00
73.P*5d      02:34:00  02:09:00
74.G4c-4b    02:34:00  02:20:00
75.+R7c-7a   02:34:00  02:20:00
76.B2dx4f    02:34:00  02:21:00
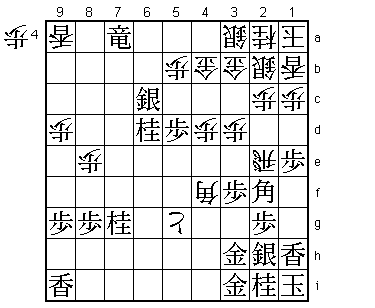
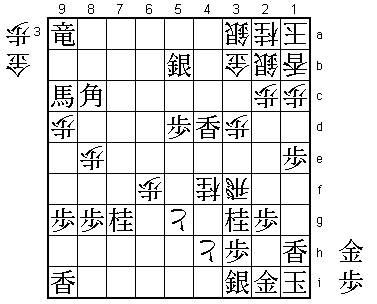
77.N*6d?     02:37:00  02:21:00

Underestimates white's reply.

78.R5e-2e!   02:37:00  02:25:00

The perfect answer. 79.Nx5b+ now fails to 80.Gx5b Sx5b= Rx2f Px2f
+P4g! and white wins because taking this pawn is a typical anaguma
mate in one (N*2g).

79.B2f-3g    02:37:00  02:25:00

No choice.

80.B4fx3g+   02:37:00  02:25:00
81.N2ix3g    02:42:00  02:25:00

Moving this knight up seriously weakens the anaguma castle. Also, if
black gives up a knight, the attack N*4f is very strong.

82.R2e-5e    02:42:00  02:25:00
83.+R7ax9a   02:45:00  02:25:00

Black has to give up the initiative and wait for things to come.
White now has the advantage.

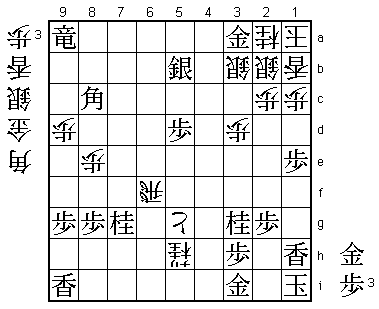
84.B*5f?     02:45:00  02:37:00

White's advantage only lasts for a single move. This is serious
mistake that turns the tables again. The right move was 84.B*4g
and when black plays 85.B*6f like in the game, 86.B5f+ is good
for white.

85.B*6f      02:45:00  02:37:00
86.B5fx3h+   02:45:00  02:37:00
87.G3ix3h    02:45:00  02:37:00
88.R5e-5f    02:45:00  02:55:00

Or 88.+P4g Gx4g R5h+ G4h and white has no good continuation.

89.B6f-9c+   02:45:00  02:55:00

This promoted bishop works very well.

90.P*6f      02:45:00  02:56:00
91.B*8c      02:52:00  02:56:00
92.R5f-4f    02:52:00  02:57:00
93.L*4g      02:54:00  02:57:00
94.R4fx3f    02:54:00  02:58:00
95.N6dx5b+   02:54:00  02:58:00
96.G4bx5b    02:54:00  02:59:00
97.S6cx5b=   02:54:00  02:59:00
98.G*4h      02:54:00  02:59:00
99.P*3i      02:54:00  02:59:00
100.G4hx3h   02:54:00  02:59:00
101.P3ix3h   02:54:00  02:59:00
102.G*4h     02:54:00  02:59:00
103.L4gx4d   02:55:00  02:59:00
104.N*4f     02:55:00  02:59:00
105.G*2i     02:57:00  02:59:00
106.P*4g     02:57:00  02:59:00
107.G*3i     02:57:00  02:59:00
108.G4hx3i   02:57:00  02:59:00
109.S2hx3i   02:57:00  02:59:00
110.P4g-4h+  02:57:00  02:59:00

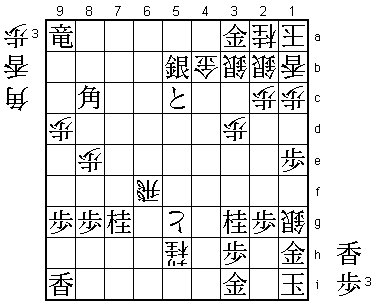
This looks very strong, but the black king is still quite far
from the action. Black has a much better position than it looks.

111.+B9cx6f? 02:58:00  02:59:00

A mistake that almost turns the tables again. Difficult to see
with only 3 minutes on the clock, but 111.L4c+ leads to a quick
win because white has no defence against +Lx3b Sx3b +Bx6f next.
White's attack is one move late.

112.+P4hx3i  02:58:00  02:59:00
113.G2ix3i   02:58:00  02:59:00
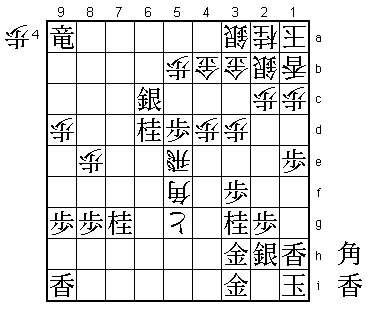
114.N4f-5h+! 02:58:00  02:59:00

Here Sugimoto realised that he made a mistake. He only looked at the
natural 114.Nx3h+ Bx3h+ Rx6f L4c+ and the black bishop works well
in defence so there is no way to win for white. Not allowing the
bishop to get back in defence is a much better way of taking the
other bishop on 6f. Things now become very close.

115.L4d-4c+  02:58:00  02:59:00
116.R3fx6f   02:58:00  02:59:00
117.+L4cx3b  02:58:00  02:59:00
118.S3ax3b   02:58:00  02:59:00
119.G*3a!    02:58:00  02:59:00

This just seems enough to win.

120.G*4b     02:58:00  02:59:00
121.P5d-5c+  02:58:00  02:59:00
122.L*1f     02:58:00  02:59:00
123.G*2h     02:58:00  02:59:00
124.L1fx1h+  02:58:00  02:59:00
125.G2hx1h   02:58:00  02:59:00
126.S*1g!    02:58:00  02:59:00

White tries everything. 126.R6i+ P*4i is hopeless and after 126.L*1f
+Px4b Sx3a +Rx3a the black king can't be mated. Unfortunately for
Horiguchi his efforts are in vain, but it is amazing that this game
still lasts for 43 moves from here.

127.G1hx1g   02:58:00  02:59:00
128.L*1f     02:58:00  02:59:00
129.L*1h     02:58:00  02:59:00
130.L1fx1g+  02:58:00  02:59:00
131.L1hx1g   02:58:00  02:59:00
132.B*4d     02:58:00  02:59:00
133.S*2h     02:58:00  02:59:00
134.B4dx5c   02:58:00  02:59:00
135.G3ax3b   02:58:00  02:59:00
136.G4bx3b   02:58:00  02:59:00
137.B8c-6e+  02:58:00  02:59:00
138.R6fx6e   02:58:00  02:59:00
139.N7gx6e   02:58:00  02:59:00
140.B5c-3e   02:58:00  02:59:00
141.S*4c     02:59:00  02:59:00
142.G*3a     02:59:00  02:59:00
143.S4cx3b+  02:59:00  02:59:00
144.G3ax3b   02:59:00  02:59:00
145.G*4c     02:59:00  02:59:00
146.G*3a     02:59:00  02:59:00
147.G4cx3b   02:59:00  02:59:00
148.G3ax3b   02:59:00  02:59:00
149.G*4c     02:59:00  02:59:00
150.G*3a     02:59:00  02:59:00
151.G4cx3b   02:59:00  02:59:00
152.G3ax3b   02:59:00  02:59:00
153.S5b-4c+  02:59:00  02:59:00
154.G3bx4c   02:59:00  02:59:00
155.G*3b     02:59:00  02:59:00
156.P*7a     02:59:00  02:59:00
157.P*4d     02:59:00  02:59:00
158.B3ex4d   02:59:00  02:59:00
159.L*4e     02:59:00  02:59:00
160.+P5g-4h  02:59:00  02:59:00
161.L4ex4d   02:59:00  02:59:00
162.+P4hx3i  02:59:00  02:59:00
163.G3bx2a   02:59:00  02:59:00
164.K1ax2a   02:59:00  02:59:00
165.B*3b     02:59:00  02:59:00
166.K2ax3b   02:59:00  02:59:00
167.L4dx4c+  02:59:00  02:59:00
168.K3bx4c   02:59:00  02:59:00
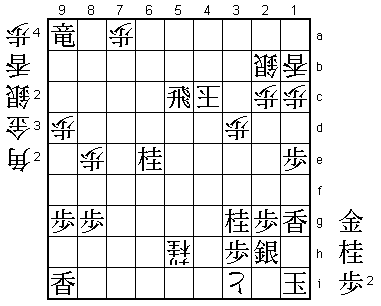
169.R*5c     02:59:00  02:59:00
Resigns      02:59:00  02:59:00

Mate after 170.K3b N*4d K2a G*3b K1a Gx2b Kx2b S*3c K1a +Rx7a. Maybe
this game was not the top level shogi we saw in the Habu-Sato matches,
but both players played it with a lot of heart, making this a very
interesting fighting game after a slow start. Sugimoto is the one
with the first win under his (kimono) belt, but judging from this
game the two players are of similar strength, so I expect Horiguchi
to strike back with the black pieces in game 2.
