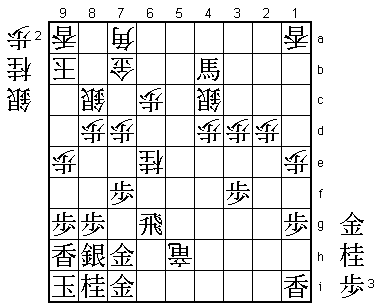
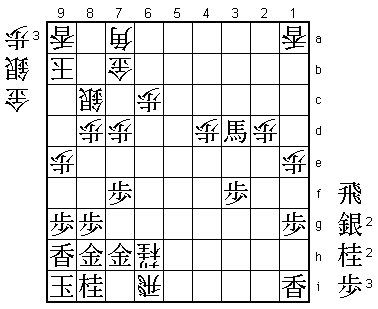
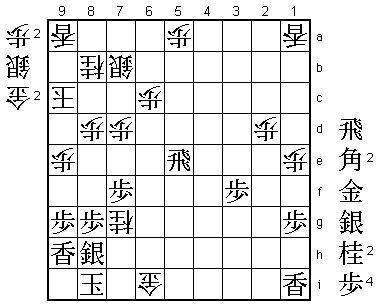
19th Zen Nihon Pro Tournament Game 5
Black: Tanigawa Koji, 9-dan
White: Moriuchi Toshiyuki, 8-dan
19th Zen Nihon Pro Tournament
Game 5
May 15th 2001
1.P2g-2f     00:00:00  00:00:00

Before the game, Moriuchi seemed a bit worried about being black or white. "Shuffle
well and throw the pawns up high" he asked the time keeper Nojima (2-dan) on the
evening before the game. Jokingly, I am sure, but I think he really wanted black in
this game to be able to play as positively as possible after losing two games in a
row. His hopes were dashed as the furigoma gave Tanigawa the black pieces.

2.P3c-3d     00:00:00  00:00:00
3.P7g-7f     00:00:00  00:00:00
4.P4c-4d     00:00:00  00:00:00
5.P2f-2e     00:00:00  00:00:00
6.B2b-3c     00:00:00  00:00:00
7.S3i-4h     00:00:00  00:00:00
8.P9c-9d     00:00:00  00:00:00
9.G4i-5h     00:01:00  00:00:00
10.P9d-9e    00:01:00  00:01:00
11.K5i-6h    00:01:00  00:01:00
12.R8b-4b    00:01:00  00:01:00
13.K6h-7h    00:01:00  00:01:00
14.S7a-7b    00:01:00  00:01:00
15.P5g-5f    00:02:00  00:01:00
16.G4a-5b    00:02:00  00:01:00
17.S4h-5g    00:06:00  00:01:00
18.S3a-3b    00:06:00  00:01:00
19.P3g-3f    00:06:00  00:01:00
20.K5a-6b    00:06:00  00:01:00
21.B8h-7g    00:06:00  00:01:00
22.P6c-6d    00:06:00  00:02:00
23.K7h-8h    00:06:00  00:02:00
24.P7c-7d    00:06:00  00:02:00
25.P6g-6f    00:07:00  00:02:00
26.N8a-7c    00:07:00  00:02:00
27.L9i-9h    00:09:00  00:02:00
28.K6b-7a    00:09:00  00:02:00
29.K8h-9i    00:09:00  00:02:00
30.G5b-6c    00:09:00  00:02:00
31.S7i-8h    00:09:00  00:02:00
32.K7a-8b    00:09:00  00:02:00
33.G6i-7i    00:10:00  00:02:00
34.P8c-8d    00:10:00  00:02:00
35.G5h-6h    00:20:00  00:02:00
36.P4d-4e    00:20:00  00:12:00

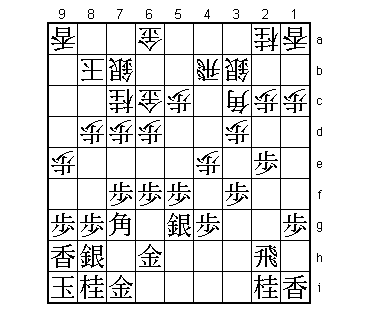
So far the game has developed in a similar fashion as game 4. Moriuchi with white
plays the "Suzuki system", i.e. allowing black to build a full anaguma. Keeping the
silver on 3b and opening the bishop diagonal with 36.P4e is a different way of playing
against black's strong castle.

37.G6h-7h    00:26:00  00:12:00
38.P5c-5d    00:26:00  00:18:00
39.R2h-3h    00:40:00  00:18:00
40.B3c-4d    00:40:00  00:20:00
41.B7g-5i    00:45:00  00:20:00
42.S7b-8c    00:45:00  00:41:00
43.B5i-3g    00:49:00  00:41:00
44.G6a-7b    00:49:00  00:42:00
45.R3h-6h!   00:51:00  00:42:00

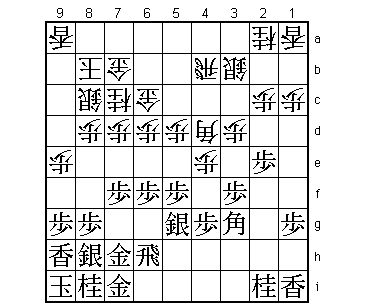
It is always difficult to attack from an anaguma position, but Tanigawa has found
a good plan. If white doesn't do anything, black plays P6e Px6e Rx6e next and can
easily develop his pieces.

46.K8b-9b    00:51:00  00:49:00

This move can't be helped. The king has to get out of the diagonal of the bishop
and 46.K8a is not a very good alternative because of a future rook drop on the back
rank.

47.R6h-4h!   00:57:00  00:49:00

Now Tanigawa switches the rook and there is nothing white can do against the following
black attack in the center.

48.P1c-1d    00:57:00  00:53:00
49.P4g-4f    00:59:00  00:53:00
50.P4ex4f    00:59:00  00:53:00
51.R4hx4f    00:59:00  00:53:00
52.S3b-4c    00:59:00  00:53:00
53.R4f-4g!   01:04:00  00:53:00

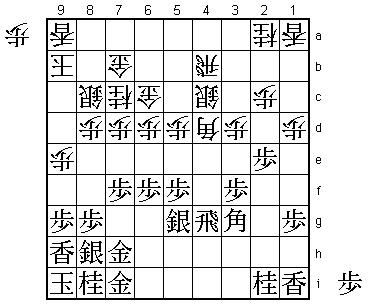
The third good rook move in succession. The reasons why this rook should be on this
unnatural square will soon become clear.

54.P1d-1e    01:04:00  01:01:00
55.P5f-5e    01:27:00  01:01:00
56.N2a-3c    01:27:00  01:29:00

With the black rook on 4g, it is hard for white to play 56.Px5e because of 57.S4f
P5f and now black can continue his attack with S5e as the rook on 4g defends against
the promotion of the pawn on 5g. Tanigawa has won the opening battle, but things are
far from easy.

57.P*4e      01:33:00  01:29:00
58.B4d-7a    01:33:00  01:30:00
59.S5g-5f    01:34:00  01:30:00
60.R4b-4a    01:34:00  01:32:00
61.B3g-4f    01:47:00  01:32:00

Black has several options here, but decides to bring all his pieces into play. This
looks very natural, but it is actually quite hard to break down white's position.

62.P*4d      01:47:00  01:38:00
63.N2i-3g    01:49:00  01:38:00
64.P4dx4e    01:49:00  02:08:00
65.N3gx4e    01:49:00  02:08:00
66.N3cx4e    01:49:00  02:08:00
67.S5fx4e    01:49:00  02:08:00
68.P5dx5e    01:49:00  02:08:00
69.B4fx5e    01:53:00  02:08:00
70.P*4d      01:53:00  02:08:00
71.S4e-5f    01:53:00  02:08:00
72.R4a-5a    01:53:00  02:09:00
73.P2e-2d    02:01:00  02:09:00
74.P2cx2d    02:01:00  02:11:00
75.P6f-6e    02:08:00  02:11:00
76.G6c-5d    02:08:00  02:19:00

Moving the gold out of the castle is not something white wants to do, but Moriuchi
has no choice.

77.B5e-2h    02:15:00  02:19:00
78.G5dx6e    02:15:00  02:22:00
79.S5fx6e    02:15:00  02:22:00
80.N7cx6e    02:15:00  02:23:00
81.R4g-6g?   02:22:00  02:23:00

It looks like black has gotten everything he wanted. A strong castle, a good bishop
and the exchange of knight and silver. Especially the white silver on 4c looks like
a big difference between the two sides. However, 81.R6g is a mistake, probably caused
by being a little overconfident about the strength of the anaguma castle. Giving white
a free promotion of the rook is not good. After 81.N'5e instead, black still has
a very good position after 82.S6d P'6b. If white doesn't respond to this, then either
Rx4d or G'6a is good for black and if white takes the pawn on 6b, then P'6c is very
painful.

82.R5a-5h+   02:22:00  02:29:00
83.B2hx6d    02:22:00  02:29:00
84.P*6c      02:22:00  02:30:00
85.B6d-4b+?  02:24:00  02:30:00

The second mistake. Better was 85.Bx9a+ Kx9a Rx6e even though the game is still quite
close then. After 85.B4b+ Tanigawa doesn't get another chance to win this game, but
he does get another chance to win this match.

86.N6e-5g+   02:24:00  02:31:00
87.R6g-6f    02:29:00  02:31:00
88.N*6g      02:29:00  02:37:00
89.G*6i      02:31:00  02:37:00
90.N6gx7i+   02:31:00  02:37:00
91.G7hx7i    02:31:00  02:37:00
92.+R5hx8h   02:31:00  02:42:00
93.G7ix8h    02:31:00  02:42:00
94.G*6g      02:31:00  02:42:00
95.R6fx6g    02:34:00  02:42:00
96.+N5gx6g   02:34:00  02:42:00
97.P*6h      02:34:00  02:42:00
98.S*5h      02:34:00  02:44:00
99.G6ix5h    02:34:00  02:44:00
100.+N6gx5h  02:34:00  02:44:00
101.G*7h     02:36:00  02:44:00
102.R*6i     02:36:00  02:45:00
103.+B4bx4c  02:37:00  02:45:00
104.+N5hx6h  02:37:00  02:46:00
105.+B4cx3d? 02:37:00  02:46:00

Here Tanigawa should have cut his losses and try to go for sennichite: 105.Gx6h Rx6h+
S'7g +Rx7g Gx7g S'7i S'8h and it is hard to see how white can continue his attack.

106.S*7i     02:37:00  02:50:00
107.R*5b     02:42:00  02:50:00
108.P*5a!    02:42:00  02:55:00

Good move. 108.G'6g also looks winning, but with the black rook working on the fifth
file, things are not easy. If black now plays 109.R3b+ then 110.G'6g followed by
+Nx7h is winning, because neither N'8e or S'9d is a mating threat and +Bx6g +Nx6g
doesn't help white at all.

109.R5bx7b+  02:51:00  02:55:00
110.S8cx7b   02:51:00  02:55:00
111.N*8e     02:51:00  02:55:00
112.+N6hx7h  02:51:00  02:56:00
113.+B3dx7h  02:51:00  02:56:00
114.R*5h     02:51:00  02:56:00
115.S*9c     02:54:00  02:56:00
116.B7ax9c   02:54:00  02:56:00
117.N8ex9c+  02:54:00  02:56:00
118.K9bx9c   02:54:00  02:56:00
119.B*7a     02:56:00  02:56:00
120.N*8b     02:56:00  02:57:00
121.B7ax4d+  02:56:00  02:57:00
122.S7ix8h=  02:56:00  02:58:00
123.+B4dx8h  02:56:00  02:58:00
124.R5hx7h=  02:56:00  02:58:00

Interesting to a non-promotion of a rook at this level. Moriuchi is using every second
of his remaining time to find a forced win and promoting a piece just takes a little
more time.

125.+B8hx7h  02:56:00  02:58:00
126.B*5e     02:56:00  02:58:00
127.S*8h     02:56:00  02:58:00
128.S*7i     02:56:00  02:58:00
129.S*7g     02:56:00  02:58:00
130.S7ix8h+  02:56:00  02:58:00
131.S7gx8h   02:56:00  02:58:00
132.S*7i     02:56:00  02:58:00
133.S*7g     02:56:00  02:58:00
134.G*6h     02:56:00  02:58:00
135.+B7hx6i  02:56:00  02:58:00
136.G6hx6i   02:56:00  02:58:00
137.R*5h     02:56:00  02:58:00
138.B*6g     02:56:00  02:59:00

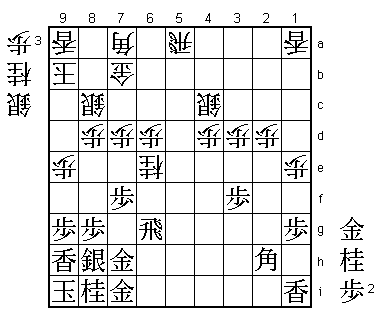
This must have been the biggest moment for Moriuchi in this match. He has used his
final minute to find a forced mate.

139.R5hx5e   02:56:00  02:59:00
140.S7ix8h=  02:56:00  02:59:00
141.S7gx8h   02:56:00  02:59:00
142.B6gx8i+  02:56:00  02:59:00
143.K9ix8i   02:56:00  02:59:00
144.N*7g     02:56:00  02:59:00
Resigns      02:56:00  02:59:00

Mate after 145.Sx7g G'7i K9i G'8i or 145.K7h G'6h Kx7g G'6g K8f S'8e Rx8e Px8e Kx8e
R'8d K9e K8c. With this win, Moriuchi wins the Zen Nihon Pro tournament for the second
time. After the game he said that this time it meant much more to him than the first
time. In part this is because of how the match developed with losing game three by
overlooking a mate. However, when Moriuchi won the first time twelve years ago, he
was only an 18 year old rookie and everything was just a great experience. At that
time, he didn't realize how difficult it was to win a tournament like the Zen Nihon
Pro tournament. After twelve years as a pro and quickly climbing up the ranks but
still without one of the seven titles to his credit, this victory has gotten so much
more importance. Also, he lost twice in straight games in the past three years (against
Habu and Maruyama).

Moriuchi is also the last winner of the Zen Nihon Pro tournament, as this tournament
will become the Asahi Open starting next year. No less than ten amateurs will be given
the chance to challenge the professionals in the new version of this tournament. These
ten games will be played on the same day (a Sunday) to attract even more attention.
Quite a lot of pressure on the professionals to show that they still belong in a class
of their own.
